Love and Mascara
  • Love and Mascara
  • About
  • Contact
  • Portfolio

Bringing a Pop of Color to a Neutral Eye

1/26/2016

0 Comments

 
Picture
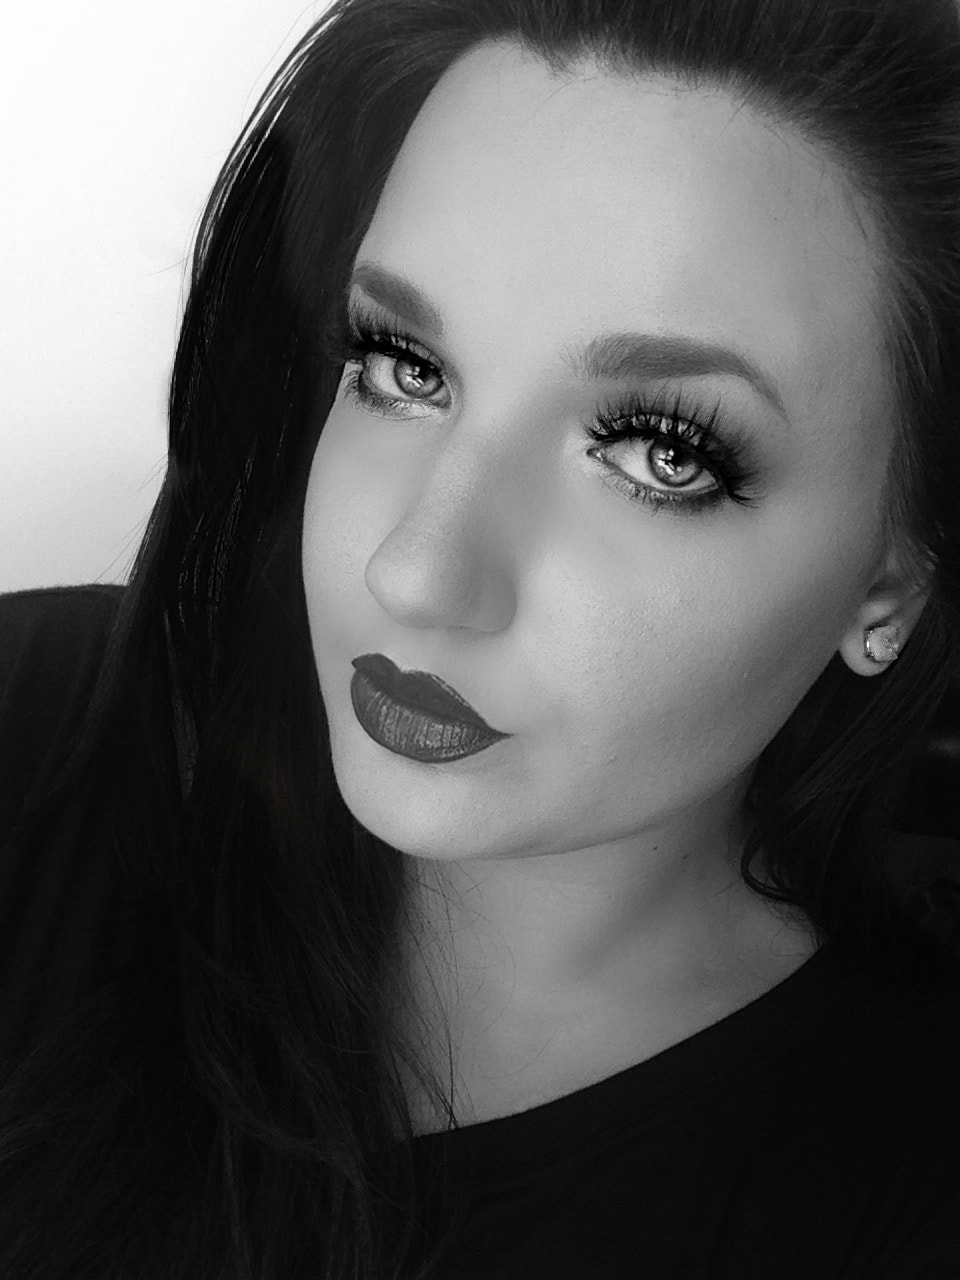
Today I'm going to talk about neutral looks and how you can bring a little something extra to them with a pop of color. Whether that be on the lid it self or with your lip color. So I have three. Two of them I've linked videos to that I done for Instagram.
Picture
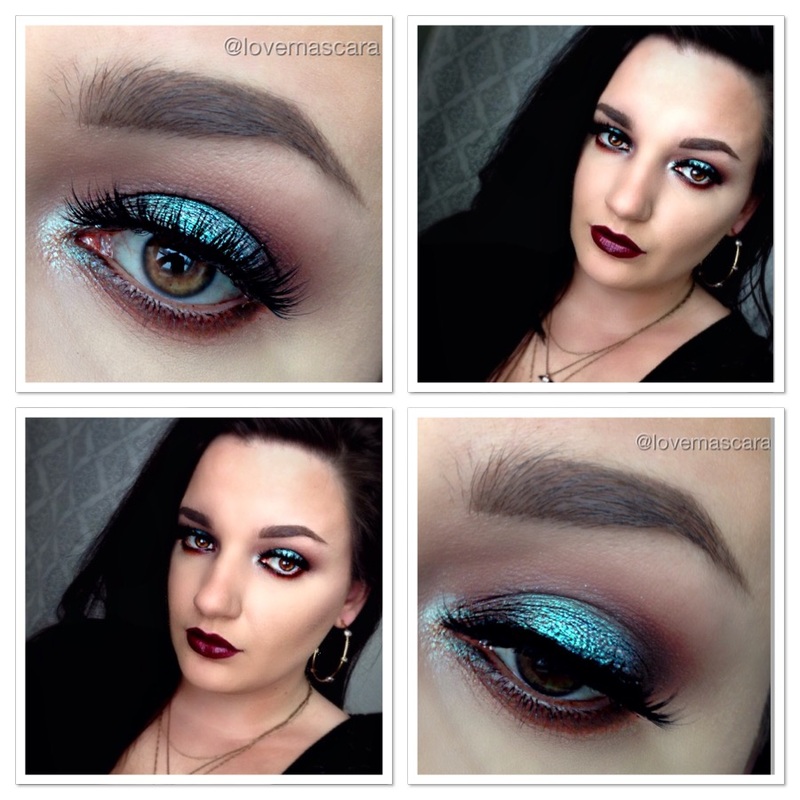
This look above, I actually seen @wickedbeautification on Instagram do with similar colors. I modified it somewhat to my own vision and used different products. Her's is gorgeous so you should check it out for sure, she's so talented. It had more plum/berry shades in it without the inner corner teal part. Mine is a bit more red brown, oranges and a lighter teal somewhat.

Here's what I used to do mine:
  • ABH shadows in: Red Earth, Bengal, Fresh Peach, Smoke
  • Coastal Scents: Light Tangerine and Dark Mango (lower lash line under Red Earth)
  • ABH Prussian Blue is in the center but what really makes it teal and bright is Sugar Pill Lumi pigment. Lumi is on it's own in the inner corner.
  • Lena Lashes Bianca lashes
My lips are Venom gloss from ABH. Basically this is a halo eye. I find halo looks are the easiest way to give pops of color because they're less structured. Also inner corner pops of color are something to think about, if you want a more structured, dramatic, winged look. So how I accomplish a halo is I work with my lightest color on the biggest blending brush I'm using and as the color gets deeper my brush gets smaller and the color gets lower. I apply the darkest color, in this case being "Smoke", with a pencil brush on the inner and outer part of the lids. The center color I usually always apply with my finger. It works best for some reason. The pigment I apply with a damp stiff brush or flat brush.
Picture
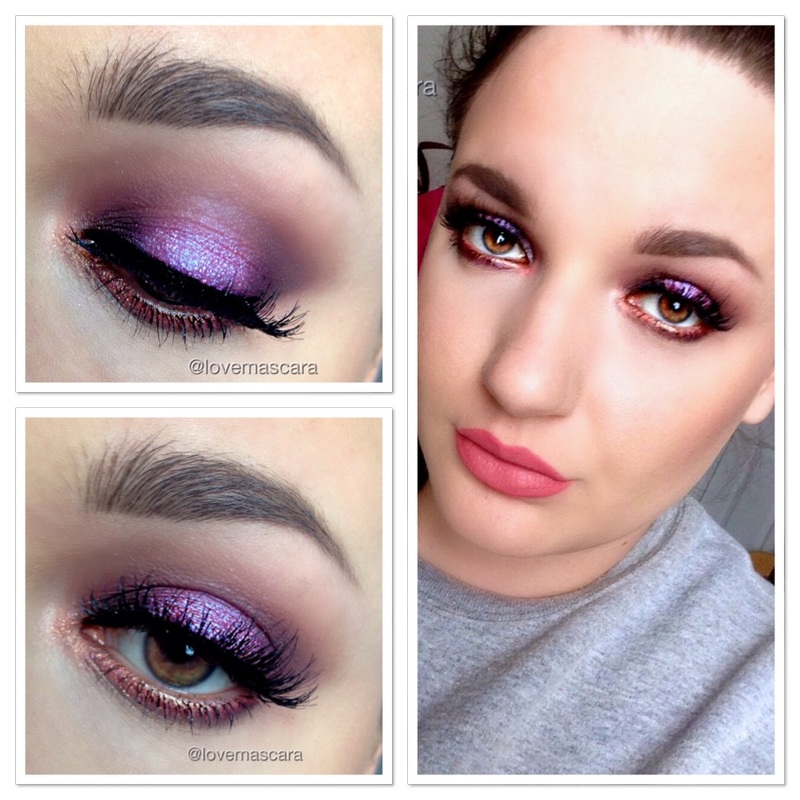
 This is a more cool toned brown eye (halo again) which when you add pink over it it tends to look a little purple. I try to keep the brown tone as much as possible so I add in warmer tones to cancel out any purple it's trying to bring out. It has some orange on the lower lash line. I have a video for it here which will take you through the whole "halo" technique I use for all halo looks pretty much. Now you could actually add in much more brown to make this even more neutral. I went in hard with the pink so you may want to do less. The Star Powder pigment brings iridescence, it's not necessarily vital to the look though. You could use the pink shades and just go with a darker pink halo eye which is still beautiful. 

Here's what I used:
  • Urban Decay Vice 4 palette: Bitter, Delete, 1985, and Fast-Ball. Flame (lower lash line)
  • Makeup For Ever Star Powder in 944 (center)
  • House of Lashes Smokey Muse lashes

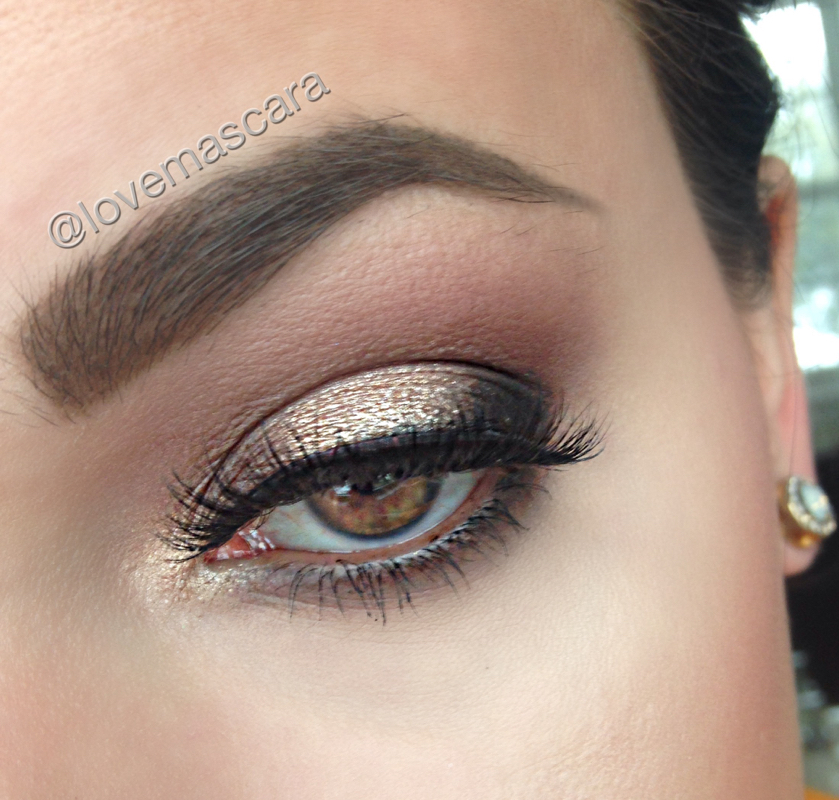
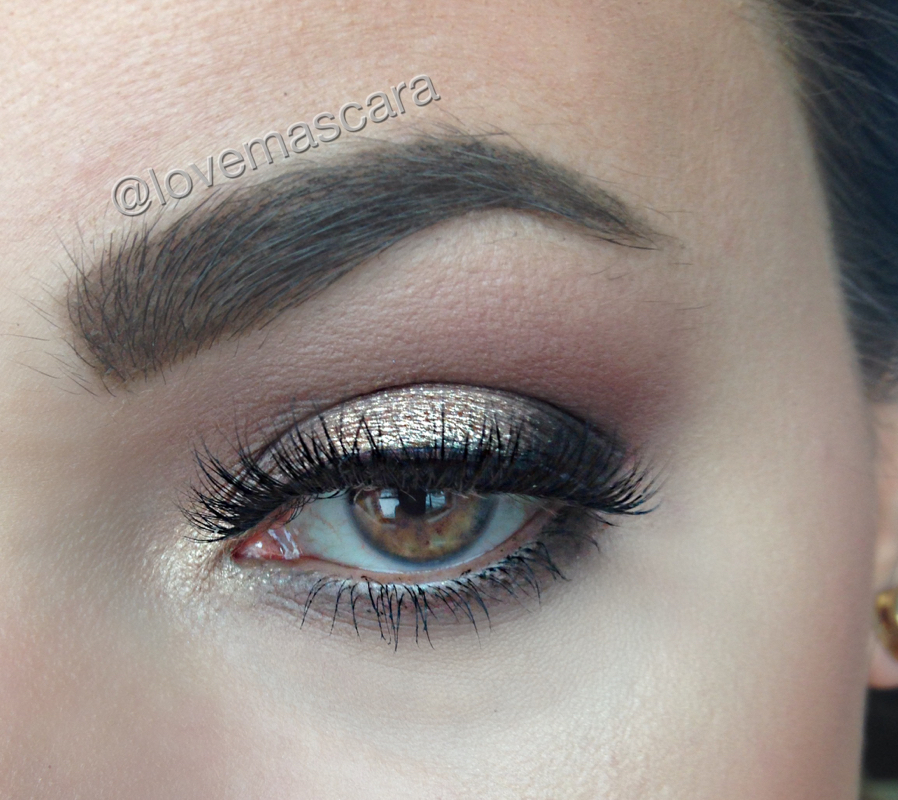
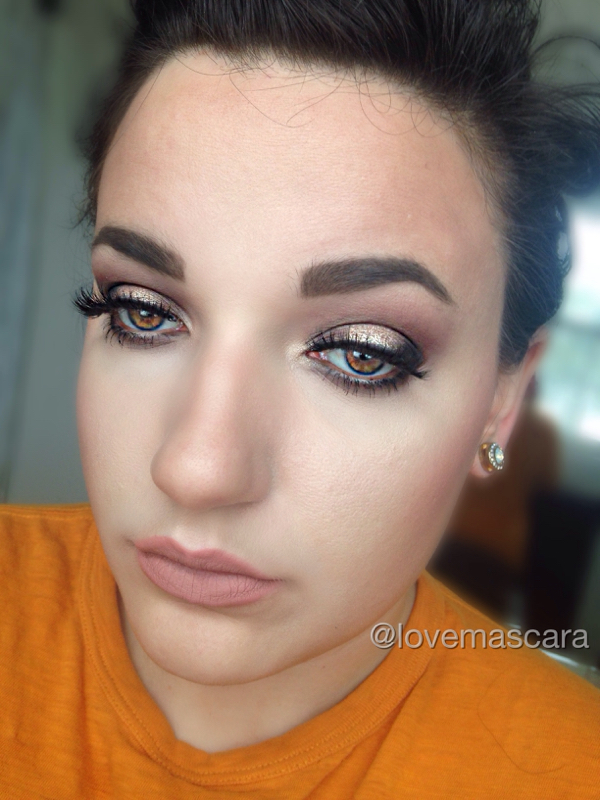
My lipstick is ABH Lovely liquid lipstick.
Picture
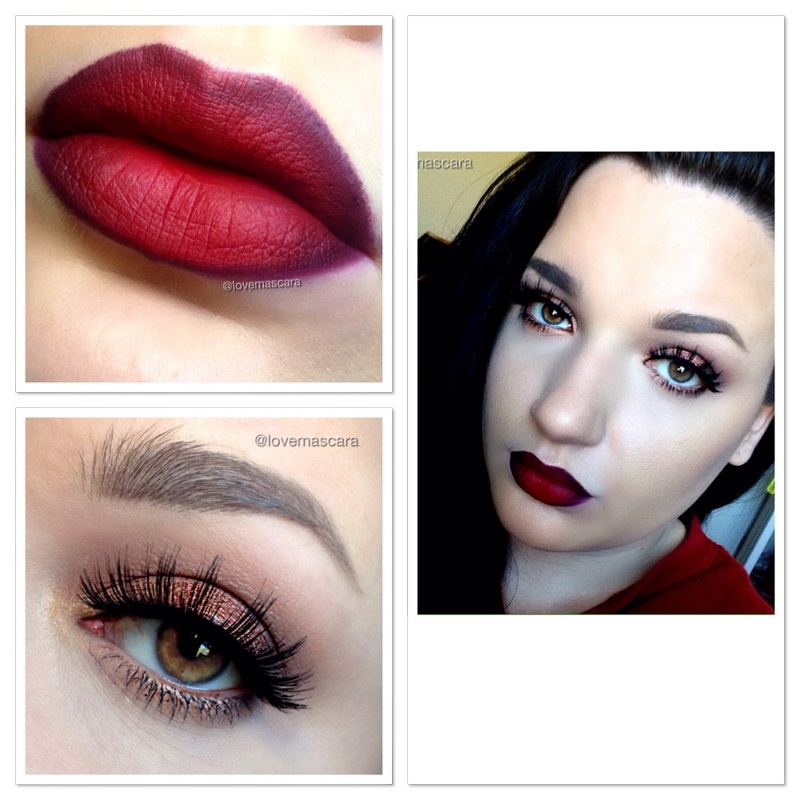
This look I really love because it's a warm neutral smokey eye with an ombre lip that has a bright red center. I have a video on how I done my ombre lip here. The eyes can be modified to what ever you want as well as the lips, I just wanted to include a pop of color that wasn't necessarily on the eye.

Here's what I used:
  • ABH Shadows: Party Dress, Henna (titanium finish orange, basically a foiled orange.), Smoke, and Noir. Bengal is in the crease I'm sure but I don't have it listed.
  • Violet Voss Lashes in Dolls Just Wanna Have Fun

Lips are Feminist lip liner from Colour Pop and Atlantic City liquid lipstick from Ofra Cosmetics.

So those are my latest, and best three examples of easy ways to add in color to your makeup. Whether it be daily, or for a special occasion they all would be suitable. My birthday is Friday so I'm thinking the first one with the teal is going to be my birthday look. If I don't find something I like better. Right now though it's my favorite. Also check out my Instagram (@lovemascara) for small tutorial videos every few days. I'm still working through the lighting and angles though so bear with me, I'm trying to better the quality of them.

I'll sign off now and I hope this was helpful, remember to be kind to each other. Spread love not hate. I appreciate you and take care!
0 Comments

Battle of the Primers

1/20/2016

0 Comments

 
Picture
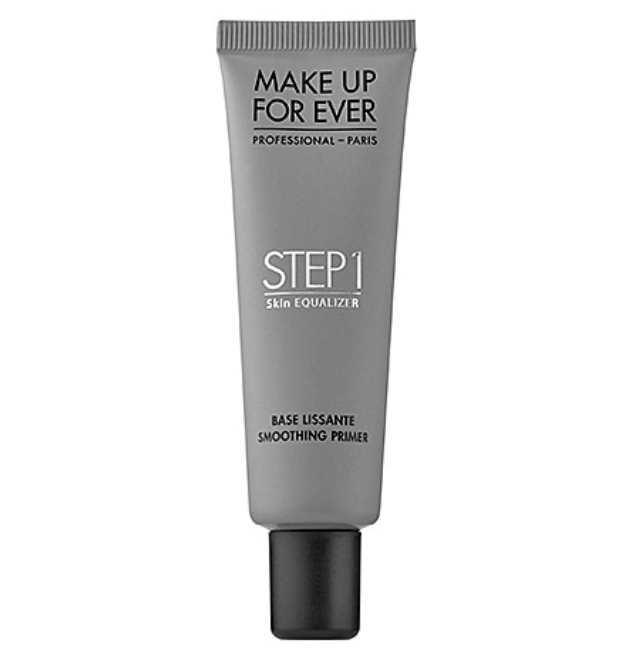
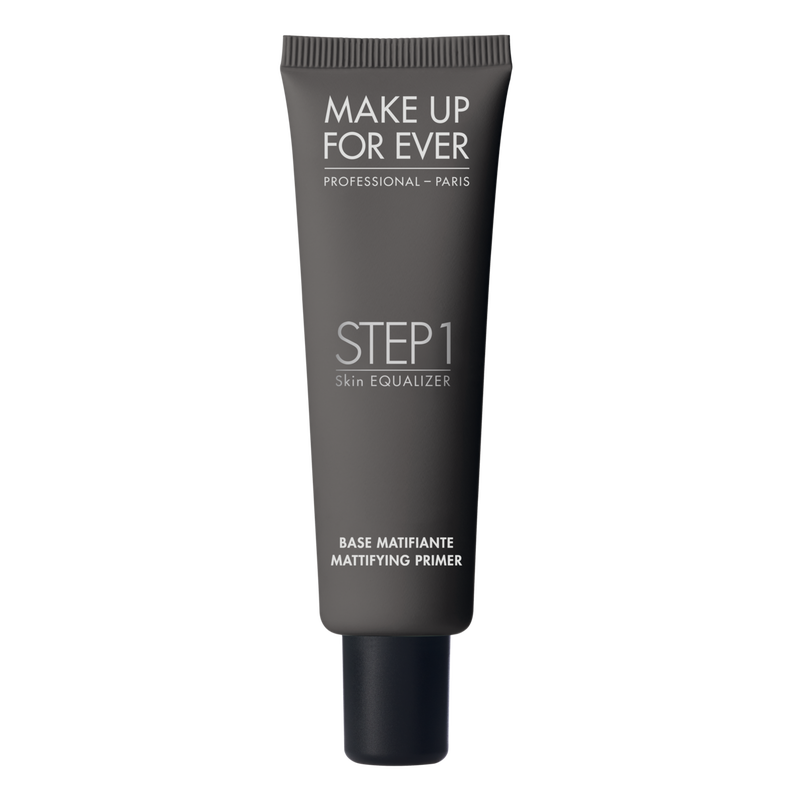
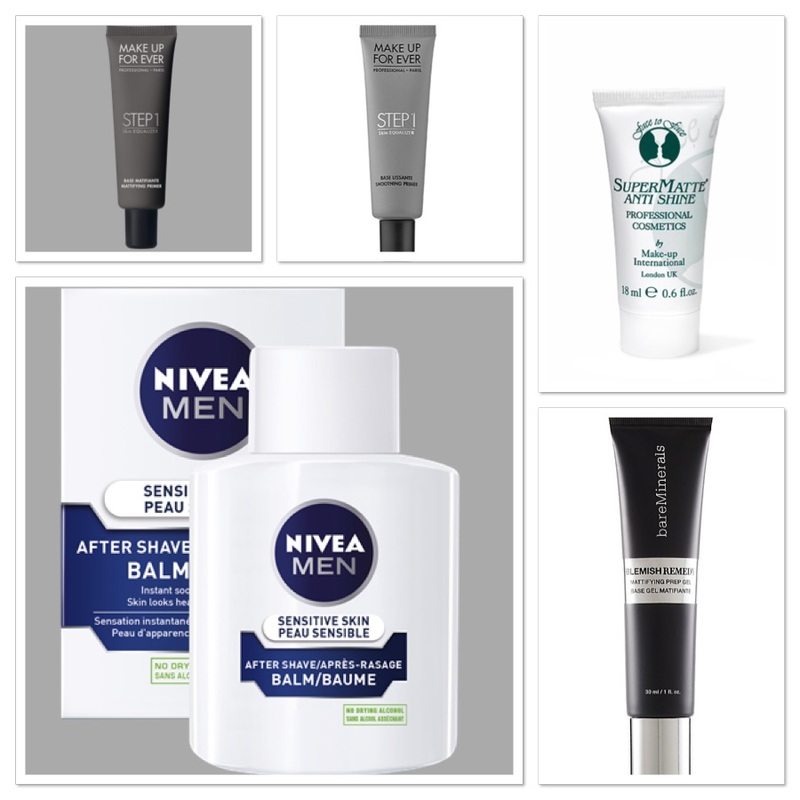
I had two new primers that I was going to review separately. Then when it got down to it, I decided to put all my primers up against each other. Or at least the ones I use the most against each other.

So here's the ones we'll be discussing:
  • Face To Face Super Matte AntiShine
  • Nivea Sensitive Post Shave Balm
  • Makeup Forever Step 1 Equalizer Mattifying Primer
  • Makeup Forever Step 1 Equalizer Smoothing Primer
  • Bare Minerals Blemish Remedy Mattifying Prep Gel
​
Picture
So first lets talk about the Face To Face Super Matte AntiShine.

This is used on stage for theater makeup. A lot of times its used by itself with a powder over top. It's also used to dab over makeup in any areas that may get shiny. Including bald areas. So therefore, I thought this would be a high potent primer. It's definitely potent. It dries completely matte. COMPLETELY MATTE. I do find however that this works best on its own with something added to it for more coverage. Using it under foundation doesn't seem to work amazingly well. My foundation actually broke apart through the day and there for I wasn't too impressed. Not to mention this is listed for nearly $28 on Frends Beauty for 0.6 oz. Which is not a lot of product. It's a chunky thicker gel formula with slight color to it (it comes in three tints). Very slight color. This is something I would use to reduce shine or spot treat but I wouldn't go for this as a primer. I can't find if this is water or silicone based. There are not a lot of reviews out for this particular product. It has very few ingredients, which I like.
Picture
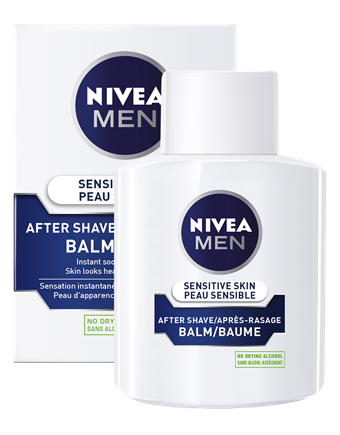
 Next up Nivea Sensitive Post Shave Balm.

Everyone and their mother has been talking this. EVERYONE. I feel like this originated from Nikki Tutorials. It went off like a rocket and dang it she was right! I got this, the scent is strong, and it's not that this primer works with longevity alone but it actually keeps your bronzer, blush and other products were you placed them without getting patchy. My makeup looked more airbrushed, smoother, and close to how I first applied it without shifting or moving through out the day. I apply it with just a brush, which is how I apply most of my primers because I tend to rub the skin with my hands and it balls up and rolls off. Isn't that a lovely picture, right? This is 3.3 oz for $5-$7 depending on where you buy. Now, keep in mind I got the "sensitive" one cause that's what I seen people using. I'm not sure if the others work as well as this formula. The bottle is nice and glass and the consistency is a thin milky gel/liquid. This is silicone based but it doesn't have Dimethicone which give you that "slip" feel in a primer.
Picture
Picture
Now onto the Makeup Forever primers. 

I'm sure I've reviewed these in the past but I'm including them because I still like them and until recently, rotated between the two I had, which are the Mattifying and Smoothing primers. I used the mattifying one on my teenage clients mainly. This is a potent, POTENT, primer. It's a bit thicker formula. It has no color. It's $37 though which is steep, even for 1 oz of product. You can buy the travel size which is 0.5 oz for $17. You don't need a lot either. This is another that I work in with a brush. It can be a little heavy though especially if you're not super oily or you apply too much. It's a product that has to be played with so I recommend getting a sample at Sephora and seeing if you do in fact need the mattifying primer. I like this primer for events as well. I've used it on several brides and also it's great for proms.

The other one is the Smoothing one. This comes out as a beige type color. I work this primer in with my fingers. This is a pore filler and smooths the skin of texture issues. It works fairly well at smoothing and I like it better than the POREfessional from Benefit or other pore fillers, the only problem I have is that when you use smoothing primers for whatever reason the "silicone feel" makes my makeup slide right off or increases my oil production. Now what you need to keep in mind about primers is that silicone based primers, won't work with "water based" foundations. So these new "serum/water" like foundations that are coming out, most of them probably are water based which is why they're so thin, thus a silicone primer won't work with that. Unfortunately those are the new trend though. Just something to be mindful of.

The Smoothing Primer has silicone, the Mattifying Primer is said to not be silicone based but it looks like it does have it some but it doesn't have Dimethicone. Also some people break out from silicone primers, I tend to think its from the Dimethicone because most primers have some form of silicone in it. So if you find yourself breaking out and you don't know why, switch up your primer and see if that helps. That is if you use a primer.  

Picture
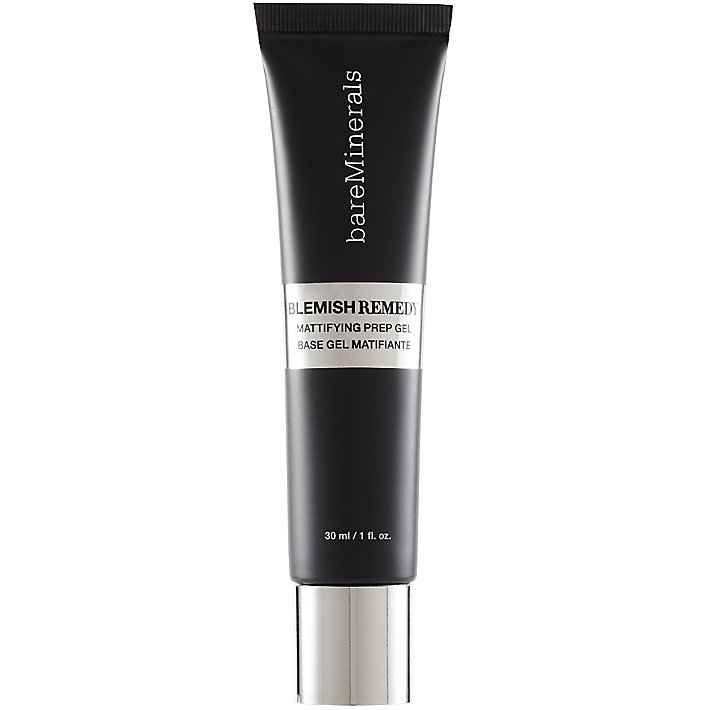
Last is kinda a surprising choice. Its the Bare Minerals Blemish Remedy Mattifying Prep Gel.

I was sent some of this to try. It's actually really good. It's very light weight and works great at mattifying the skin. It also uses Aspen Bark and Tea Tree Oil to promote clearer skin. Which is very interesting I think. I don't know for sure how well it works with problematic skin but as far as a primer, it's really good. Great actually. It's $24 for 1 oz. It's dermatologist tested and noncomedogenic therefore it's not going to cause you black heads. So if you have acne or are prone to break outs, I'd give this a go. This is silicone based and also has Dimethicone which makes it feel very silky. Which I typically don't like but this one isn't bad.

To be considered a "silicone based" product most of the forms of silicone will be listed near the top of the ingredient list. You can google the different ingredients to look for cause there are quite a few. If they are closer to the bottom then it's probably not silicone based. Most all primers include some water, because water is what thins product out or makes them liquid people so just because it has water in it doesn't always mean it's "water based". I recommend reading the details of the product in description sections online because usually a company will put "water based" or "silicone based" in the description of their product. Especially for foundations.

0 Comments

Bridal Series: Bombshell Glam

6/4/2015

0 Comments

 
Picture

I went to go visit my best friend Faith and talked her into being my model for my Bridal Series. She's the quintessential "blonde bombshell" so we did a very glamourous look. 

One the eyes:

ABH: Bengal, Smoke, and Fresh Peach

MAC Whisper Pink pigment

MUG Corrupt eyeshadow

Red Cherry Lashes in #43

NYX Tame and Frame brow pomade in Blonde

Face:

Dior Skin Star foundation in Linen mixed with NARS Sheer Glow in Fiji

Kat Von D Shade Light contour palette

Becca Songbird blush

The Balm Mary Lou Minizer highlighter

Evian Mineral Spray

Lips:

First we used OCC liptar in Cha Cha mixed with Grandma
Then we used liptar in Harlot
Then we used Gerard Cosmetics Rodeo Drive 

So there are three lip options to choose from.

0 Comments

Bridal Series Colorful Summer Makeup

5/19/2015

0 Comments

 
Picture

I hadn't done a Bridal look in a while and it's now in the prime of bridal season. So I got my friend Jamie to let me do some fun makeup on her for a bridal look.

Picture

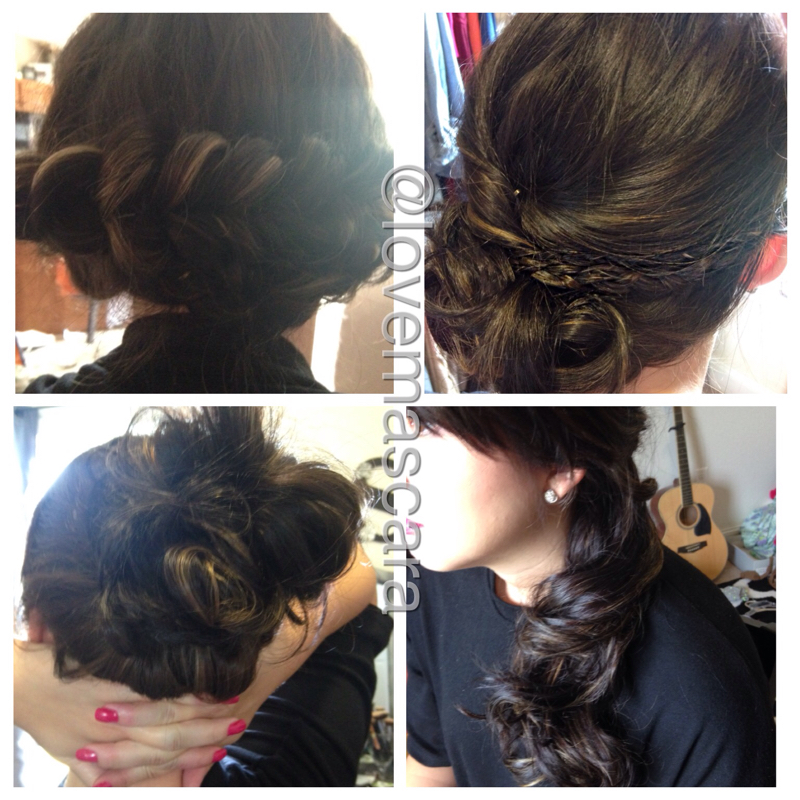
We did some hair as well. Easy updos and messy hair.

Top left: Pull Through Braid. Low style up do.

Top Right: Side Bun with Two Braids.

Bottom Left: Messy Updo

Bottom Right: Cascading Twisted Side Ponytail

Picture

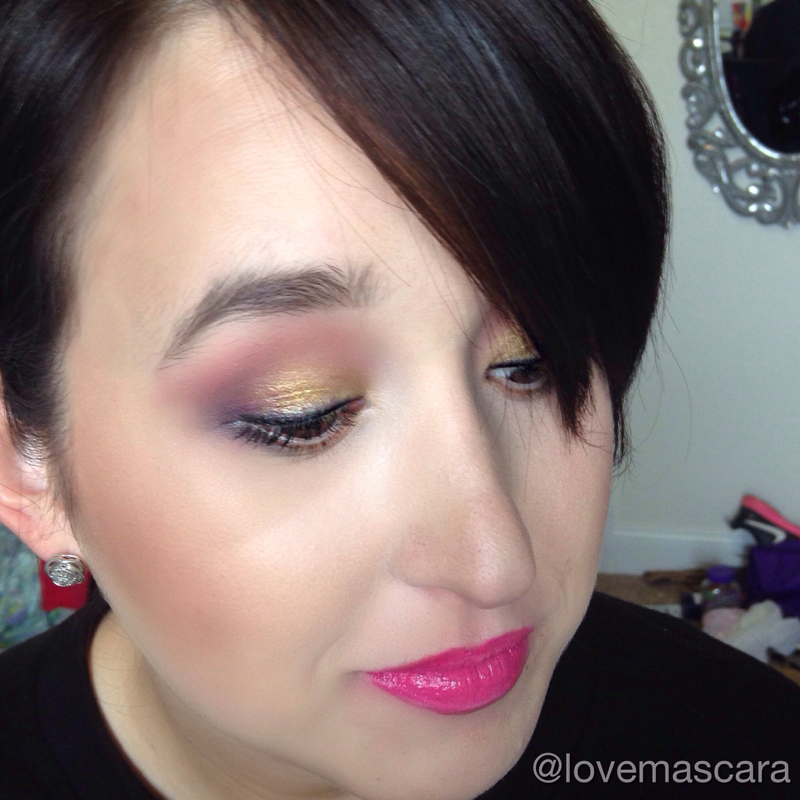
For her makeup we done

Eyes:

Makeup Geek: Pixie Dust, Mango Tango, Razzleberry, Corrupt

ABH: Violet

MUG Immortal Gel Liner

Loreal Voluminous Carbon Black Waterproof Mascara

Face:

NARS Sheer Glow

Becca Songbird blush

Stila Kitten Highlighter

Kat Von D Shade Light contour kit

Lips:

LA Splash Smitten Liptint in Enchanted mixed with

Stila Bellisima liquid lipstick

And Buxon Jennifer gloss over top

0 Comments

Makeup Tips for Special Occasions

4/6/2015

0 Comments


Greetings everyone! Since we're getting into warmer months, it's the season for proms and weddings. Now, my wedding was a fall wedding in October but my best friend's was in June that same year and most weddings are typically in the warmer months. As a matter of fact I have once coming up at the end of this month actually. So I wanted to go over some things that I've found were necessary and helpful for special things. So lets get into it:

  • Drink lots of water. Water makes your skin more plump and clears up imperfections
  • Moisturize. I don't care if you have oily skin you still need to moisturize daily. It helps with aging and actually levels out oil in the skin and can help your oily issues.Just find one that works for you
  • Sunscreen. Wear sunscreen everyday for aging benefits but on the big day of your occasion you'll probably want to use something that doesn't have sunscreen in it for that event. Sunscreen can cause flash back, which is that white cast on you skin when the camera flashes.
  • Whiten your teeth. Whitening Lightning has teeth whitening pens for actual teeth and even for vaneers. They run sales all the time and you'll need to start about 2 weeks before you're event cause that's how long it takes to get maximum benefits from them. They also have Dial A Smile kits that have whitening gel and LED lights with other things as well.
  • Stick with subtle colors. Prom is a little easier to do color because dresses are usually colorful and bright even so you can do glitter and fun stuff. I always feel it's better safe than sorry though especially if you're doing things on your own. So stick with neutrals or soft colors. Plum and cranberry/burgundy are great colors to use if you want a color but not sure what to use. 
  • Use a setting spray. EVERY. SINGLE. TIME. I like Ben Nye Final Seal and Urban Decay All Nighter Spray. Setting sprays set the makeup so it's less likely to move or break up during your even. MAC Fix + is really popular and smells great but I don't like it to hold my makeup in place I actually prefer it before makeup to prep the skin because it's rich with vitamins and hydrates the skin really well too.
  • Use a primer. There are tons of primers that you can use to fit your needs, Makeup Forever just released a whole line of primers that do everything from smooth, hydrate, illuminate all the way to color correcting. There are calming primers, pore minimizing, so on and so forth. What you need it for is to hold on to your makeup. So I recommend Benefit 15 hour Primer. It's like a gigantic glue stick. It's more like a balm but I use it for every client that I work on. I used it in my own wedding and it did a great job. If you're incredibly oily I might would use a mattifying primer either by itself or under a stronger primer like the Benefit one I mentioned.
  • Use an eye lid primer. This keeps your eye shadow from creasing and helps it go on evenly as well. It also keeps the eye shadow more vibrant through out the day. I really like Too Faced Shadow Insurance and NARS Pro Prime those are my favorite and I feel they hold up better than other. MAC Pro Longwear Concealer can also be used as a primer and it covers the veins and discoloration on the eyelid too so you have a clean canvas to work on so to speak.
  • Use your perfect shade of foundation. This is obvious but the reason I want to stress it is because there's nothing wrong with mixing two foundations to get your perfect color. Blend all the way down under the jawline and onto the neck. Not adding extra product just blending what you have left down to make it even. Work with a small amount and build from there because you'd be surprised how little it can actually take to get the coverage you need and using to much makes you look a little cakey. Also try to use a foundation without spf if you can to avoid flash back. I really like NARS All Day Luminous Foundation if you aren't super oily, Laura Mercier Oil Free Foundation if you are oily, and Makeup Forever Mat Velvet + if you're combination. If you feel like your foundation is too thick you can add a drop of Almond Oil or Jojoba Oil to one pumps and it thins it out without losing its coverage. True story.
  • If you want to contour I recommend powder contouring instead of cream contouring because cream contouring has to be set with powder contour and it makes the makeup really heavy. So if possible powder contour.
  • Use subtle highlighter but definitely use some on the cheek bones unless you have a lot of texture issues.Highlighter mimics sunkissed skin and gives you a "healthy" look so I always use it. I again prefer powder over cream so I recommend Hourglass Ambient Lighting Powder in Luminous Light, Becca Opal highlighter used lightly, and Laura Mercier Matte Radiance Baked Powder in Highlight 01. Those are my favorite and the most universal in my opinion.
  • Do not use an over powering blush you want to look healthy and not like you have pink cheeks. Makeup Geek Spell Bound is a fantastic neutral pale pink if you're fair to light. Becca Songbird has a healthy sheen to it and is a darker coral that is stunning on tan skin. The NARS Dual Intensity bush in Fervor is lovely for light or dark skin because it can be used dry for a subtle effect or wet for a more luminous and darker look.
  • Go for lip color instead of nude lips. When I say nude lips I mean like Kim K nude. MAC Myth and Creme d Nude colors. If you want to be more nude than go for something that is your lip color but better or maybe a shade darker or lighter. They always say the perfect nude color for you is the color of the inside of your bottom lip. Also you'll want a lipstick that won't wear off so I prefer liquid lipsticks. I love Lovely from Anastasia Beverly Hills is a neutral pink that suits almost all skin tones, I love Bellisima from Stila is a pale peachy pink nude great for fair to light skin, and I love Vamp from Anastasia as well for darker skin tones. If you want something a bit darker but still neutral then mixing Vamp and Lovely makes a beautiful muted burgundy that's not incredibly dark. Also Color Pop Brink which isn't a liquid lipstick is a beautiful everyday slightly more mauve color. I also use MAC Faux lipstick and YSL Ultimate Beige #3 on my clients as well.
  • Bring oil absorbing sheets with you especially if it's going to be hot or if you're prone to oily skin.
  • Always fill in your brows, you don't have to sculpt them if you don't want but fill in any gaps because the brows frame the face. If you're getting them waxed or tweezed do so a few days before your event so any redness has time to go away.
  • Use waterproof mascara my favorite is Loreal Voluminous Carbon Black.
  • If you want to wear lashes wear more natural ones that won't be too heavy or irritate your eye. I prefer shorter band lengths as well. My favorites are Red Cherry 213, Kiss Lashes in Chic, and Luxy Lash in Woke Up Like This or Hollyhood. Also I prefer to use DUO waterproof lash glue.
0 Comments

Bridal Series Pink Glamour

3/7/2015

0 Comments

 
Picture

This is my dear friend Megan. Gorgeous isn't she? She will be getting married at the end of next month so she's s good candidate for my bridal series. We did a super glamourous timeless look on her today. Also she has beautiful green eyes so they really popped with the makeup and smokey eye as well as the shimmer.

Eyes:

ABH Red Earth, Smoke, Fresh Peach, Noir and a touch of Dusty Rose

MAC Whisper Pink pigment applied wet

Red Cherry Lashes in 213

ABH dip brow

Face:

Laura Mercier oil free foundation and RCMA VK 11 palette for concealing and contouring

Becca Opal highlighter and Song Bird blush

MAC Emphasize under the eyes

RCMA no color powder to set

Ben Nye final seal setting spray

Lips:

ABH Vamp and Lovely mixed.

The pre makeup tools I used were Murad skin perfection moisturizer. Benefit 15 Hour Primer. Dr. Jart+ black label detox beauty balm. Toofaced Shadow Insurance.

0 Comments

Bridal Makeup Series: Smokey Golden Eye

3/5/2015

0 Comments

 
Picture
Picture
Picture
Picture

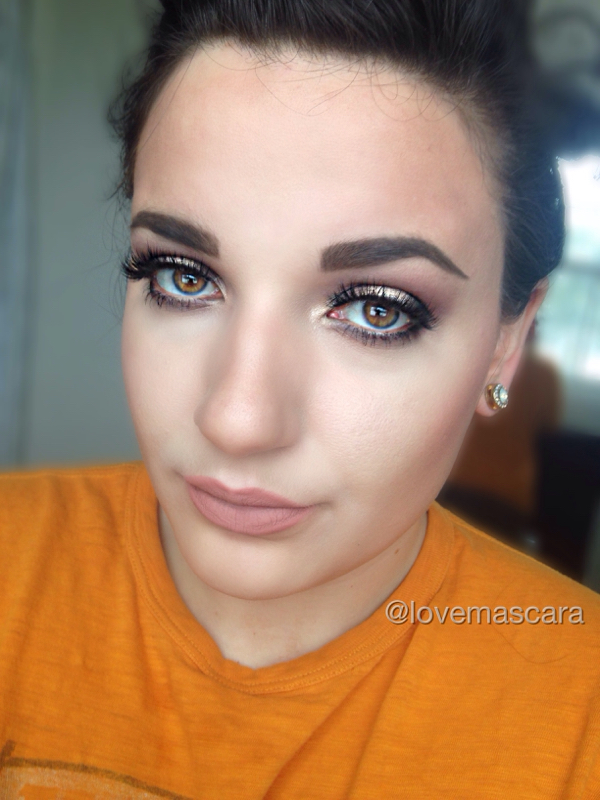
So this is my first installment of the Bridal Series. This is a perfect bridal look in my opinion. It's smokey with lots of lashes that aren't too long and dramatic but very thick. It has a touch of shimmer in the center of the lid. It's neutral but smokey and sexy.

Eyes

ABH Red Earth, Dusty Rose (both in the crease) Smoke and Noir. Smoke is on the inner and outer corners of the lid. Without much product touching the center of the lid.

MUG After Glow pigment in the corner of the eye and center of the eye.

Lena Lashes style Bianca

ABH Dip Brow in Medium Brown

Face:

Nars All Day Luminous Foundation

Cream contoured and highlighted (see seperate post about contouring)

MAC Warm Soul Blush

ABH Contour Kit (to set)

MAC Lightscape for highlight

Lips:

ABH Pure Hollywood

0 Comments
    Picture

    Erin

    I'm from Tennessee. I'm a makeup and skincare lover. I have always enjoyed creating looks but I love to help people with product knowledge and application even more. I've been able to start blogging and do these things I love because God has seen fit to bless me with the opportunity. Thanks for stopping by and visiting with me!

    View my profile on LinkedIn
    Ebates Coupons and Cash Back
    Picture

    RSS Feed

    Tweets by @loveand_mascara

    Categories

    All
    AdoreBox
    Allure Beauty Box
    Bath
    Bauble Bar Series
    Blog/Updates
    Blush
    Body
    Bridal Makeup
    Brushes
    Buying Guide
    Concealing Contouring And Highlighting
    Crazy Makeup/Themed Makeup
    Empties
    Eyebrows
    Eyelashes
    Eyeshadow
    Fall Makeup
    Fashion
    Favorites
    Foundation
    Gift Guides
    Go To Routines
    Hair
    Hauls
    Holiday Makeup
    Jewelry
    Lips
    Makeup
    Makeup Look
    Makeup Tips
    Mascara
    Nails
    NewBeauty
    New Launches
    Play! By Sephora
    Powder
    Prom Makeup
    Reviews
    Routines
    Saturday Night Sheet Masks
    Skincare
    Skincare Tips
    Snapchat Filter Series
    Spring Makeup
    Step By Step
    Summer Makeup
    Swatches
    The Good The Bad And The Eh
    What Is It?
    Why Isn't Anyone Talking About This?

    Archives

    January 2022
    July 2021
    March 2021
    February 2021
    January 2021
    December 2020
    November 2020
    October 2020
    September 2020
    August 2020
    July 2020
    June 2020
    May 2020
    April 2020
    March 2020
    February 2020
    January 2020
    December 2019
    November 2019
    October 2019
    September 2019
    August 2019
    July 2019
    June 2019
    May 2019
    April 2019
    March 2019
    February 2019
    January 2019
    December 2018
    November 2018
    October 2018
    September 2018
    August 2018
    July 2018
    June 2018
    May 2018
    April 2018
    March 2018
    February 2018
    January 2018
    December 2017
    November 2017
    October 2017
    September 2017
    August 2017
    July 2017
    June 2017
    May 2017
    April 2017
    March 2017
    February 2017
    January 2017
    December 2016
    November 2016
    October 2016
    September 2016
    August 2016
    July 2016
    June 2016
    May 2016
    April 2016
    March 2016
    February 2016
    January 2016
    December 2015
    November 2015
    October 2015
    September 2015
    August 2015
    July 2015
    June 2015
    May 2015
    April 2015
    March 2015
    February 2015
    January 2015
    December 2014
    November 2014
    October 2014
    September 2014

    RSS Feed

Proudly powered by Weebly
  • Love and Mascara
  • About
  • Contact
  • Portfolio