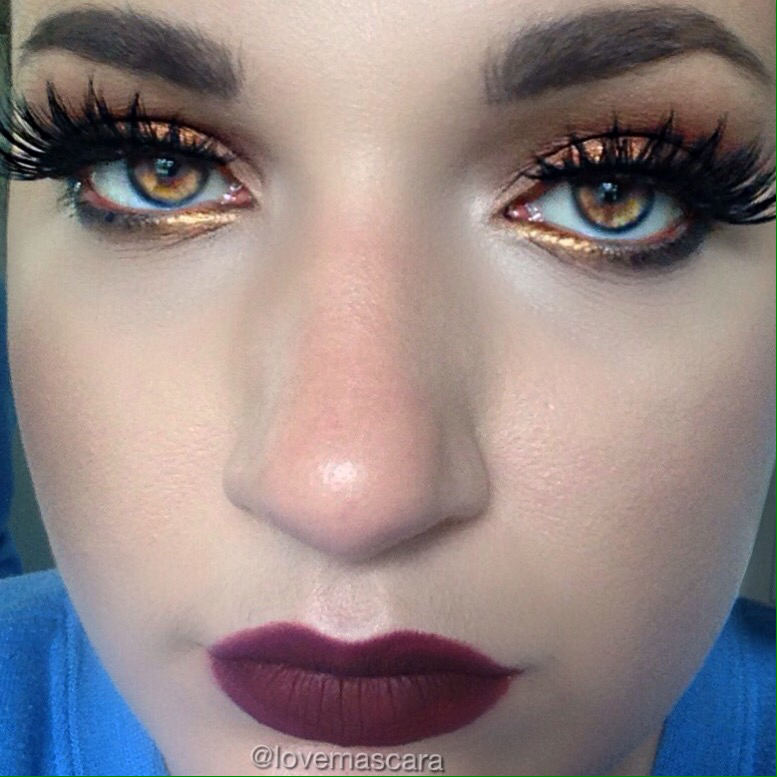
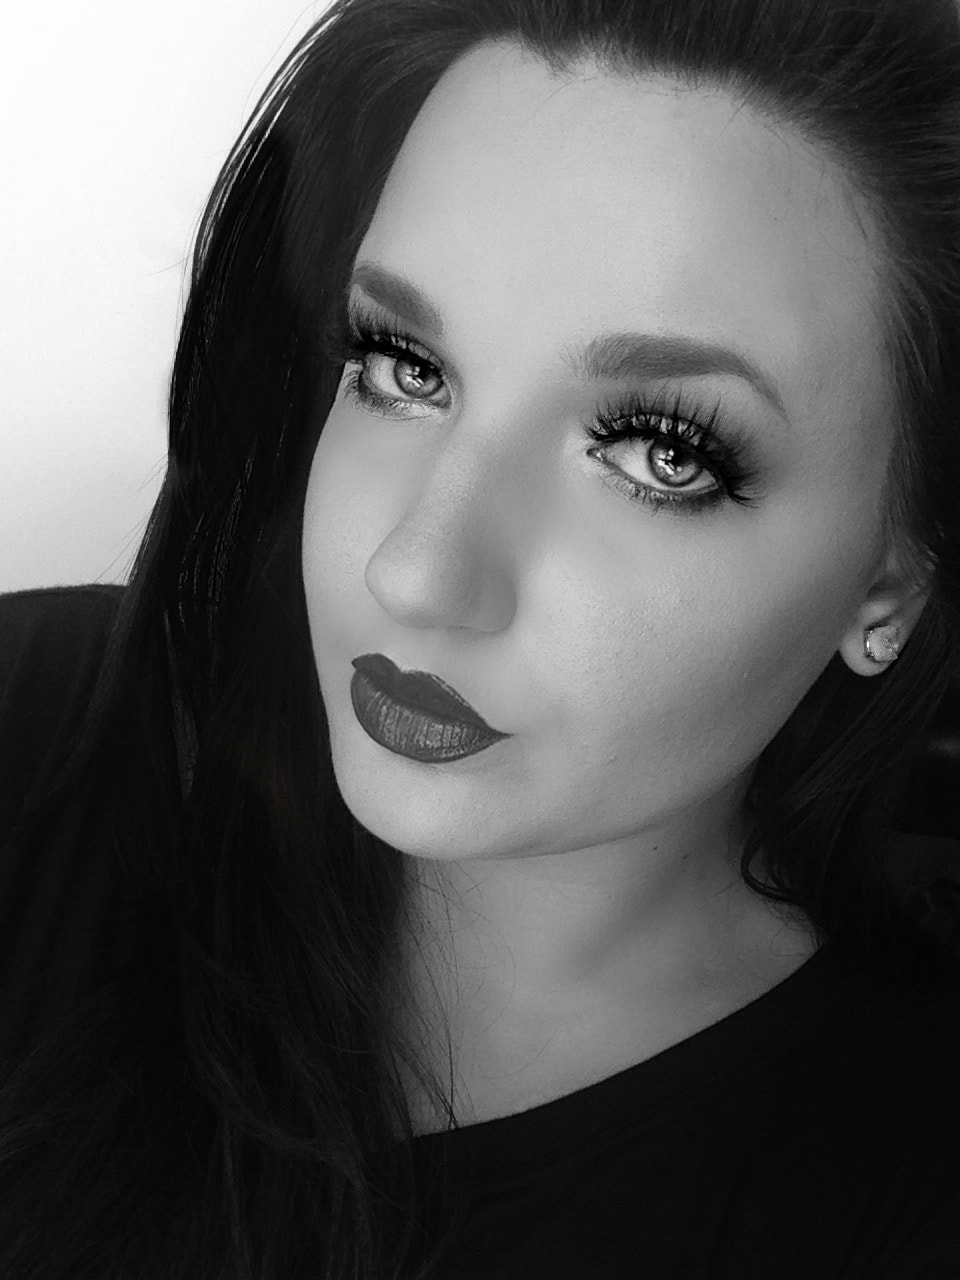
 It's Halloween season and you don't want, or can't dress up for work or what have you but you still want to be festive. It's the perfect time to play with colors and get out of your comfort zone with makeup. So I'm doing a series of Halloween appropriate wearable makeup by color. This one being Orange, obviously. The look above it s a brown smokey eye with an Orange foiled look. I used the Morphe 35 Smokey palette for this. I'm not sure if that's still what it's called but it's a very colorful palette that has a range of mattes and shimmers of all colors. So I use mainly browns and then put shimmery or foiled browns over top of that on the outer half, then I used a foiled copper color and then a foiled orange. You can go straight into foiled orange though. Mine is really smokey your don't have to make yours as smokey if you don't want but I do recommend using the orange on the lower lash line because it's very pretty. I used House of Lashes Iconic lashes. Then I went with a burgundy lip which is ABH liquid lipstick in Vamp. 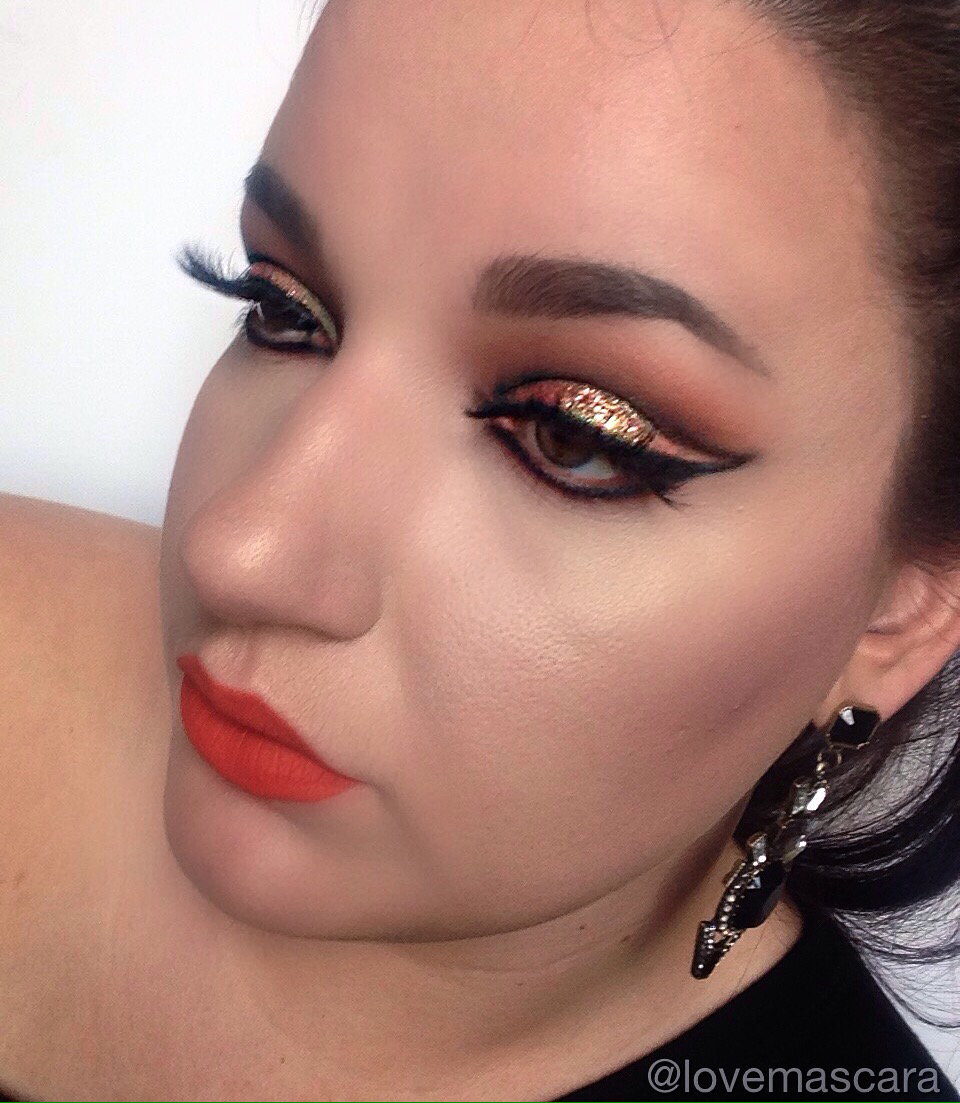 This look is really really dramatic. It's for my girls that have a steady hand and more time. It's a cut you like a knife crease, harsh winged liner and glitter. For the crease I used: MUG: Corrupt, Mocha, and Poppy (Mocha first to trace out the wing in the crease, Poppy to blend and use above the line you just drew, corrupt to go back in and darken that wing from where it's been blended slightly.) On the lid: MUG Hologram duochrome pigment with a wet flat stiff straight line brush and placed all the way to the end of the crease wing Violet Voss glitter in Rosalind Immortal Gel Liner from MUG but any black gel liner will work and I bring it up and connect it to that crease wing. Lilly Lashes in Mykonos Lower Lashline: Poppy used first and the Corrupt over top Lips: Colour Pop: Pacific 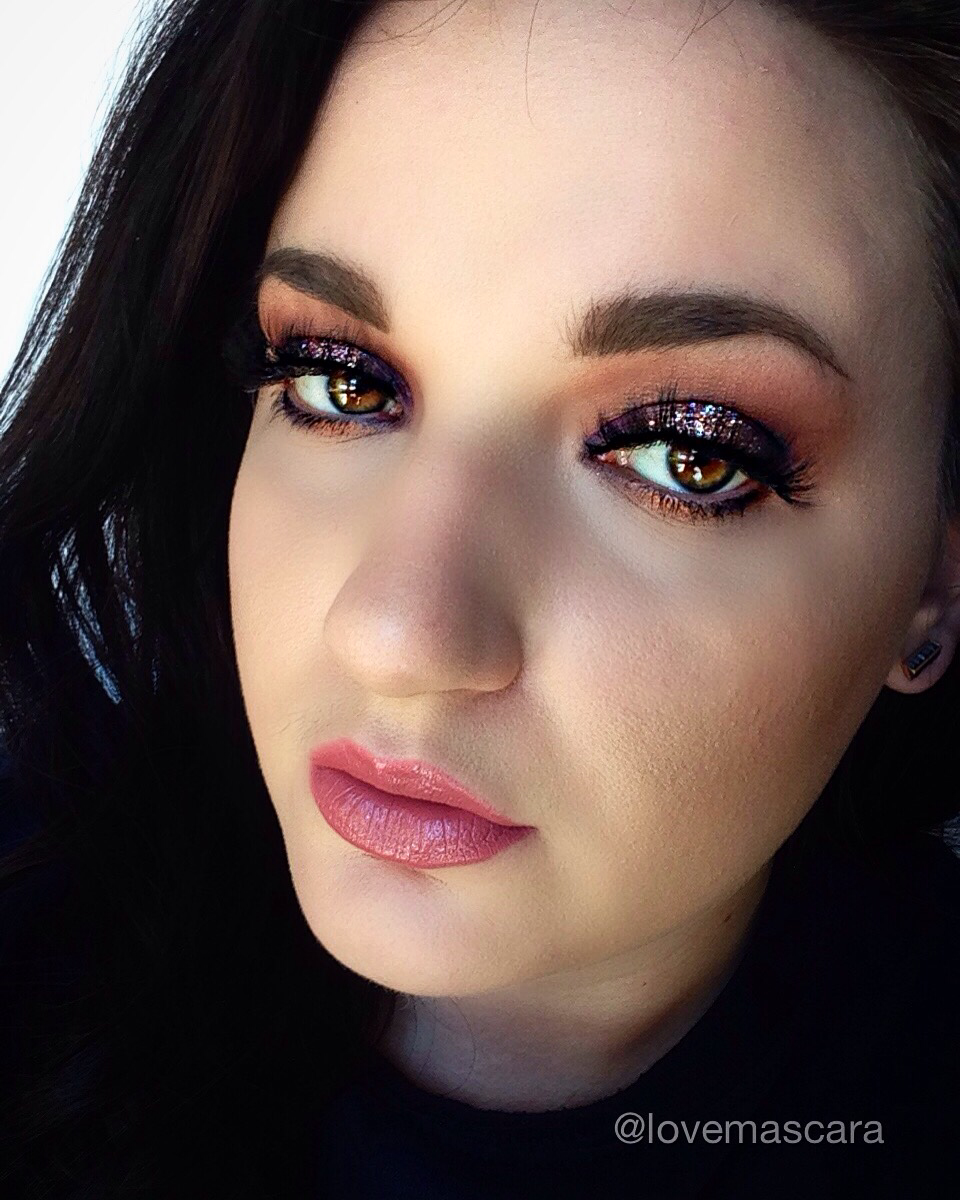 This last look is really glamorous and pretty but still festive.
Eyes: ABH shadows in Violet, China Rose, Bengal, and Fresh Peach. (Violet is on the inner and outer corners of the lid. China Rose in the center for a halo eye. Bengal and Fresh Peach in the crease) Beauty Bar Baby Glitter: Fantasy gllitter (gorgeous) Lilly Lashes in Mykonos Lips: ABH Lovely liquid lipstick and Vintage gloss.
0 Comments
I've been talking to some mom's and just busy ladies in general, and the one thing they tell me is "I need some tricks to save me time while doing my makeup but still look like I have makeup on". So I thought on that for while, makeup is like therapy for me I get lost in it and I love to have plenty of time to do it. However, there are those times when I am on a set time frame and we've all woke up late before so here's my best tips and tricks to save you time while still looking "put together". 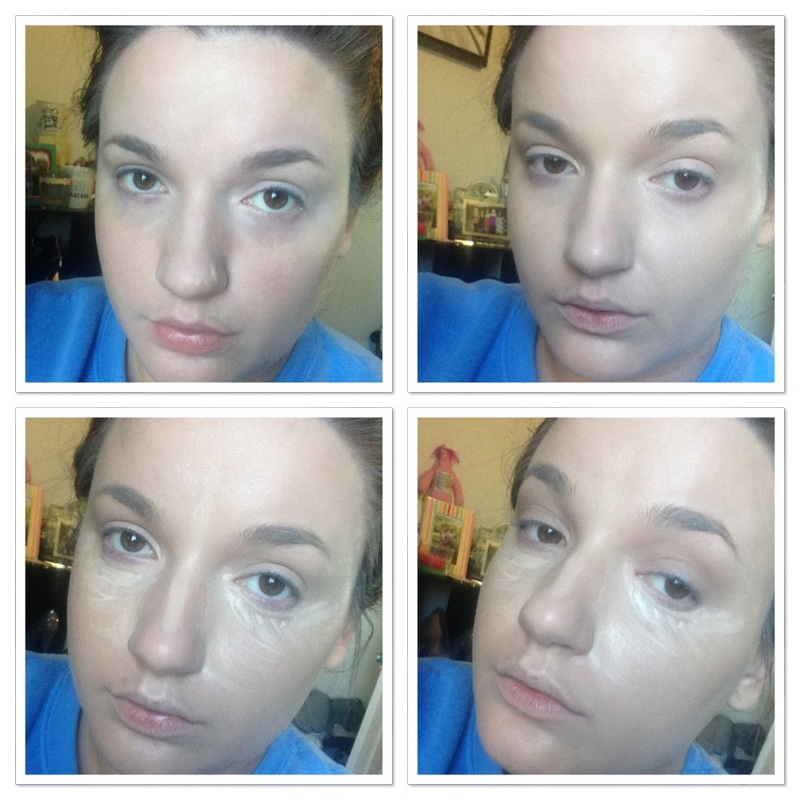 Starting with a fresh face, the first tip I can give you is: Use a BB Cream or CC cream, one that has a tint is good. For this I used Dr Jart+ Black Label Detox BB Cream and added some Cover FX custom cover drops for pigment. A really good one is the IT Cosmetics CC Cream however, the shade range isn't great. Also the Smashbox BB Cream is a cult favorite. Mainly why this is a tip is because its: primer, moisturizer, concealer and coverage all in one. So even though I do recommend using a real moisturizer and primer as much as you can, in a pinch this would work fine. The one thing it won't do very well is correct dark circles, so I do cancel those out no matter what. I use NYX Dark Circle corrector in Medium. It also won't give you the fullest coverage. Which is why most people use a foundation over a BB Cream. I added Custom Cover Drops for not only color but added coverage as well. Next is highlighting/brightening/concealing under eye area and high planes of the face. So I used the Maybelline Lumi Pen. The Urban Decay Naked Skin concealer is even better, MAC Pro Longwear concealer is a good choice and can also be used as eye shadow primer. What I do is I highlight with this pen and I let it set while I do my shadow. Accomplishing several things: 1) using the "baking" technique for fuller coverage and more prominent highlight the longer is sits 2) making it easy to clean up any fall out from your eyeshadow and 3) giving more coverage over all to the face in the areas it was applied. 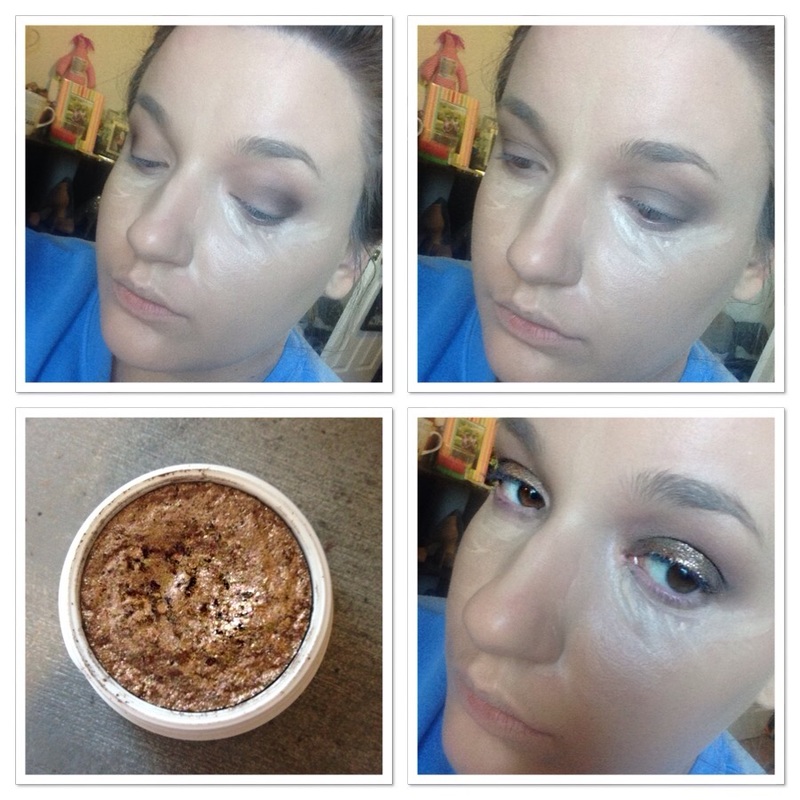 Ok so scooting right on over to shadow this is one of those times when you really need a product that makes a statement on it's own. So first apply a crease color after you put on primer, I chose Noble from Mi Vida Loca Remix palette but Peach Smoothie from MUG would work fine or Beaches and Cream. Then I went in with a darker brown with a smaller brush on the outer lid and blended it with the same fluffy brush I used for my crease. Next I used Colour Pop "Nillionaire" shadow. Which is a glittery golden brown shadow. I apply it with my finger it's intensely pigmented and I apply it all over the lid. It doesn't usually require any blending so you're pretty much good to go. 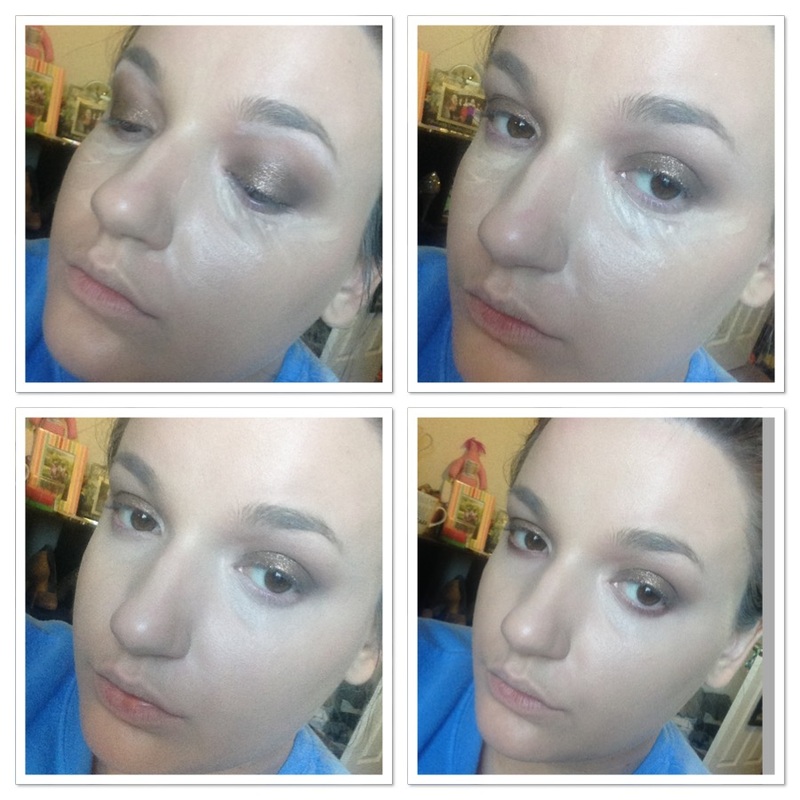 So here is a step that you can do or not. It doesn't make or break the look. So what I do is I take a pencil, in this I used the Benefit Eye Bright pencil, to highlight the underneath of the brow and then I just blend it out. On the lower lash line I use a brown eyeliner and smudge it. Now if you apply it too heavily it will melt so you can use a brown shadow just the same. After that I blend out the concealer with my ring finger you could use a brush if you wish or a beauty blender but I use my finger to save time and to pat the concealer in to get the most coverage. 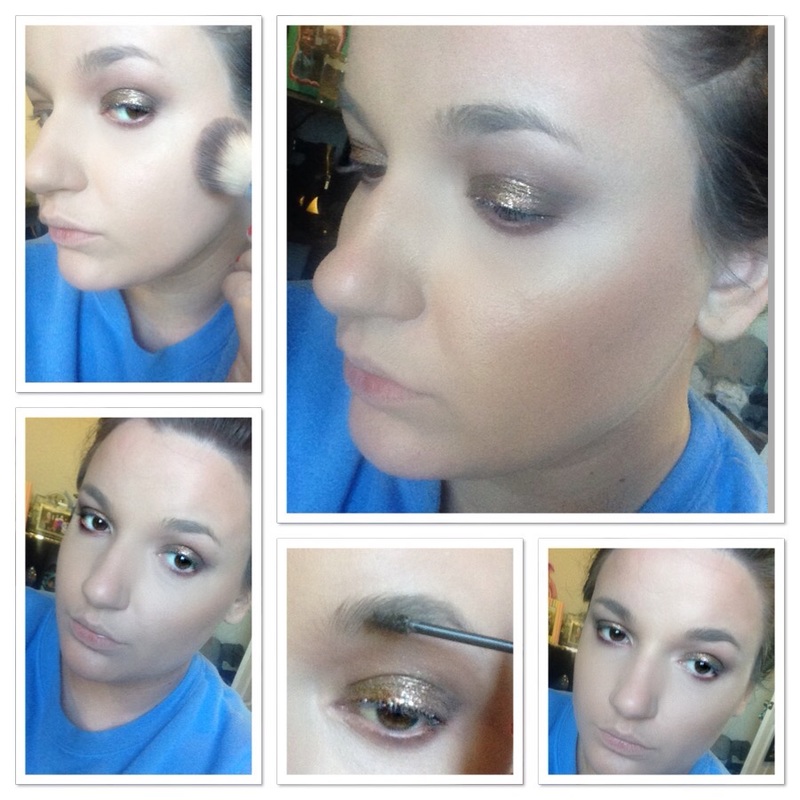 My next tip is use a powder that will both set and highlight. I used Hourglass Ambient Lighting in Diffused Light but MAC pro shade in Emphasize is great too. Of course any light shade will work to set. Highlighting is just an option. Do not use something super shimmery to set though. Next use a bronzer in a shade to where you can use it as contour, bronzer, and blush. So I used Makeup Forever Fusion Bronzer in shade 20M. The big picture is just showing you how subtle and glowy it looks. Next I used a tinted brow gel. I truly do recommend the Benefit Gimme Brow for this. It's got the best color and plus it has fibers in it so that it fills in your brows somewhat while it shapes them. Next if you still need some filling in you can use a brow pencil to touch up any sparse areas. 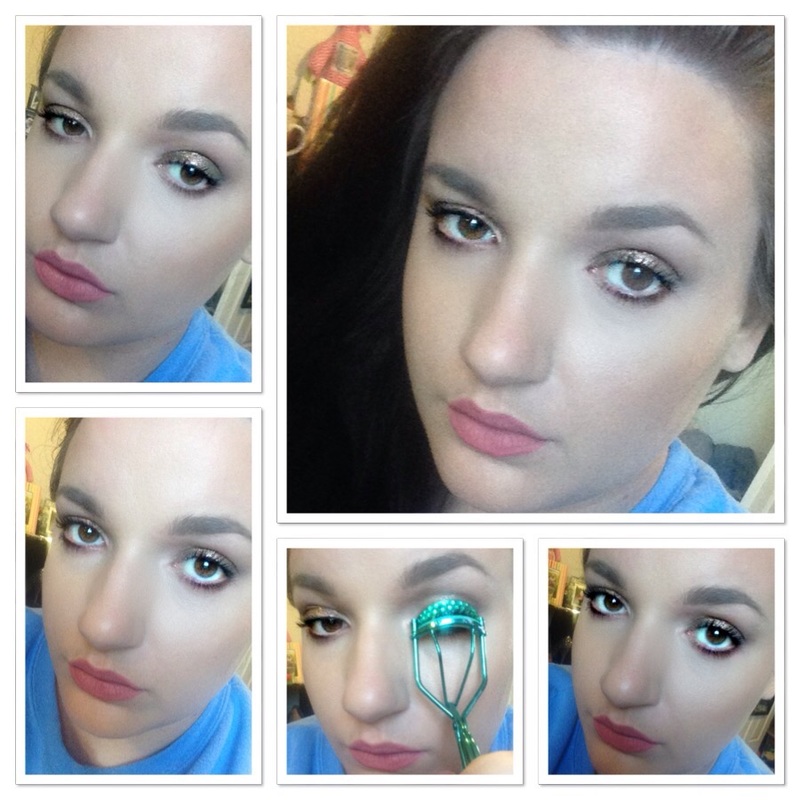 My next tip is to use a liquid lipstick close to your natural lip color because when it wears off after so many hours it won't be as noticeable. Also take it with you for touch ups. I'm using Lovely form ABH in this. One of the last things I do is mascara. I would recommend lashes if you are quick with them. That's the route I go, if you are not then this next tip is to beef up your lashes although I don't recommend doing this all the time cause it's rather harsh. So I curl the lashes first, then apply mascara, wait for the coat to dry and curl them again and re apply. I use Urban Decay Perversion mascara and L'Oreal Carbon Black Voluminous mascara they're very similar to me. I use a mascara that thickens and then one that lengthens last. So I curl the lashes before mascara, after the first coat has dried and after the second coat has dried, then apply the last coat that is supposed to lengthen. "Lengthen" being the operative word. The reason I curl after mascara is because it holds the curl so much better and makes my lashes which are thin and short seem longer. I don't use liner. That's time consuming especially if you want a wing. At best I would tight line or smudge liner on the lash line.
Lastly I use a setting spray. I used Smashbox Primer Water. Which can also be used to prime the face, set the makeup and refresh the makeup. The bigger picture is the finished product. As you can see, it's not barely there makeup it's really only lacking false lashes for me to be completely satisfied. So that's my tips. This is about 5-10 minute makeup depending what steps you take and how long it takes you to do them. Feel free to omit or add to as you see fit. I hope it was somewhat helpful. 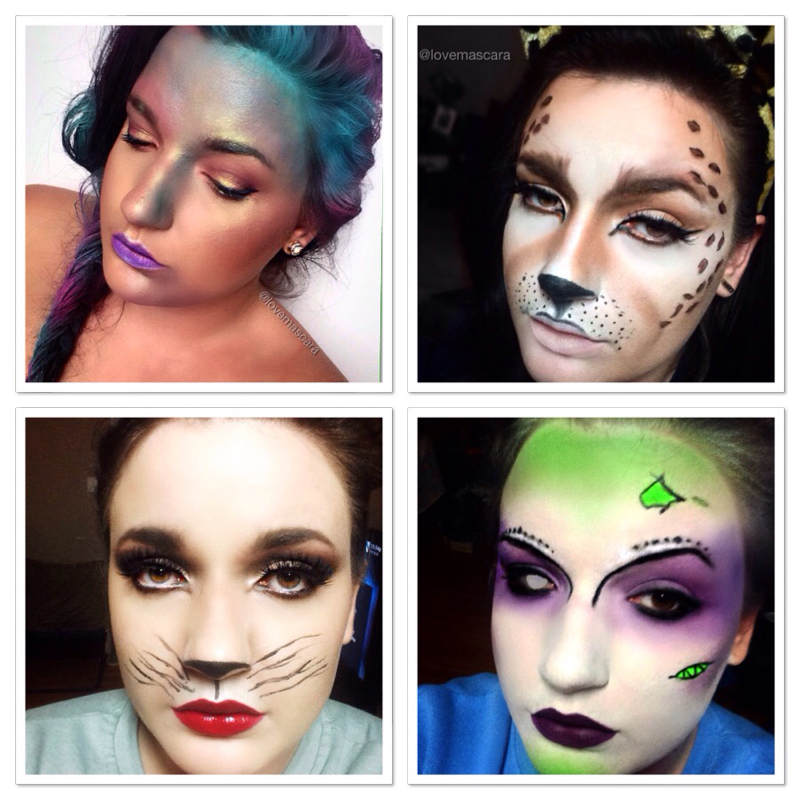 ITS TIME!!! Thursday is the first day of October!!! I was going to wait until October 1st to officially start doing halloween looks butttttttttt as you can see that didn't happen. I'm too excited and honestly it's a good outlet for me, I thoroughly enjoy creating and re-creating looks any time of year. So some of these are inspired by Pinterest and some are looks I just threw together. So top left: Mermaid Barbie. This is actually using a lot of duo-chrome and foiled shadows. I didn't do scales or anything cause I wanted her to be iridescent and majestic. I used colored hair spray. I sprayed the braid first with white spray and then went in with pink and blues. It was actually really easy just pile on the blues, greens and purples.....lots of highlight. Top Right: Leopard/Cheetah Cat This was a little more difficult. More detailing there are alot of different variations of this online to look at. Basically lots of contour colors, browns, and liner. White paint was laid down first on the face before anything else. Bottom Left: Cute Kitty This was actually on Pinterest. I loved it super simple and great if you want to be a cute little cat for a party. Red lips was a fun turn to it as well. Liner for detailing and whiskers. Fluffy lashes and a really heavy brown smoky eye. Bottom Right: Beetle Juice inspired. This was a look I found on pinterest although that one was far better. It's from an artist Alana Dawn on Instagram. It was an amazing feminine Beetle Juice look. Requires lots of white paint, purple shadows, neon green, a dark lip and liner for detailing. 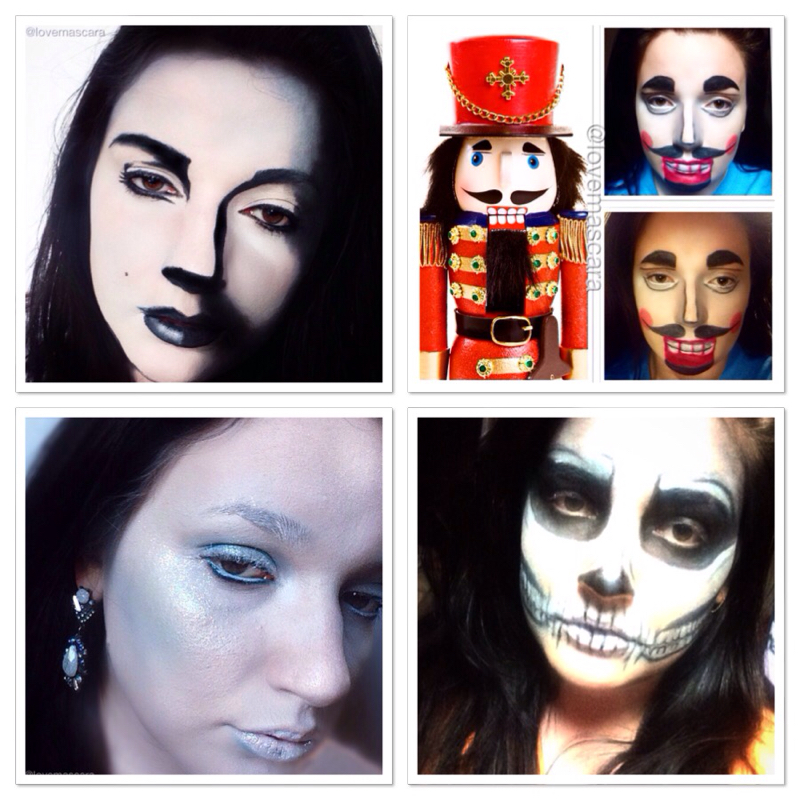 Top left: Drawing/Sketch This was something I seen on Pinterest. The had done Marilyn Monroe. I obviously don't look like Marilyn Monroe. This is lots of white paint and black shadow and gel liner. It's pretty easy. You just look at a picture and where the dark areas are like shadows, or whatever on the picture you just shade your face in that area as well. If that makes sense. Top Right: Nutcracker This was something really cool. I don't know why I wanted to do a Nutcracker look but I liked how it turned out. It's a lot of strategic and symmetric detailing. It has to be very neatly done so that makes it difficult somewhat, however if your comfy with that then it's easy and fast. Bottom Left: Ice Queen You always see a lot of Ice Queens or Frozen queens. Nicole Guerriro done one a while back that was beautiful. I wanted mine to be completely frozen. Everything about her just cold and statuesque. I added glitter to this one for extra and sparkle like ice statues. Pale blue shadow as contour or blush, which ever. Bottom Right: Skull You see a lot of skulls around this time. Skulls are hard in my opinion. It's a lot of detailing and time consuming. This was inspired by a male artist who does insane SFX makeup. I don't remember his name but it was amazing. 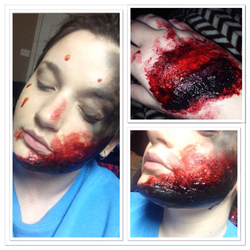 For gory looks I use Ben Nye Thick Blood and tissue paper for texture. I also add in some black paint or shadow before hand if I want it to look charred or burnt. Pink if I want it to look fresh and I also use liquid blood from Walmart if I want it to be runny. These are actually really easy to do but messy. So if you want to just be something scary and gory get some Thick Blood or Fresh Scab and you can have a look in no time. I'll be coming up with some looks for you to do. Like deers, scare crow, so on so forth. I'm so excited. Get ready for Halloween overload.
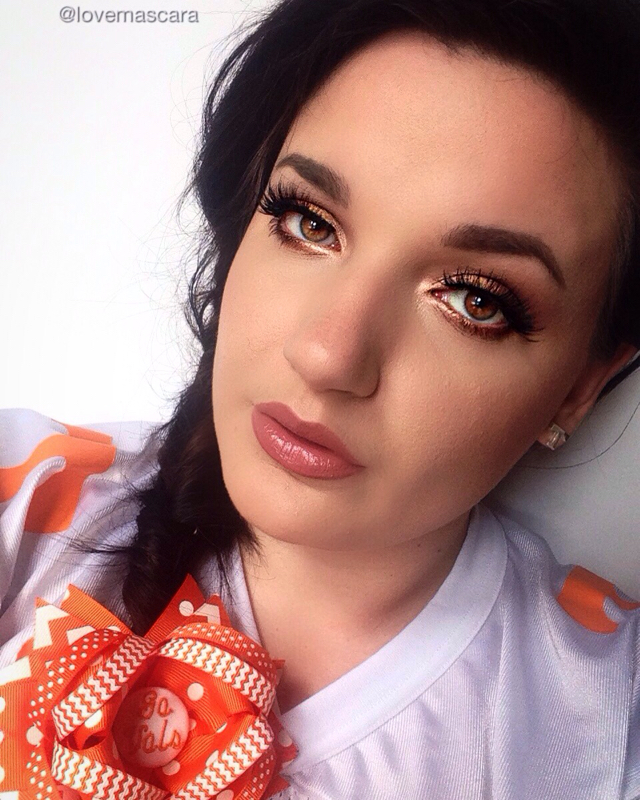 I'm from Tennessee and I'm a fan of the Tennessee Volunteers in the SEC. So this past Saturday was our first home game and a good one. We unfortunately lost in over time but I'm proud none the less. So as you can see I get pretty decked out for game day. Tennessee everything from shoes, to jewelry, hair bows and jerseys. Since we're the Big Orange my eyeshadow was a bronzey orange. Which also turns out to be a really pretty fall look in general. This braid is one that I learned from Sam Villa videos. Very easy. 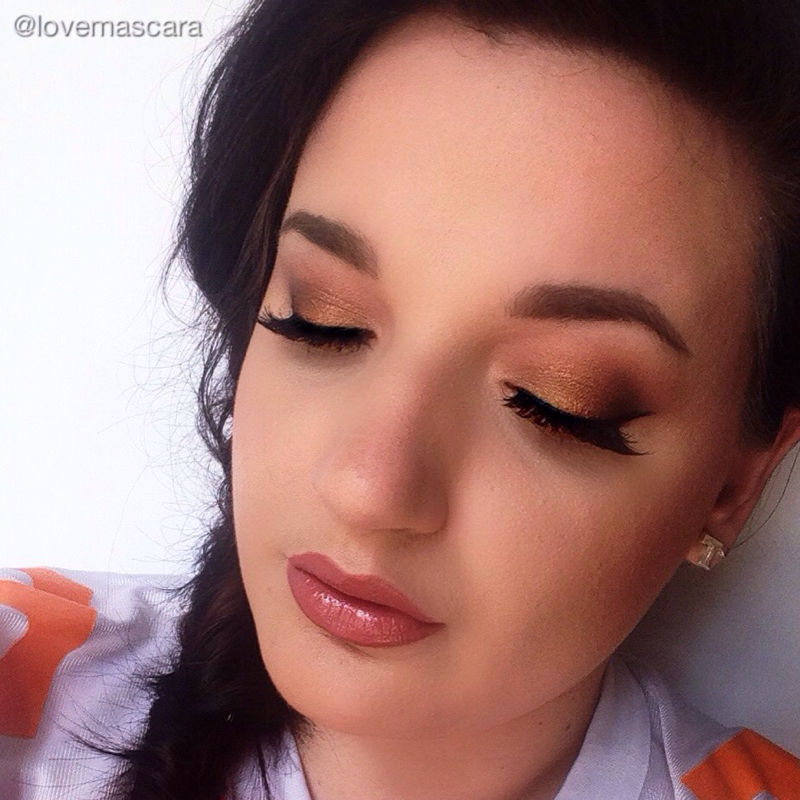 On the eyes I'm wearing:
Lips are:
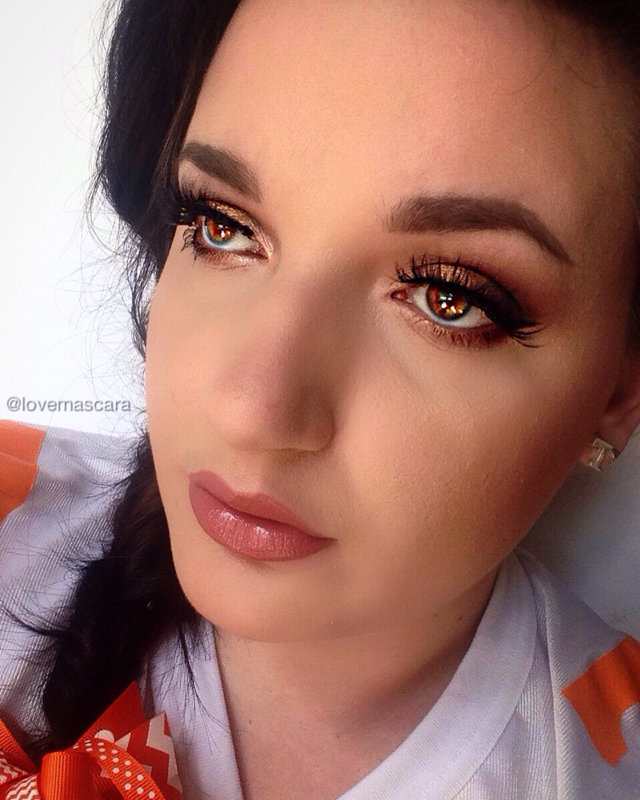 Hair Bow and earrings are from Etsy.
GO VOLS!! 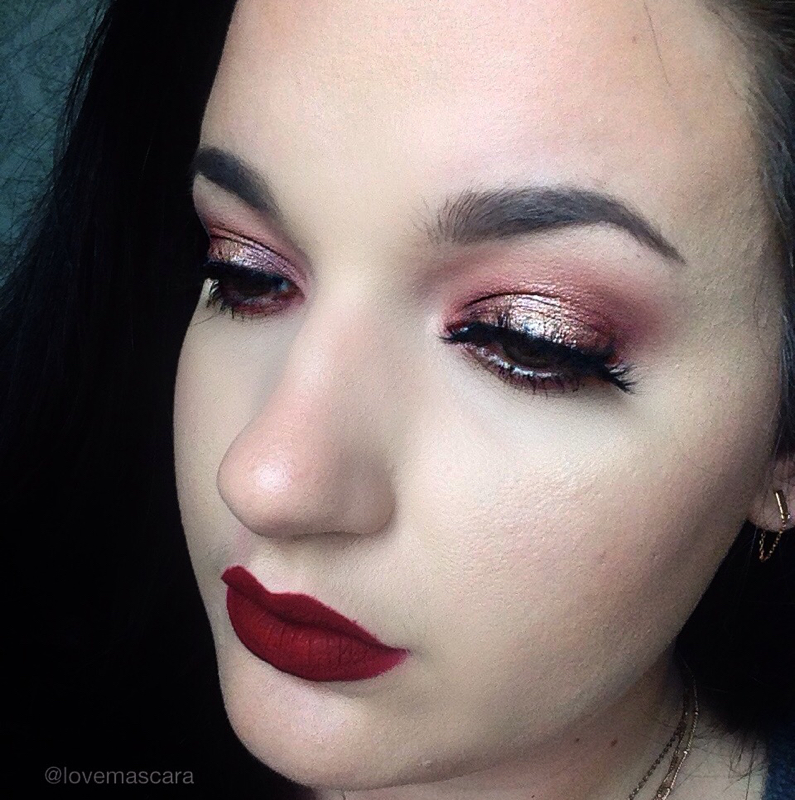 This is going to be a step by step of how I do my "halo" eye looks. Also, I incorporated gold into the look because gold is the color for Children's Cancer Awareness and September is Children's Cancer Awareness Month. This hits home for me, I had a member of my family beat liver cancer at the age of 2, I believe. So to show my support in a makeup type way, I thought I'd sport a gold look. I will also say that this was brought to my attention and inspired by Manny MUA. His video for it is right here. If you want to learn more about Children's Cancer Awareness then check out Cancer Free Kids for ways that you can help raise awareness. 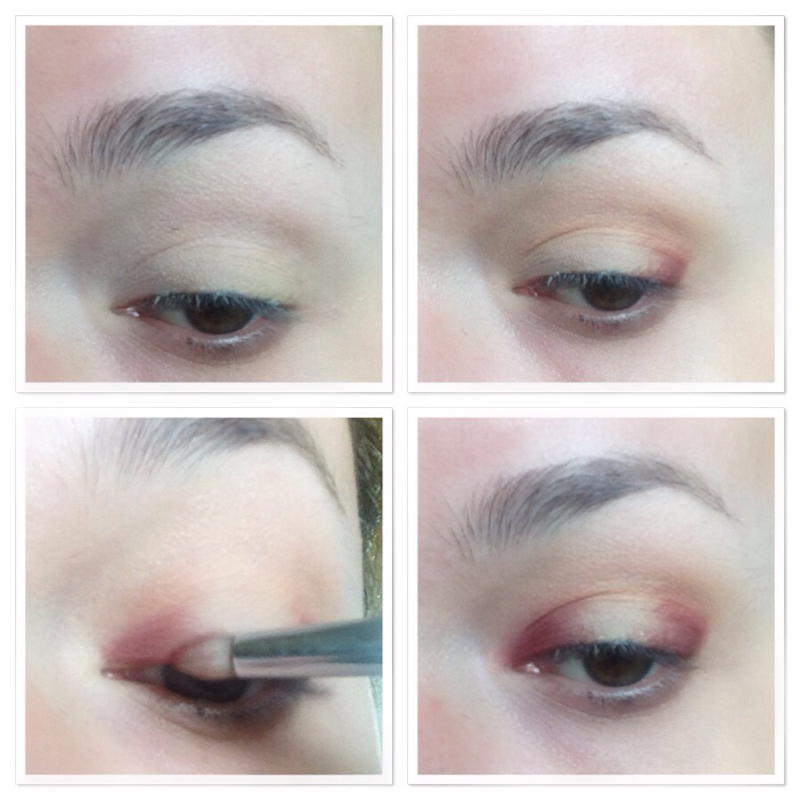 To start out my "halo" I lay down my primer, and then apply a shade of eye shadow that is closest to my skin tone so that my colors go on and blend smoother. I then put Peach Smoothie from Makeup Geek in the crease as a peach transition color. It's very pale you can barely see it. It just warms it up the crease. Next I use a pencil brush to apply a cranberry color. This one is Bitten from Makeup Geek. I apply it on the lid first from lashes then up slightly in the crease. Then I apply it on the inner corner of the lid. Trying my best to leave the middle open. 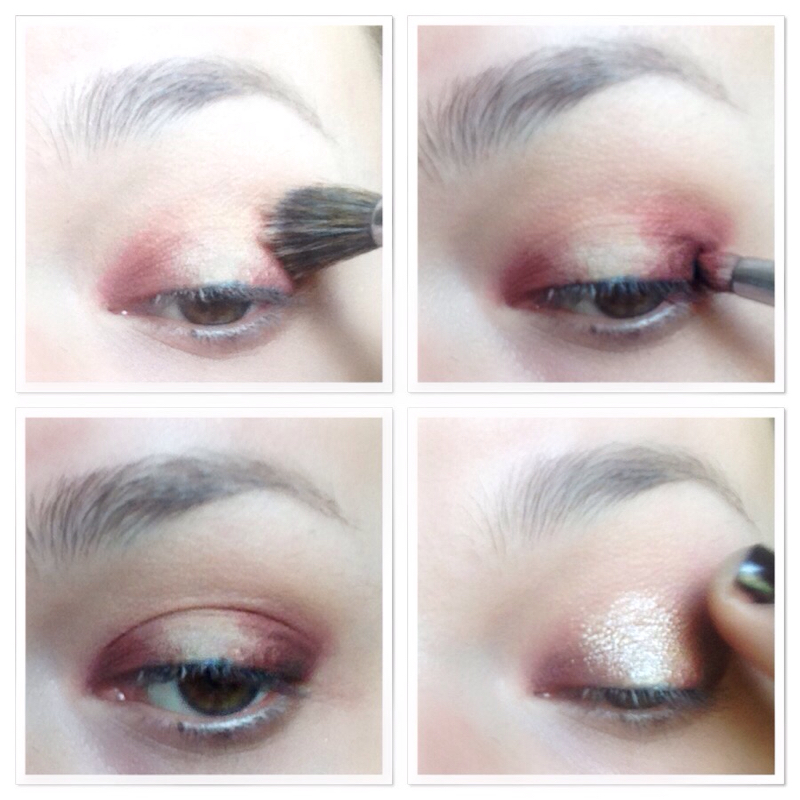 Then I take a large blending brush and blend over everything. From there, I take a darker shade, which was Deep Plum by ABH, and apply that the same way with the pencil brush. I stay closer to the lash line and don't bring it up as far as that first color. Next, I apply my middle or bright shade with my finger. I do this no matter what color it is. I don't know why I just feel like with halo looks using your finger to apply your middle shade is the best way. I used In the Spotlight from Makeup Geek first and then I put Tan pigment from MAC over top with a brush. 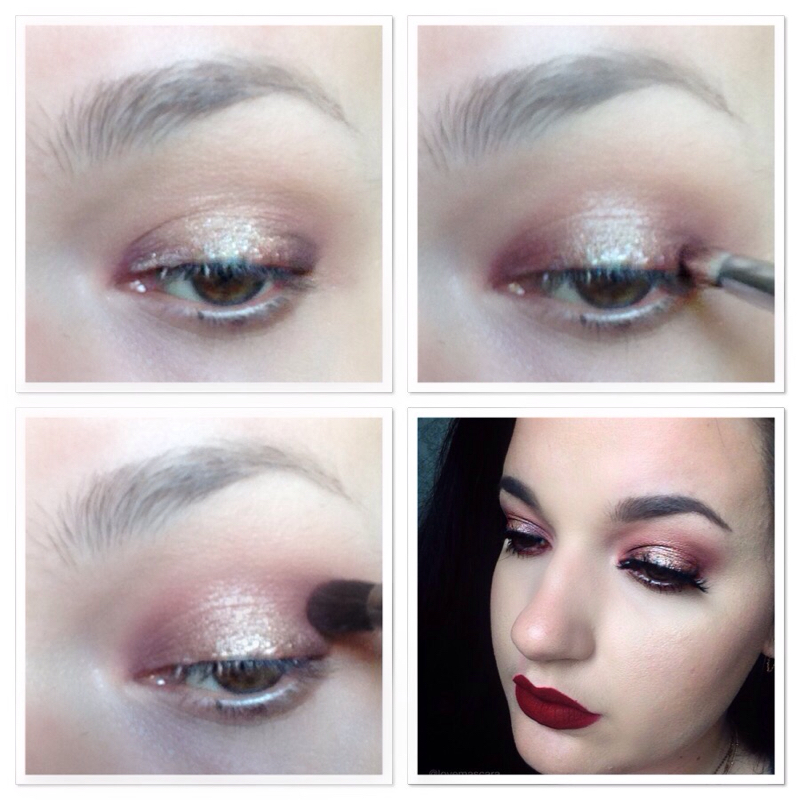 From here I blend again. Which is key with these looks, you have to constantly blend. Then I touch up the corners again so that I don't lose the intensity of the darker colors. I usually go back and add more to the center and to the corners several times until I'm satisfied.
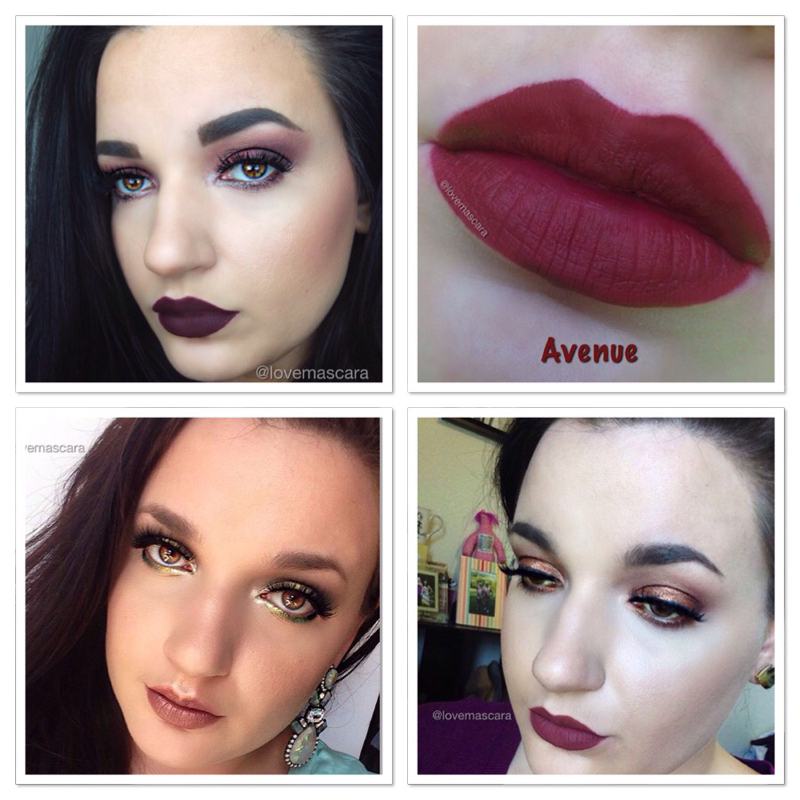
Lastly I take a denser, smaller, blending brush and that cranberry shade again and work it into the crease. I want it to be a softer color and not so intense in the crease unlike the lid where I want the most pigment to be. Then I just apply the red shade on the entire lower lash line with a pencil brush or any other small brush would do. I add lashes, I don't do liner but you can if you want. I feel like liner is for more dramatic and structured looks and this one is a little more messy and blown out. So I would just put on a pair of fluffy lashes and be done with it. These lashes are Lilly Lashes in Mykonos. Any lash will do though. The lips are Colour Pop Cosmetics "Avenue" if you're wondering. 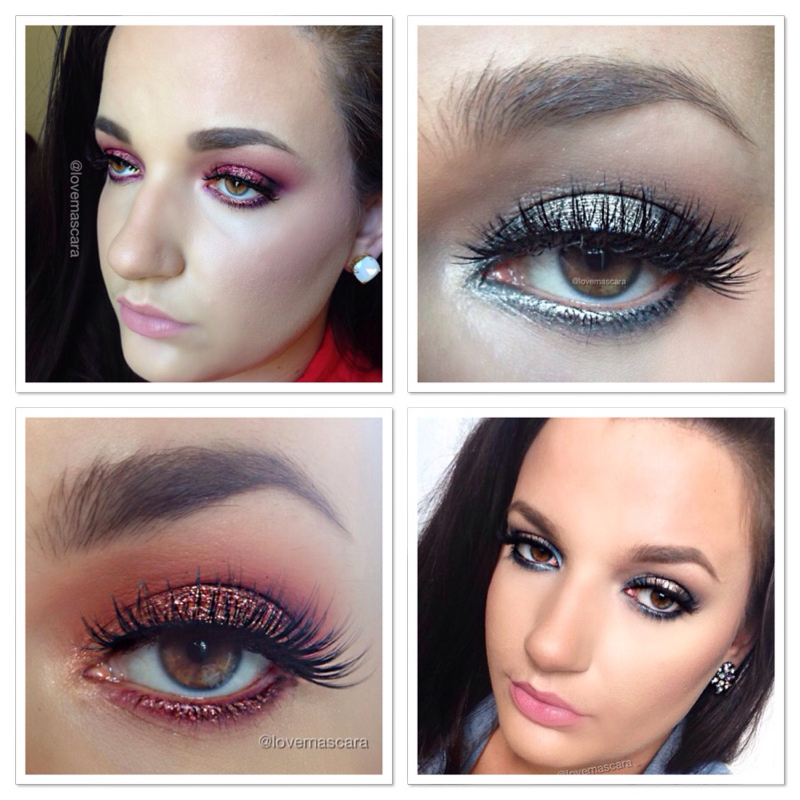 Yea I know it's not technically fall, but in my world Sept 1st means it's fall. So when you think of fall you think of plums, warm browns, berry lips, golden tones, etc etc. While I love ALL those colors, I wanted to give you some ideas for fall that are still very much fall but not so typical.
 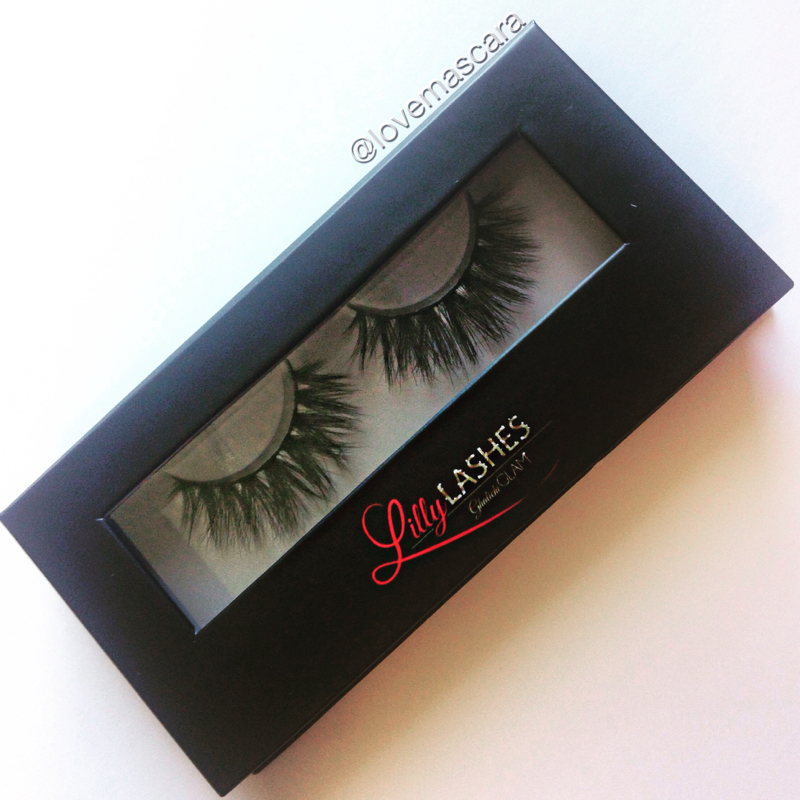 As you know, I love a good pair of lashes. My obsession started with Red Cherry 213's which I still love and grew to all different kinds. I have quite a collection now. I'm always down to try new companies and especially if they offer 3D which is just a layered lash. Which a lot of companies have been offering for years but no one thought to call it 3D. Anywho, I recently purchased some Lilly Lashes. The style is Mykonos. Its a popular style, thanks to Jaclyn Hill. I of course love this certain style as they remind me so much of the Nubounsom Bella lashes that I LOVE. 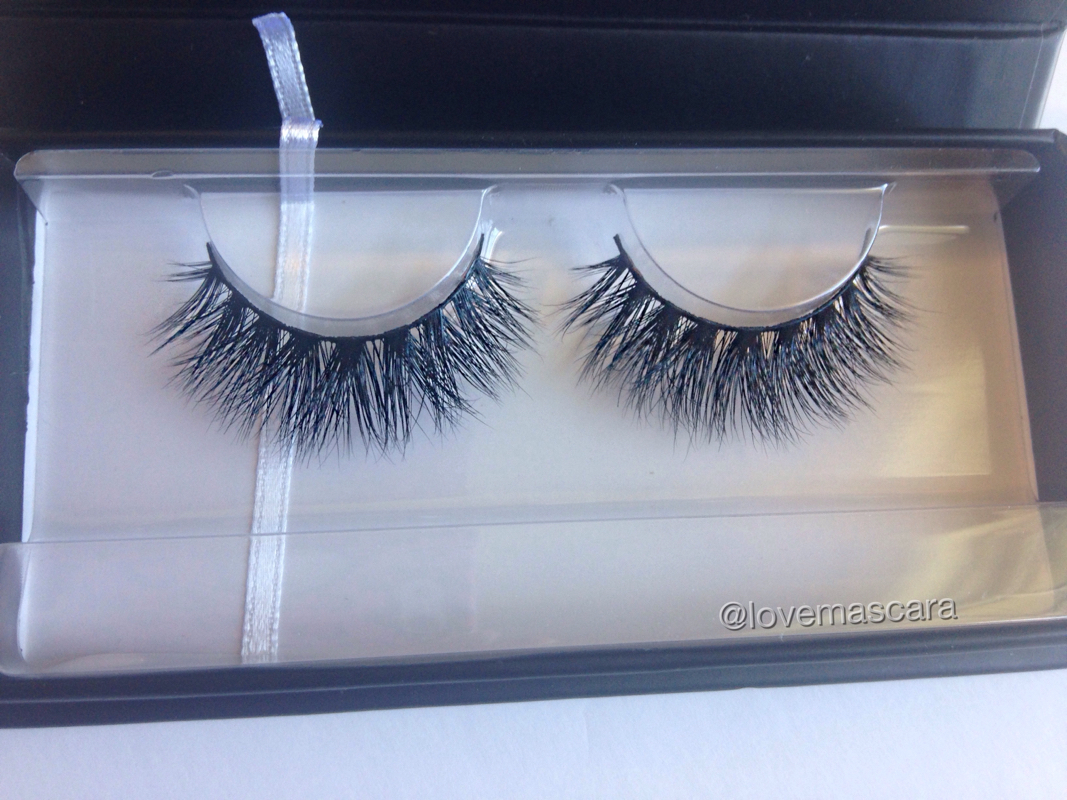 These are gorgeous, simply put. My only complaint is that the right side seems to differ from the left. The lashes are supposed to be shorter on the inner part of the eye, and on the right eye that just isn't the case. They're still totally wearable and it could totally just be me, because looking at the picture they seem right. I swear though I have a hard time figuring out which is which when I put them on. None the less, they are gorgeous. I like the Nubounsom Bella just a little better because they're so full but these are a little more wearable than the Bella ones. You can see the eye look and they aren't the main focus which is really nice. They aren't crazy long either which is also nice. I find them very comfortable, with a band that is similar to Lena Lashes band as far as thickness. They are $30 I believe, and I'm sorry I couldn't find a coupon code for them. 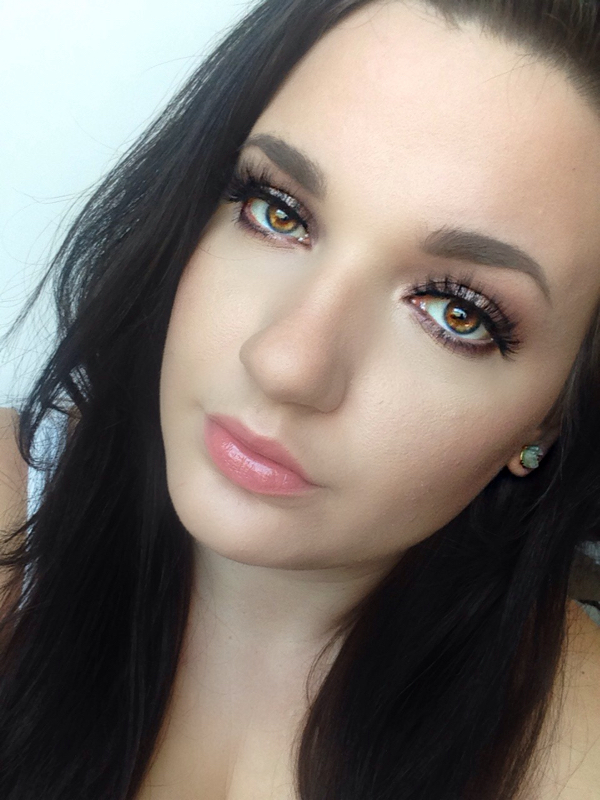 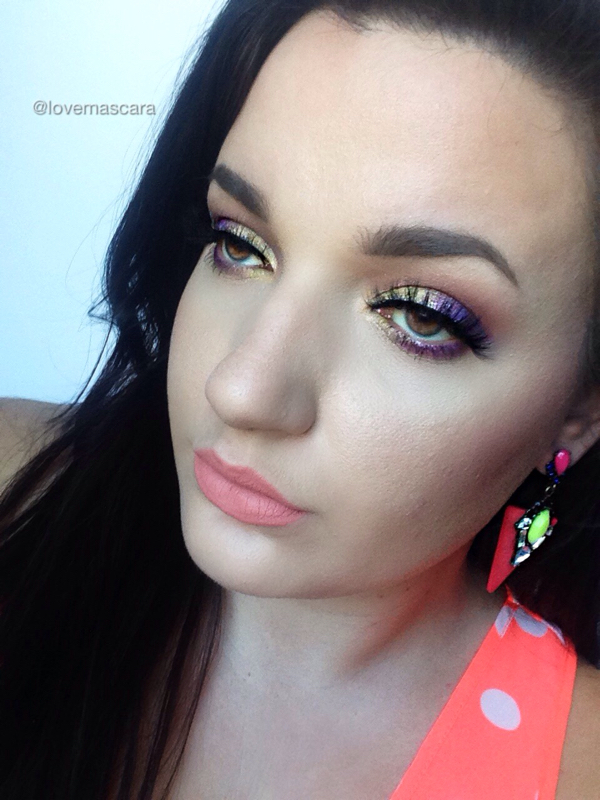 I'm wearing them in both looks above, with no liner. As you can see they do well with colorful looks and neutral looks.
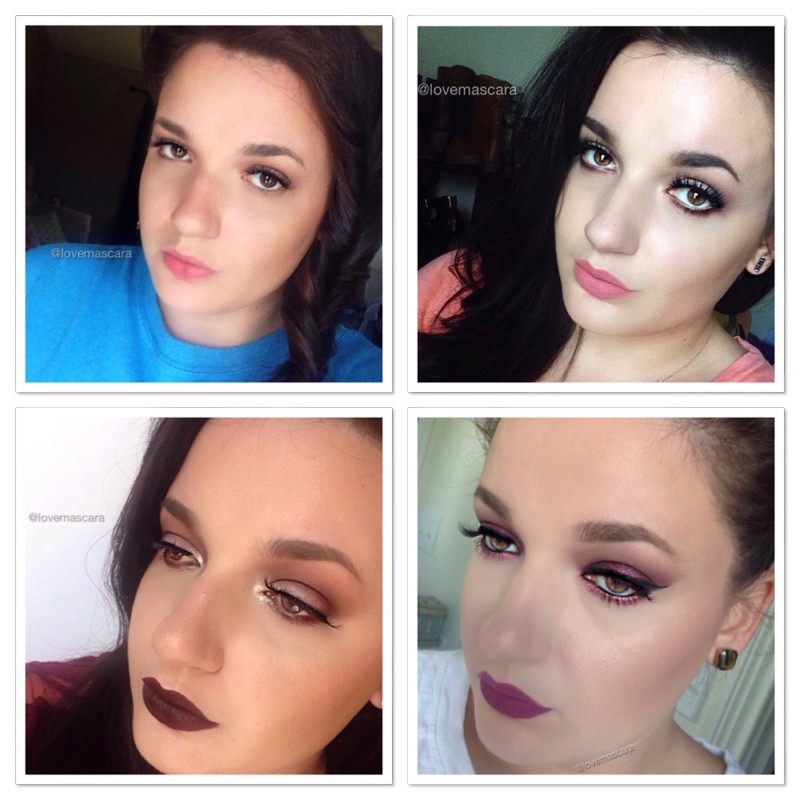 There is all kinds of beauty out there. Some people like simple, and naturally enhanced beauty. Some people like a little more, and some people like the whole 9 yards lashes, bright lips, color, winged liner, everything. There is absolutely nothing wrong with any of that. It all depends on how you feel, whatever makes you feel good is what you should do. AND FORGET THE REST. Forget what people say, don't take their input if you don't want it. You do exactly what makes you feel beautiful and the rest of the world will stop and stare. So these looks can be work, school, or whatever appropriate. 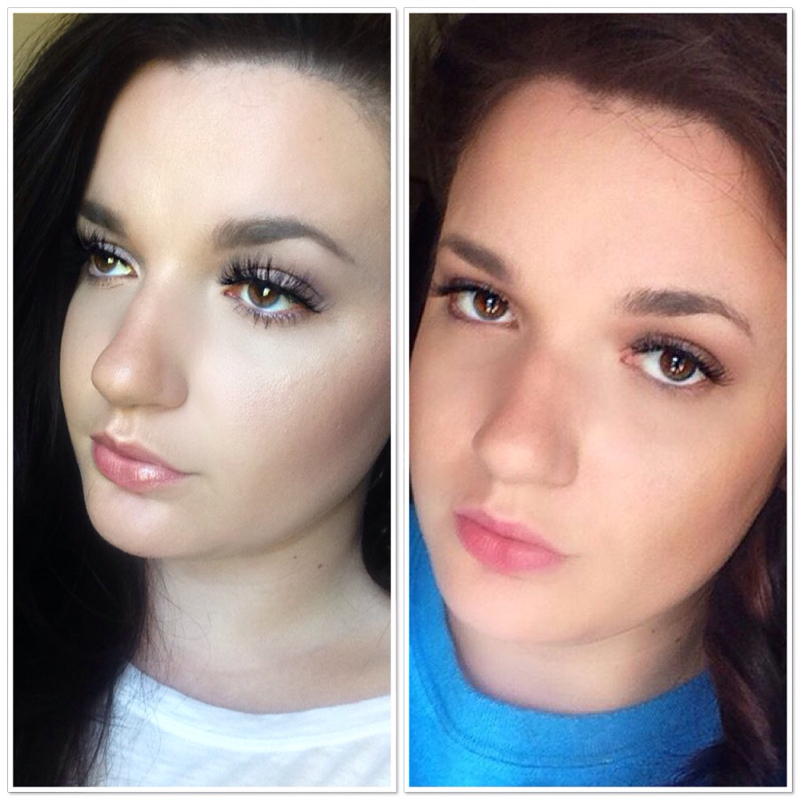 First up, is for my natural babes. I'm wearing lashes but you don't have to. The keys to natural makeup, or natural looking makeup is:
So starting with the first point, playing up your features, focus on that. If you have great lips, make that your focus. Wear bright lipstick, or just lipstick in general. Super shiny gloss and a highlighted cupids bow also emphasize lips. If you have great skin, find a blush that gives you a glow. Subtle colors of peach and pink with soft sheens to them are great choices. Highlight the skin with eyshadow or powder highlighter. Highlighter brings light to the face which catches the eye. Speaking of eyes, if you have a great shape or beautiful colored eyes find a shade that compliments it. For eye shapes focus on your crease to contour the eye socket more. Another great tip that's fast and easy is cream shadow. Just make sure to wear eye primer. Laura Mercier Caviar Sticks are wonderful and so are Maybelline Color Tattoo. This will give you a solid metallic color across the entire lid. Blend it will your finger or a brush and it's a simple fix. If you've got great lashes, pile on the mascara. Wear a ton, wipe off 80% of the product on the brush and just build from there. Looks that I feel best in, like really really sexy, is when I'm wearing lashes and gloss like the picture above on the left. Its simple, looks natural, and it's not hard. Skin care is your foundation. Find something that works for you. If you're oily, get products to help combat that and invest in primer. If you have texture issues make sure your exfoliating and choose a smoothing primer. If you're dry make sure you are moisturizing with the heaviest hydrating moisturizers and products you can use. Including sprays like Fix Plus from MAC to keep those dry patches at bay. For problem skin, do whatever your dermatologist suggests first but I really like the Murad Acne Line if you want to try something. Invest in good concealers and foundations that cover. The Dermablend Smooth Liquid Camo is breathable but really nice. Revlon Colorstay is also good with coverage. Cream concealers will hide blemishes better that liquid concealers. As for brows, they frame your face. Just drill that in your head. If you don't want to do anything else at least make sure your brows are shaped, meaning tweezed or something so they have a shape and don't have sparse hairs every which way, and if they're very sparse try filling them in to "sculpt" them slightly. This can be as light or heavy as you want. So Benefit Gimme Brow is a really great low maintenance tool. It fills in and builds up the brow with fibers. While also taming the the brow and keeping it in place. Brow powder or even eye shadow applied with a slanted brush will fill in and define a brow just fine. Neutral tones like taupes and cool toned browns work better on most unless you're red headed or very warm brown. If you want a natural, minimal, look I wouldn't go past powder. I wouldn't mess with pomades and brow pens I would stick to powder and brow gel.  This is some intermediate looks. They require a little more work. Or at the very least have more color. So this is where I would start using lip color. Like mauves, burgundys, berry colors something that is neutral but that you can see. The eyes are definitely smokier with not your normal browns. More berry, purples, and inner corner shimmer and such. Notice the lower lash lines are really smoked out. I choose eyeshadow over liner any day on the lower lash line because crayon liners melt so easy. Powder stays better. These blown out smokey eyes require more time because your have to layer colors to give them more depth so you have to spend a lot of time blending. So just keep that in mind. Start with a lighter shade on a bigger brush and then work your way into darker colors applied with smaller brushes and blended out with that bigger brush again. Blending is key and it does take practice. You don't have to wear lashes for this either, but I always do. You can sculpt the brow a little more if you want with these looks too. Venturing into brow pens, pencils, and pomades. Not entirely necessary though. 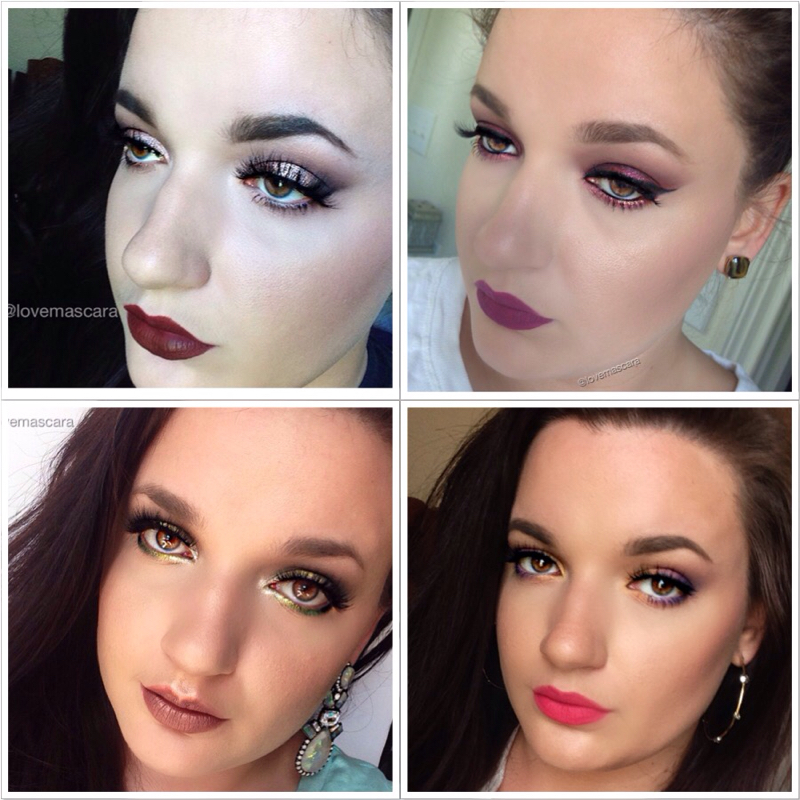 These looks are more advanced. So winged liner, brighter and darker lips. Colorful shadow. Lashes of course. Dramatic, sharp lined shadow. Just a lot of different options. I love color as you know and I feel like there is always a way to wear it without looking like a clown. It's all about blending. For lip color, start with a neutral toned eye look and a colored lip. That way you don't have so much to focus on or like you're trying to hard. Even in the bottom right picture I have a colorful eye and a pink lip. It goes well together because it's a more muted pink and the colors on the eye stay on the lid and lower lash line they aren't super dramatic or too high in the crease.
The brows are more sculpted and not on the natural side. There's a lot of highlighting going on too, cupids bow, inner corner of the eye, heavy highlight on the cheek, and so on. Winged liner that is both very dramatic and in the bottom right it's a very small wing. As for eye shadow, some colors are actually really easy and complimentary like, earthy greens, plums, cranberry, navy, and even baby pink and soft corals. You can pair those with neutral eye shadows like browns and peaches and have an awesome "pop of color " which makes it the focus. If you want to do a colorful eye then start with a more nude lip and then go from there. So that's my tips. Practice, practice, practice. Remember what ever you feel comfortable with is what you should do. As long as you feel beautiful, that's all that matters. Promise. 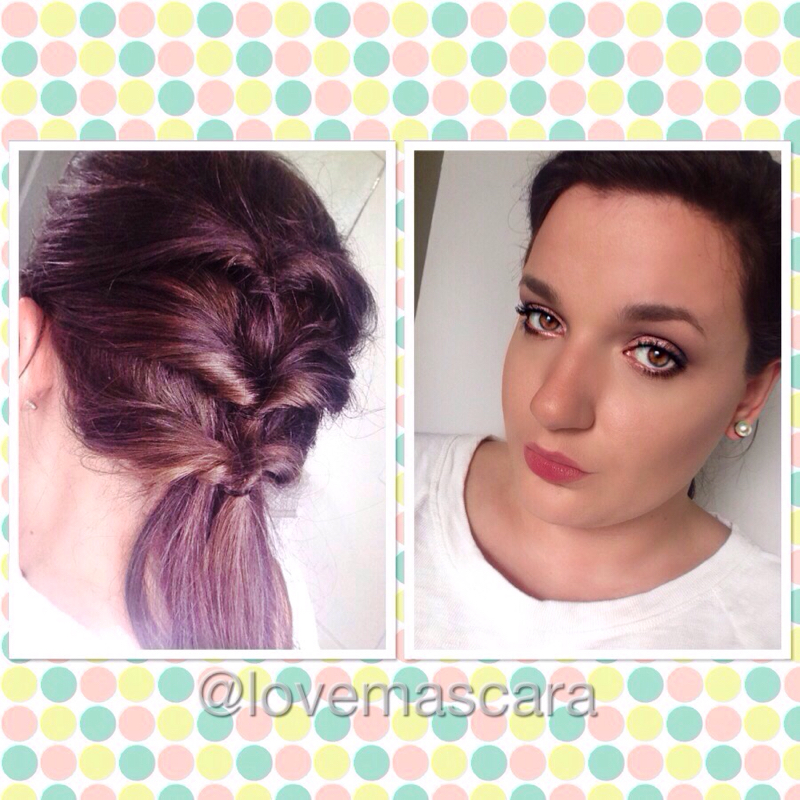 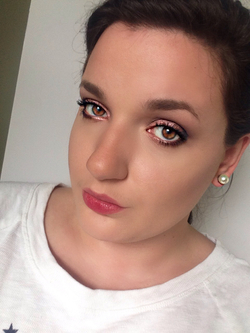 It's that time of year again.....time for school supplies, getting up early, seeing your friends again and looking like a real live person 5 days a week. So I'm bringing you an easy makeup routine and hair that will let you sleep in a few minutes longer. This is all about products that will multi task, last and work fast. (hey that rhymed) So for this look I used Smashbox #shapematters palette for the face and eyes. You could also use it for brows but I used Benefit Gimme Brow Voluminizing Brow Gel. It's just quicker. For lips I used Sephora Collection Rouge Infusion in Peony which is #19 I think. So with the eyes I kept it kinda neutral but with some color. It's a shimmery mauve pink and a deep eggplant color on the outer corner. Blended with a peachy color in the crease. No liner. Tons of mascara. Brows I just swept Gimme Brow through, I made them kinda feathery though. I wanted a more natural unkempt look. For the face I used the contour powder for contour, bronzer for blush and glow for the highlight. I set my under eye area with the highlight (matte yellow) shade from the palette. My foundation is MUFE Ultra HD foundation. Your foundation, or bb cream will work just fine. Lips are a liquid lipstick that is actually more sheer and stays shinier. So it doesn't have the staying power of a matte liquid lipstick but it does stay on very well. The color is like a more intense color of my own lips which looks really nice. So this look is clean, fresh and a little smokey. For the hair I found this on Pinterest. I do recommend using clear elastics or really really thin elastics for it. It was really easy and something different to try. It took me about 3 minutes, if that.
So there ya go. If you have a setting spray then I recommend using it but if you don't want to that's fine too. Always have a sponge, brush or pouf in your bag to buff out any creases or dab away any shine. 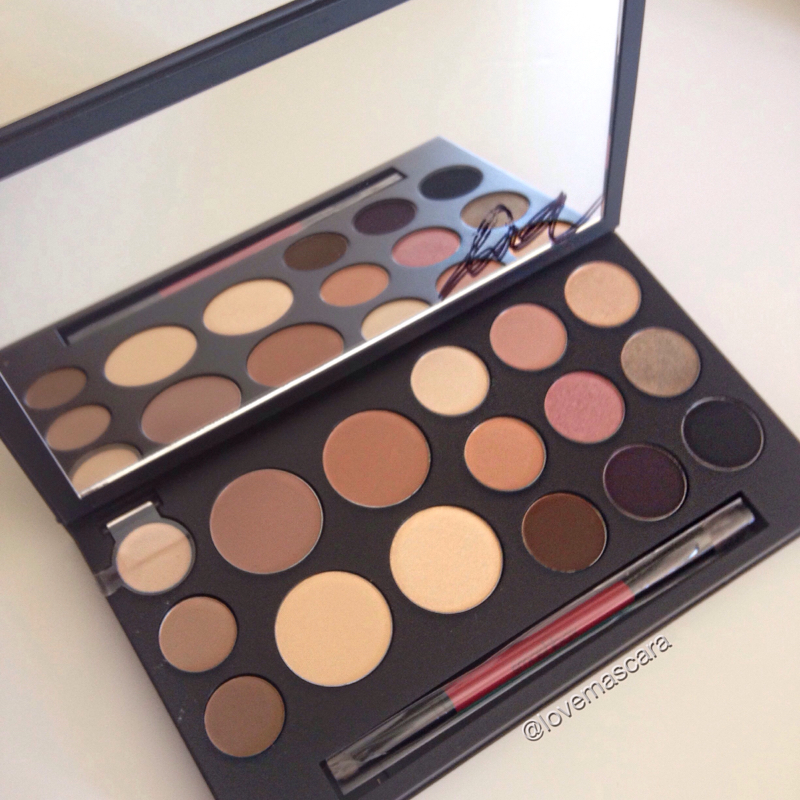 This bad boy is the #shapematters palette from Smashbox. It's a 3 palettes in one palette. It's incredibly convenient. I got this in my Epic Rewards gift from Sephora. I was afraid some of it wouldn't be the best quality like some palettes can be. You usually get one thing or a few that aren't as good quality. I can truly say from packaging to product they hit it out of the park,. It's amazing quality from the shadows to the contour to the brows. It's sturdy packaging with a huge mirror and double ended brush. I'm very VERY impressed with this. It comes with a "lookbook insert" for face, eyes, and brows, that you literally just scan over your phone and it shows you a video. It's a very revolutionary concept although I haven't tried the cards yet. This goes for $65 at Sephora. It comes with: 9 best selling shadows (3 shimmers and 6 mattes) Contour, Bronze, Highlight and Shimmery Highlight Brow Wax 2 Brow Powders in Taupe and Soft Brown  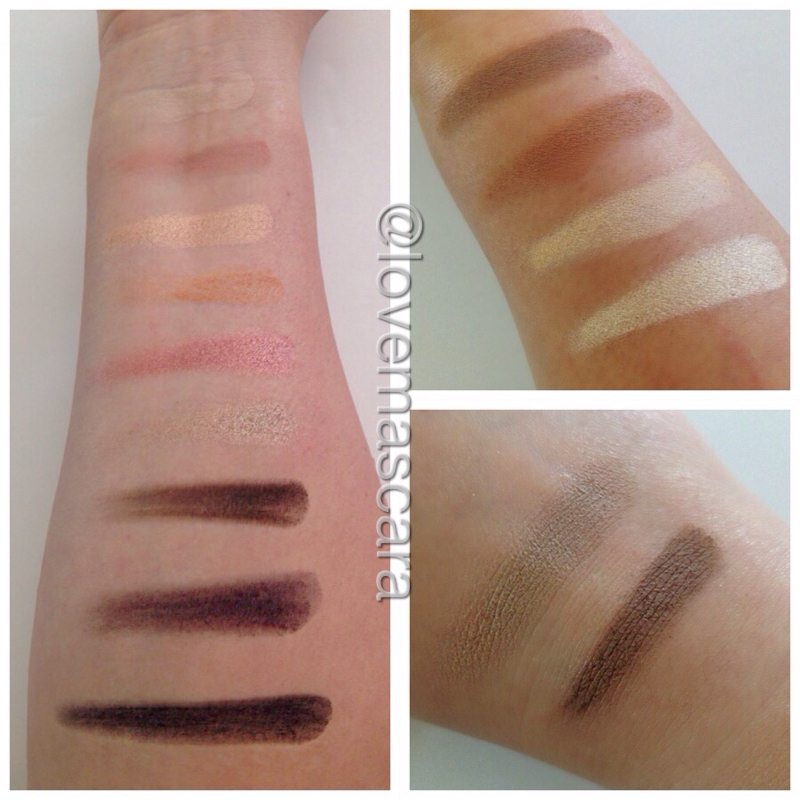 Left side is all the eye shadows. Swatches from Top to Bottom are:
Top Right is the "face" section. Top to bottom is:
Bottom Right is the brow section. left is Taupe and right is Soft Brown The brow wax is clear so it can't be swatched. I use it with an angled brush. I do prefer brow gel as opposed to clear wax. It works just fine though. <a href="http://www.bloglovin.com/blog/13981591/?claim=s75xcy49khq">Follow my blog with Bloglovin</a> This will definitely be going with me if I'm having to travel anywhere or touch up makeup possibly. It's big and kinda bulky but it has everything you need. I personally prefer that than having a ton of small compacts or brow pencils that can get lost in makeup bags or whatever. It's just convenient and it's great quality as well, so even though you'd have to stay on the neutral side that would be fine because it's still gorgeous and fantastic formulas.
|
ErinI'm from Tennessee. I'm a makeup and skincare lover. I have always enjoyed creating looks but I love to help people with product knowledge and application even more. I've been able to start blogging and do these things I love because God has seen fit to bless me with the opportunity. Thanks for stopping by and visiting with me! 

 
Categories
All
Archives
January 2022
|
 RSS Feed