|
I've been talking to some mom's and just busy ladies in general, and the one thing they tell me is "I need some tricks to save me time while doing my makeup but still look like I have makeup on". So I thought on that for while, makeup is like therapy for me I get lost in it and I love to have plenty of time to do it. However, there are those times when I am on a set time frame and we've all woke up late before so here's my best tips and tricks to save you time while still looking "put together". 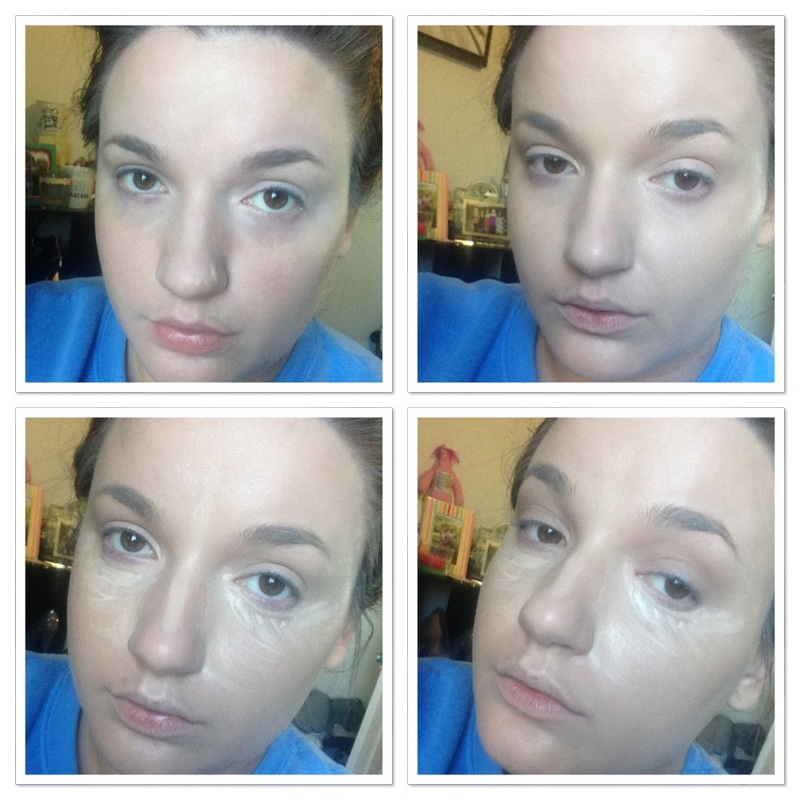 Starting with a fresh face, the first tip I can give you is: Use a BB Cream or CC cream, one that has a tint is good. For this I used Dr Jart+ Black Label Detox BB Cream and added some Cover FX custom cover drops for pigment. A really good one is the IT Cosmetics CC Cream however, the shade range isn't great. Also the Smashbox BB Cream is a cult favorite. Mainly why this is a tip is because its: primer, moisturizer, concealer and coverage all in one. So even though I do recommend using a real moisturizer and primer as much as you can, in a pinch this would work fine. The one thing it won't do very well is correct dark circles, so I do cancel those out no matter what. I use NYX Dark Circle corrector in Medium. It also won't give you the fullest coverage. Which is why most people use a foundation over a BB Cream. I added Custom Cover Drops for not only color but added coverage as well. Next is highlighting/brightening/concealing under eye area and high planes of the face. So I used the Maybelline Lumi Pen. The Urban Decay Naked Skin concealer is even better, MAC Pro Longwear concealer is a good choice and can also be used as eye shadow primer. What I do is I highlight with this pen and I let it set while I do my shadow. Accomplishing several things: 1) using the "baking" technique for fuller coverage and more prominent highlight the longer is sits 2) making it easy to clean up any fall out from your eyeshadow and 3) giving more coverage over all to the face in the areas it was applied. 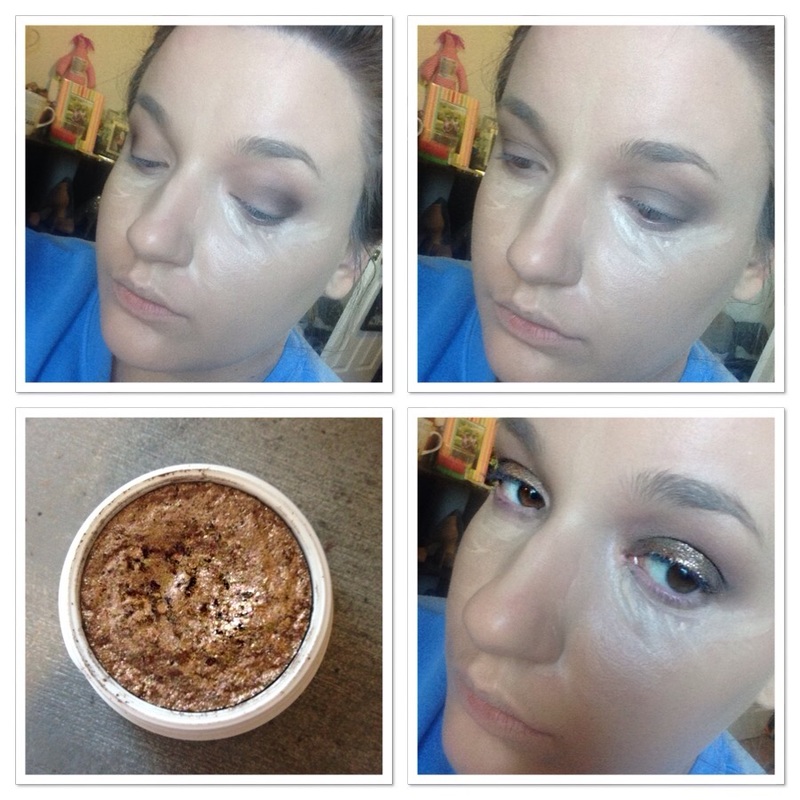 Ok so scooting right on over to shadow this is one of those times when you really need a product that makes a statement on it's own. So first apply a crease color after you put on primer, I chose Noble from Mi Vida Loca Remix palette but Peach Smoothie from MUG would work fine or Beaches and Cream. Then I went in with a darker brown with a smaller brush on the outer lid and blended it with the same fluffy brush I used for my crease. Next I used Colour Pop "Nillionaire" shadow. Which is a glittery golden brown shadow. I apply it with my finger it's intensely pigmented and I apply it all over the lid. It doesn't usually require any blending so you're pretty much good to go. 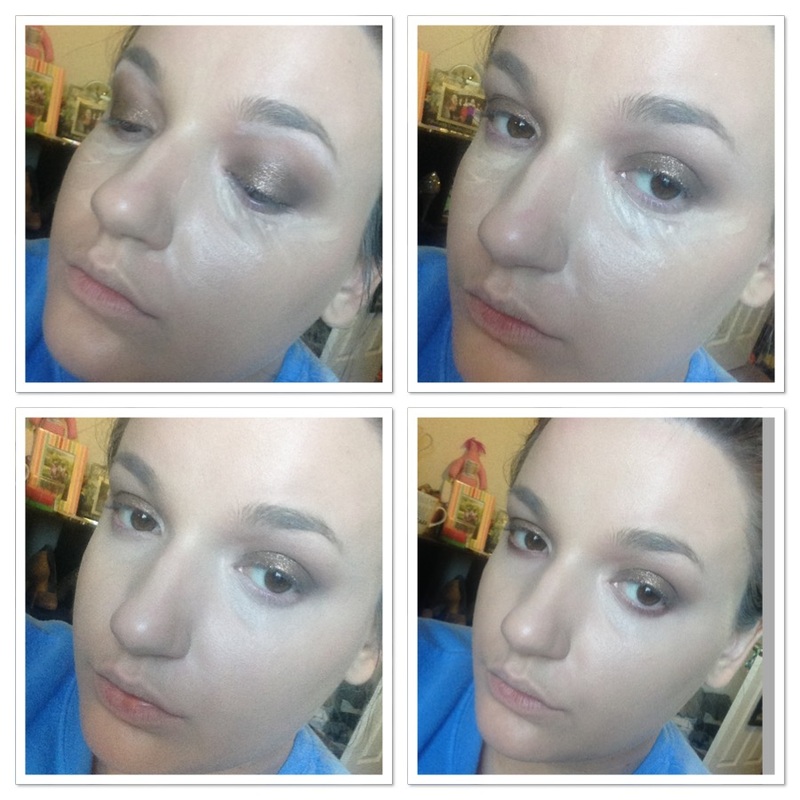 So here is a step that you can do or not. It doesn't make or break the look. So what I do is I take a pencil, in this I used the Benefit Eye Bright pencil, to highlight the underneath of the brow and then I just blend it out. On the lower lash line I use a brown eyeliner and smudge it. Now if you apply it too heavily it will melt so you can use a brown shadow just the same. After that I blend out the concealer with my ring finger you could use a brush if you wish or a beauty blender but I use my finger to save time and to pat the concealer in to get the most coverage. 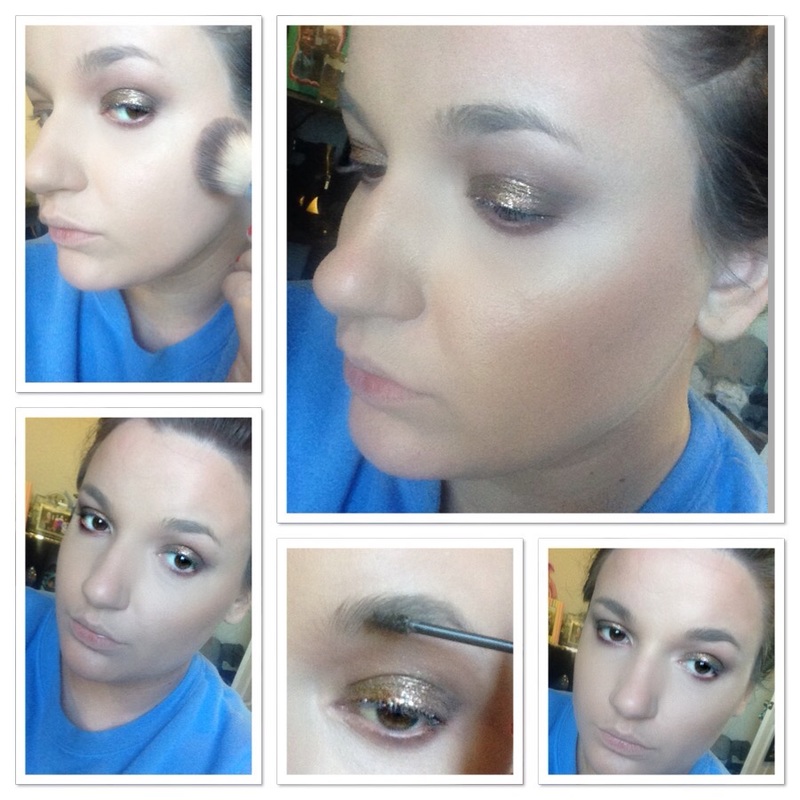 My next tip is use a powder that will both set and highlight. I used Hourglass Ambient Lighting in Diffused Light but MAC pro shade in Emphasize is great too. Of course any light shade will work to set. Highlighting is just an option. Do not use something super shimmery to set though. Next use a bronzer in a shade to where you can use it as contour, bronzer, and blush. So I used Makeup Forever Fusion Bronzer in shade 20M. The big picture is just showing you how subtle and glowy it looks. Next I used a tinted brow gel. I truly do recommend the Benefit Gimme Brow for this. It's got the best color and plus it has fibers in it so that it fills in your brows somewhat while it shapes them. Next if you still need some filling in you can use a brow pencil to touch up any sparse areas. 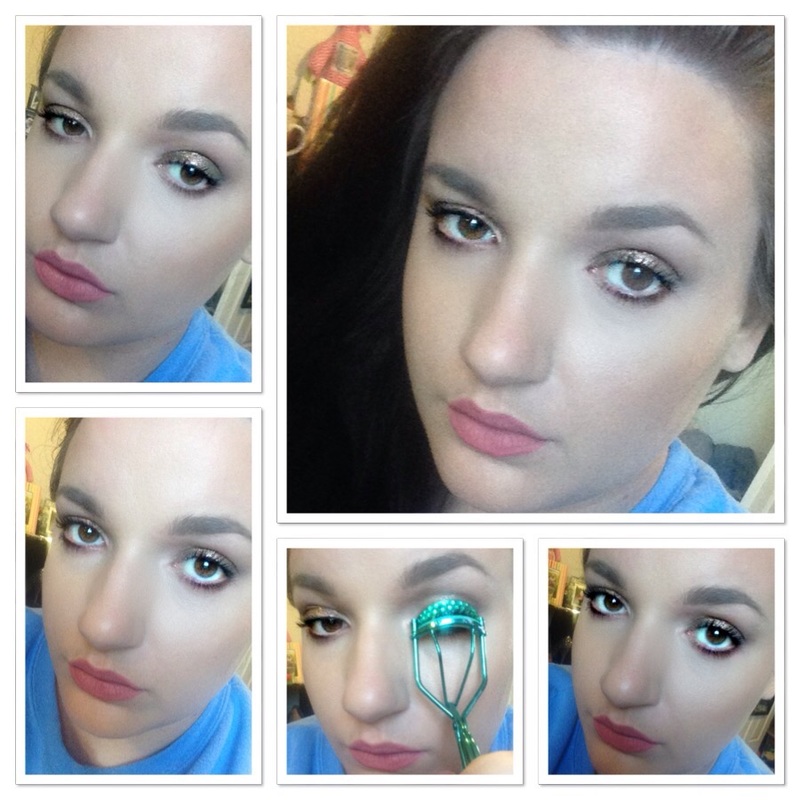 My next tip is to use a liquid lipstick close to your natural lip color because when it wears off after so many hours it won't be as noticeable. Also take it with you for touch ups. I'm using Lovely form ABH in this. One of the last things I do is mascara. I would recommend lashes if you are quick with them. That's the route I go, if you are not then this next tip is to beef up your lashes although I don't recommend doing this all the time cause it's rather harsh. So I curl the lashes first, then apply mascara, wait for the coat to dry and curl them again and re apply. I use Urban Decay Perversion mascara and L'Oreal Carbon Black Voluminous mascara they're very similar to me. I use a mascara that thickens and then one that lengthens last. So I curl the lashes before mascara, after the first coat has dried and after the second coat has dried, then apply the last coat that is supposed to lengthen. "Lengthen" being the operative word. The reason I curl after mascara is because it holds the curl so much better and makes my lashes which are thin and short seem longer. I don't use liner. That's time consuming especially if you want a wing. At best I would tight line or smudge liner on the lash line.
Lastly I use a setting spray. I used Smashbox Primer Water. Which can also be used to prime the face, set the makeup and refresh the makeup. The bigger picture is the finished product. As you can see, it's not barely there makeup it's really only lacking false lashes for me to be completely satisfied. So that's my tips. This is about 5-10 minute makeup depending what steps you take and how long it takes you to do them. Feel free to omit or add to as you see fit. I hope it was somewhat helpful.
0 Comments
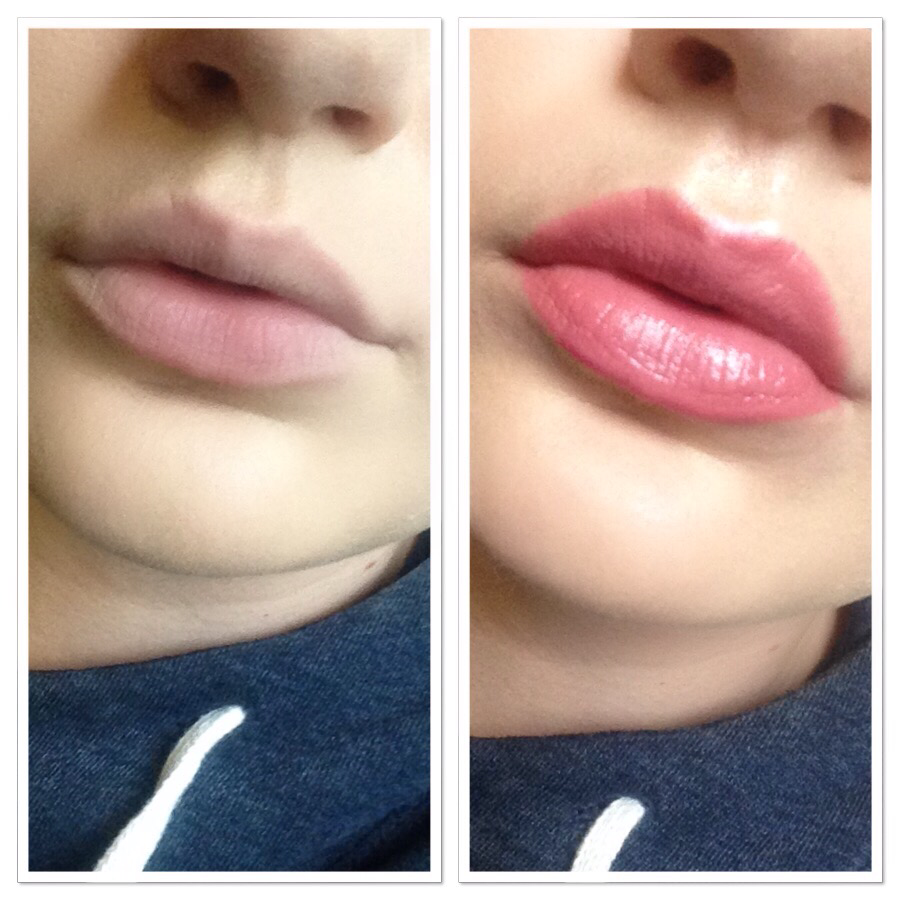 In this I'm going to tell you what I do to fake fuller lips. This isn't something I do all the time but, when I feel like it, I think it does help. 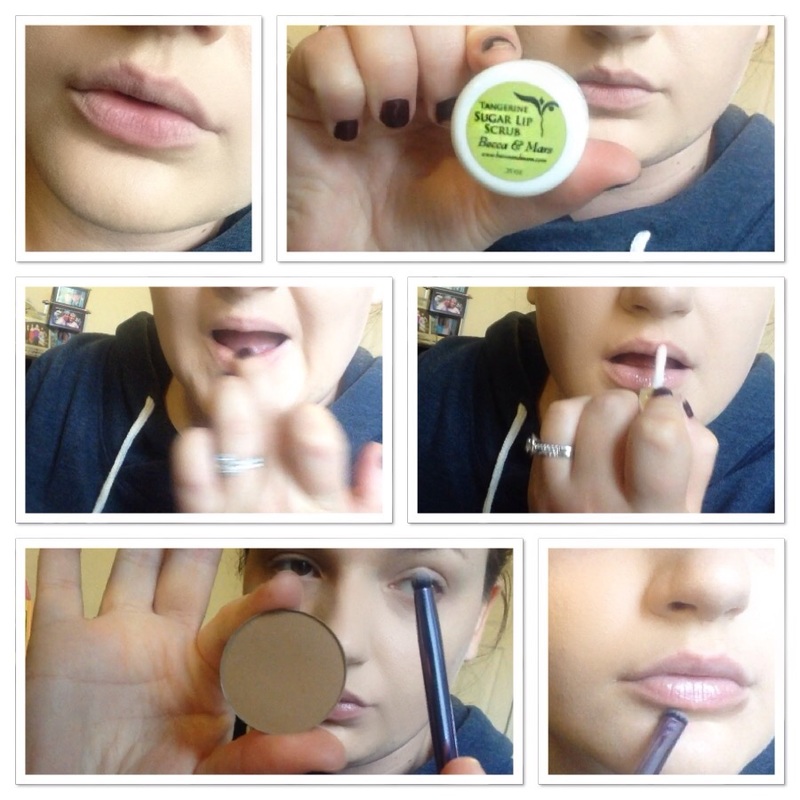 First I exfoliate the lips. I use a lip scrub from Becca and Mars that I got on Etsy. It's a sugar lip scrub and it's edible so you just lick it off pretty much. It's also very moisturizing which I love. Then I use my Dior Lip Maximizer which is supposed to help plump the lips. I leave it on while I contour the lips. I take a contour powder or a shadow whatever you want to use and a small dense brush and I put it above the sides of the upper lip and below the sides of the lower lip. I blend it over under the center of the bottom lip too. This just creates a shadow so that the lips look like they're more full. 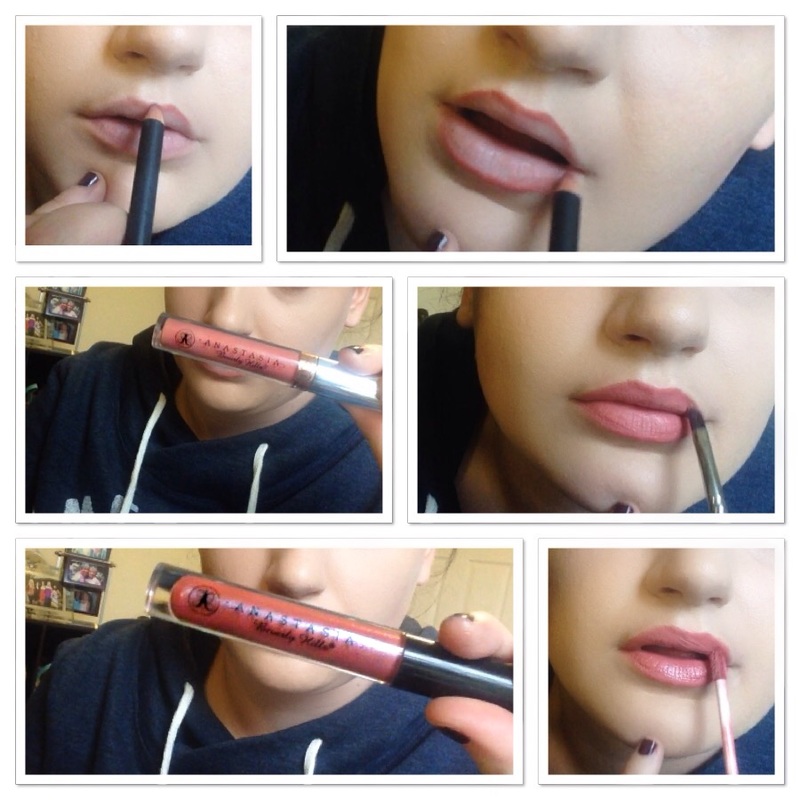 If there is a lot of gloss still left on the lips I'll blot them some but usually there isn't by the time I get ready to line them. I don't over draw them lately. You certainly can but I haven't really. I keep the line on the outer part of the natural line though so it's still my shape but just slightly fuller. I'm using Soar from MAC in this. Next I apply my lip color which is Lovely from ABH. It's a nice mauve shade. I use a lip brush so that It's a bit sharper and easier to control the product and where I want it to go without being too messy and too much product. Then I apply a gloss. Gloss always makes your lips look fuller because the light reflects off the shine of the gloss. I used Metallic Rose from ABH. It has flecks of glitter in it so it catches the light more than an opaque gloss. The gloss is a close shade to the lip color. You could also use a clear gloss or any gloss really. 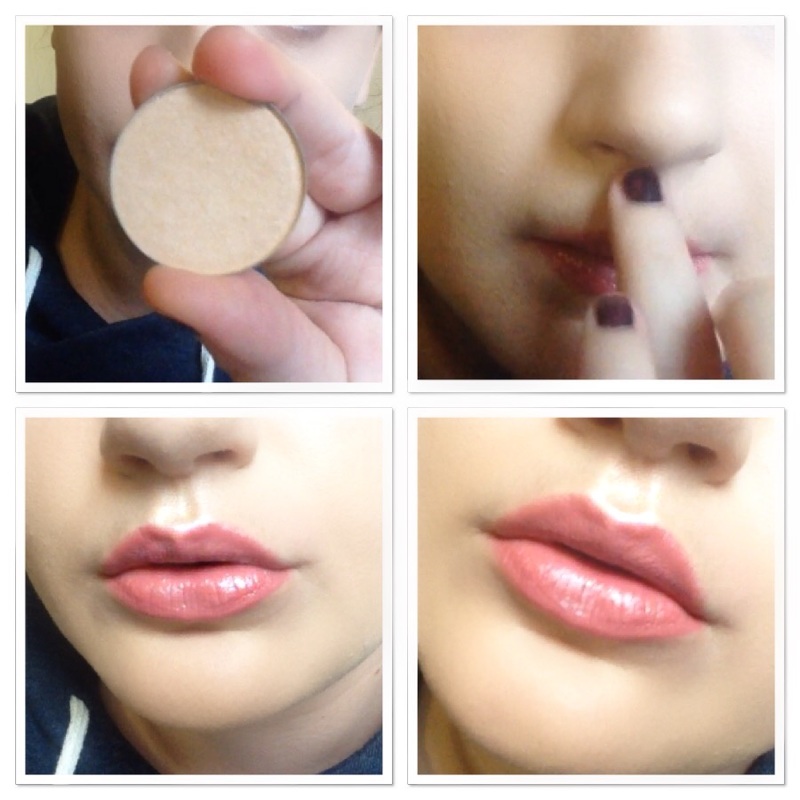 Next I use a highlighter on the cupids bow. I'm using ABH Sand highlighter but you can use any shade. You can also use a white liner to highlight as well. I just apply it with my finger. This really defines the cupid's bow and makes it more prominent.
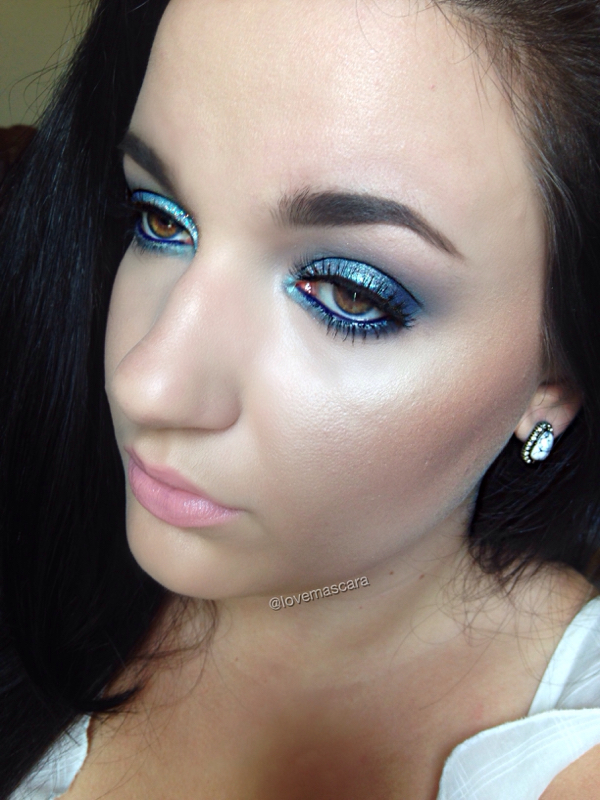
And that's that. That's pretty much all I do. I don't add a light shade on the actual lip like some people do because the gloss would cover that up. If you were using a more sheer gloss yo.u could apply it over the lip color. For that I like using the NYX Jumbo Pencil in Milk. Concealer would work just as well. 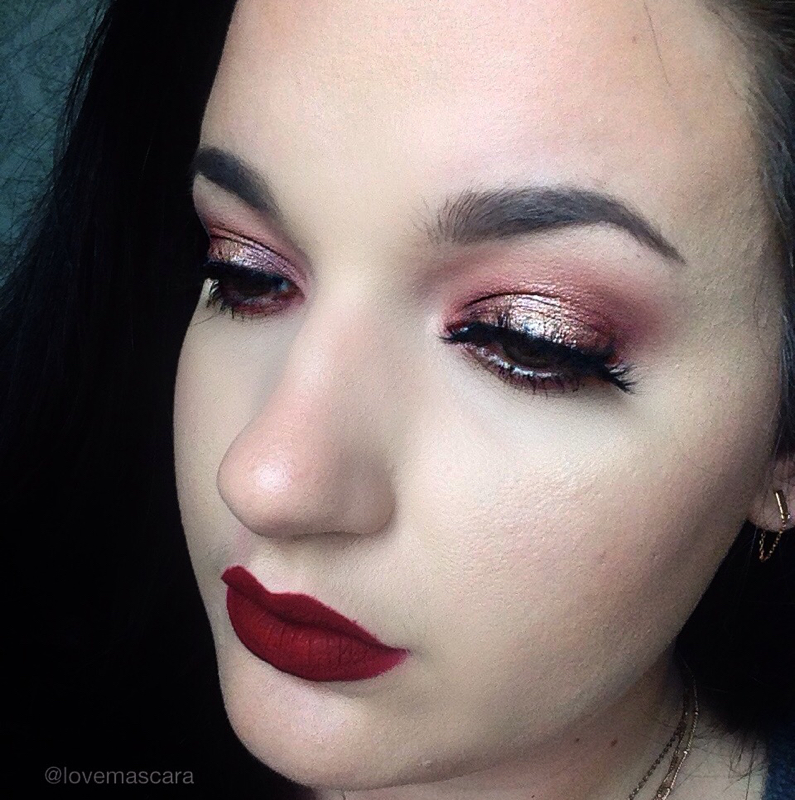 This is going to be a step by step of how I do my "halo" eye looks. Also, I incorporated gold into the look because gold is the color for Children's Cancer Awareness and September is Children's Cancer Awareness Month. This hits home for me, I had a member of my family beat liver cancer at the age of 2, I believe. So to show my support in a makeup type way, I thought I'd sport a gold look. I will also say that this was brought to my attention and inspired by Manny MUA. His video for it is right here. If you want to learn more about Children's Cancer Awareness then check out Cancer Free Kids for ways that you can help raise awareness. 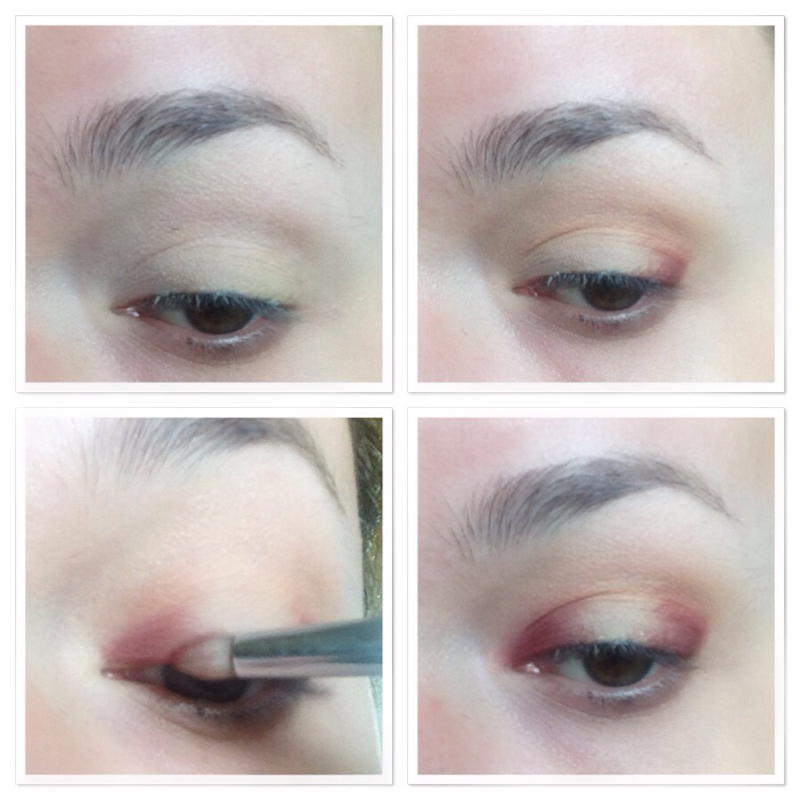 To start out my "halo" I lay down my primer, and then apply a shade of eye shadow that is closest to my skin tone so that my colors go on and blend smoother. I then put Peach Smoothie from Makeup Geek in the crease as a peach transition color. It's very pale you can barely see it. It just warms it up the crease. Next I use a pencil brush to apply a cranberry color. This one is Bitten from Makeup Geek. I apply it on the lid first from lashes then up slightly in the crease. Then I apply it on the inner corner of the lid. Trying my best to leave the middle open. 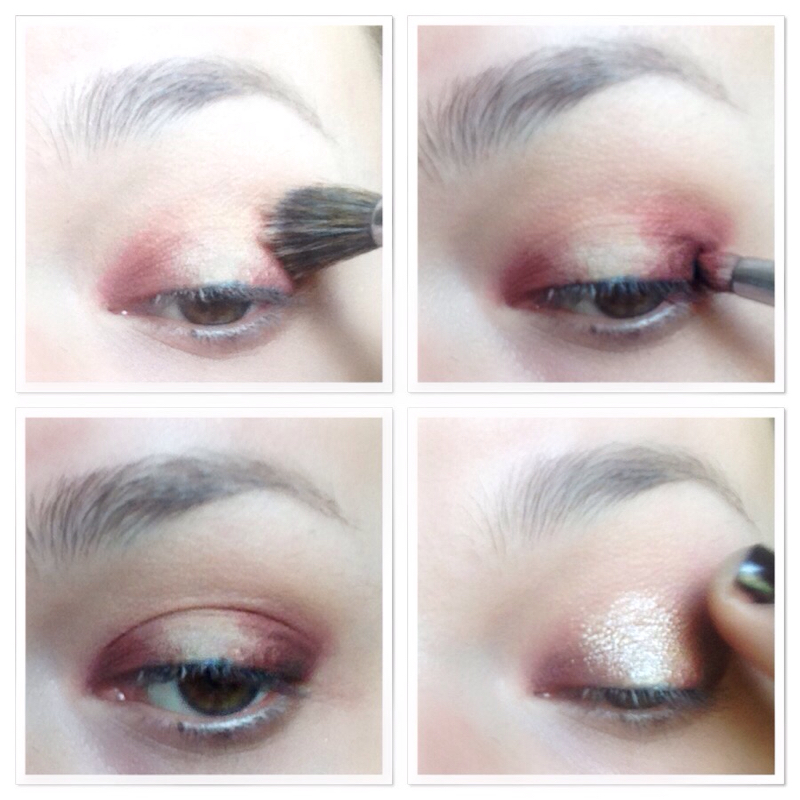 Then I take a large blending brush and blend over everything. From there, I take a darker shade, which was Deep Plum by ABH, and apply that the same way with the pencil brush. I stay closer to the lash line and don't bring it up as far as that first color. Next, I apply my middle or bright shade with my finger. I do this no matter what color it is. I don't know why I just feel like with halo looks using your finger to apply your middle shade is the best way. I used In the Spotlight from Makeup Geek first and then I put Tan pigment from MAC over top with a brush. 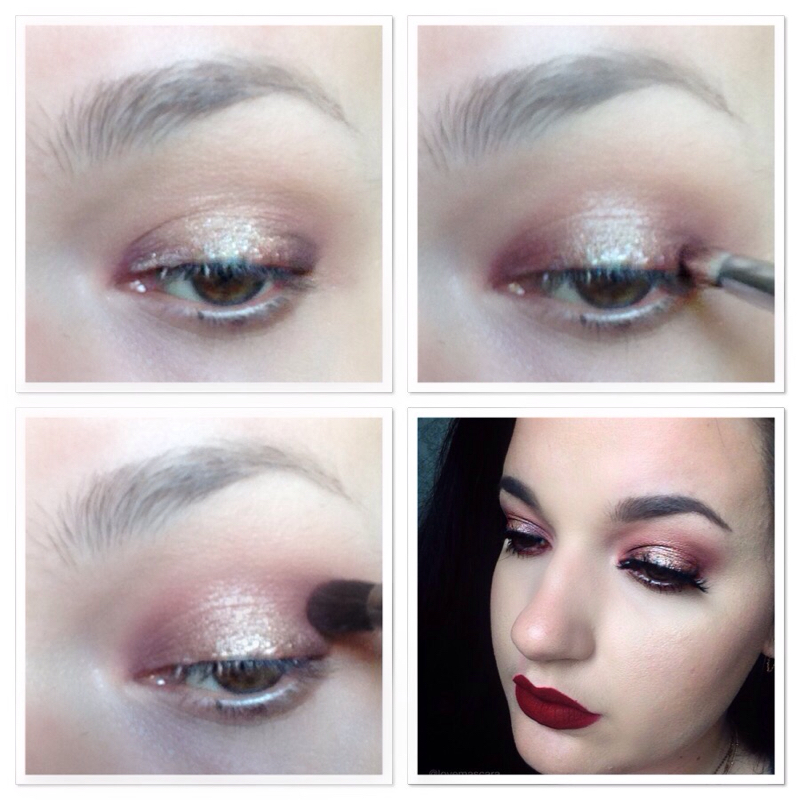 From here I blend again. Which is key with these looks, you have to constantly blend. Then I touch up the corners again so that I don't lose the intensity of the darker colors. I usually go back and add more to the center and to the corners several times until I'm satisfied.
Lastly I take a denser, smaller, blending brush and that cranberry shade again and work it into the crease. I want it to be a softer color and not so intense in the crease unlike the lid where I want the most pigment to be. Then I just apply the red shade on the entire lower lash line with a pencil brush or any other small brush would do. I add lashes, I don't do liner but you can if you want. I feel like liner is for more dramatic and structured looks and this one is a little more messy and blown out. So I would just put on a pair of fluffy lashes and be done with it. These lashes are Lilly Lashes in Mykonos. Any lash will do though. The lips are Colour Pop Cosmetics "Avenue" if you're wondering. 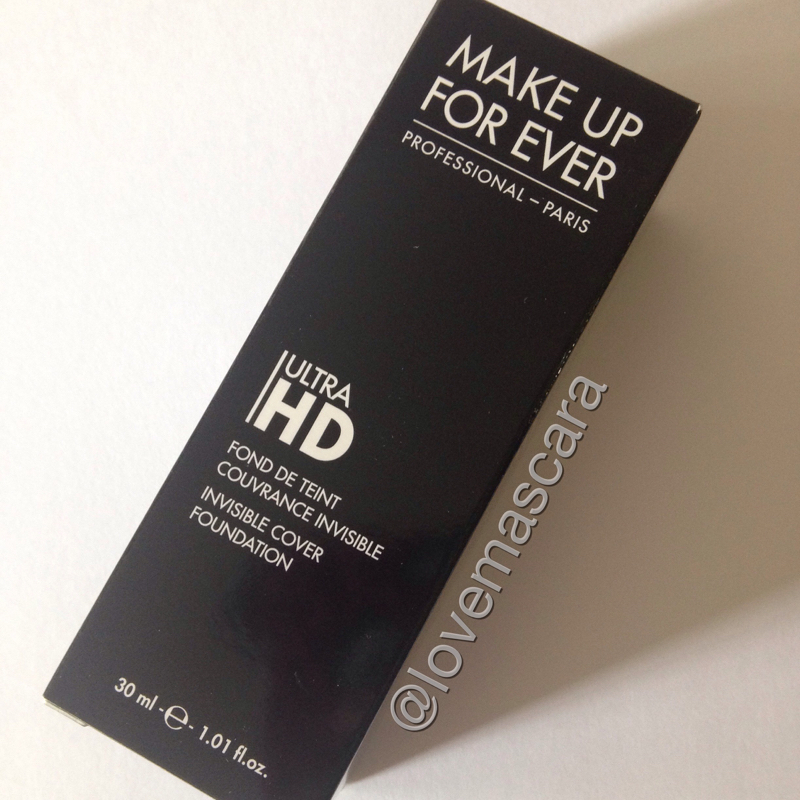 I recently got the new Makeup Forever Ultra HD Foundation from Frends Beauty. I really liked the old version and I was literally at the very end of the bottle so I thought I would give this a try. They are discontinuing the old one and this is the same price. There are 40 shades available. There are new shade names but it has a conversion chart. My original shade was 117 and my new shade is Y225 as seen below. The idea behind the ultra HD is that it's supposed to be more invisible, more lightweight and natural looking. It's medium coverage and developed for film and TV and "completely invisible under the latest 4K lens". This also comes in a stick formula. 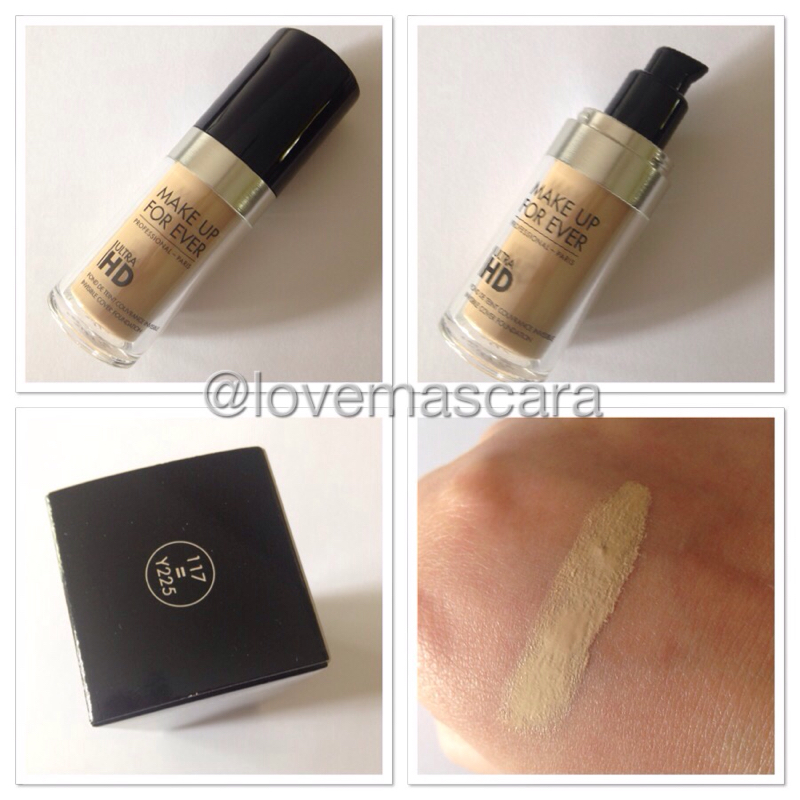 When swatched, this seemed a little more sheer than I liked I actually had to get more product to have a better swatch. 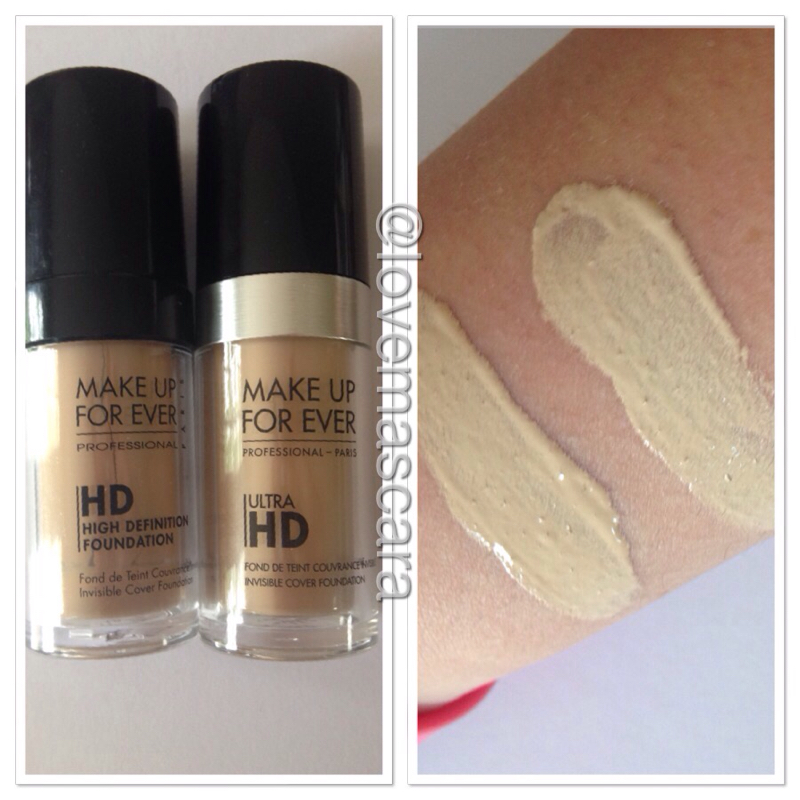 So here is the old formula and the new formula side by side. The left swatch is the original and the right swatch is the new. The colors match perfectly. The old formula is a little thicker and a bit better coverage. It could be thicker because I've had it for a long time so keep that in mind. The new formula is breathable and still has good coverage to be thinner. 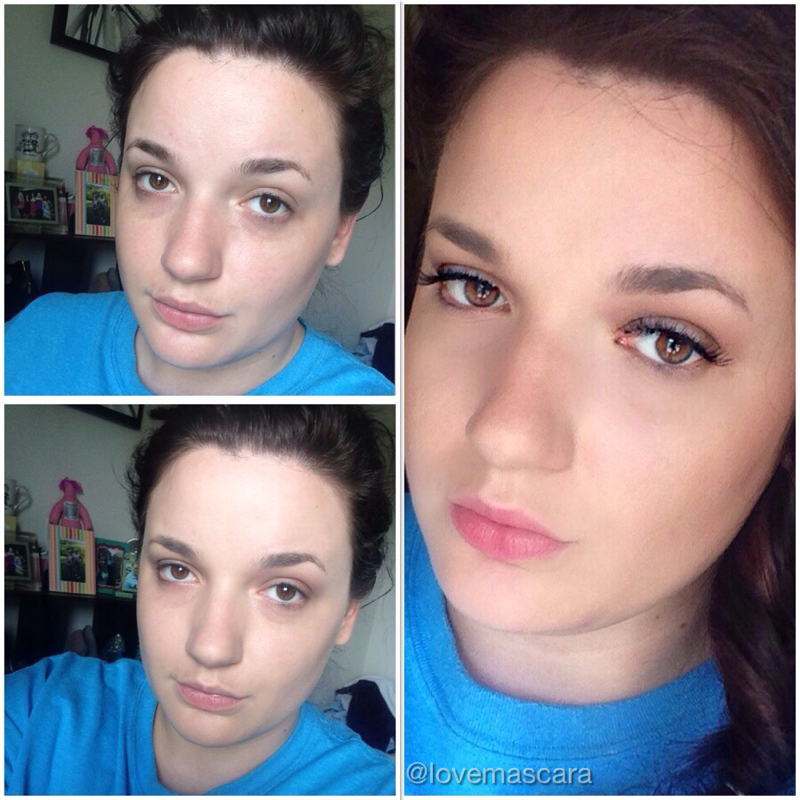 The top left picture is no makeup obviously. You can tell I have some redness, my dark circle are alive and kicking, and some little spots. The bottom left is just under eye corrector and one layer of the Ultra HD. On the right is the finished product. I went very minimal so that nothing takes away from the actual foundation. It has some concealer under the eyes and some bronzer and that's about it for the face. It done a great job. I used it over Makeup Forever Hydrating Primer and it really performed well. I only used one layer and I'm very satisfied. This will be great for freelance artists and if you have trouble finding your correct shade in other brands I seriously doubt you'll have that issue with this. It's weightless, it feels like nothing. It doesn't transfer. Just all around really really nice. This formula is a "like skin but better" finish. Which in my mind translates to satin. It's not dewy on me at all. It's not matte though either. I think some people refer to matte as "mask like" or thick like paint. When it's really just no shine/sheen what so ever. Matte formulas are best for those who are particularly oily skin.  The rest of this makeup is:
NARS New Lover gloss stick MAC Careblend Pressed Powder in Dark Benefit Gimme Brow in Medium/Deep and that's it Ardell Demi Wispies Makeup Geek Mocha in the crease Pretty low key huh? This hair is the Side Pony Tail Loop that I learned by watching Sam Villa on Youtube. Very easy and he does really awesome videos on everything to do with hair. 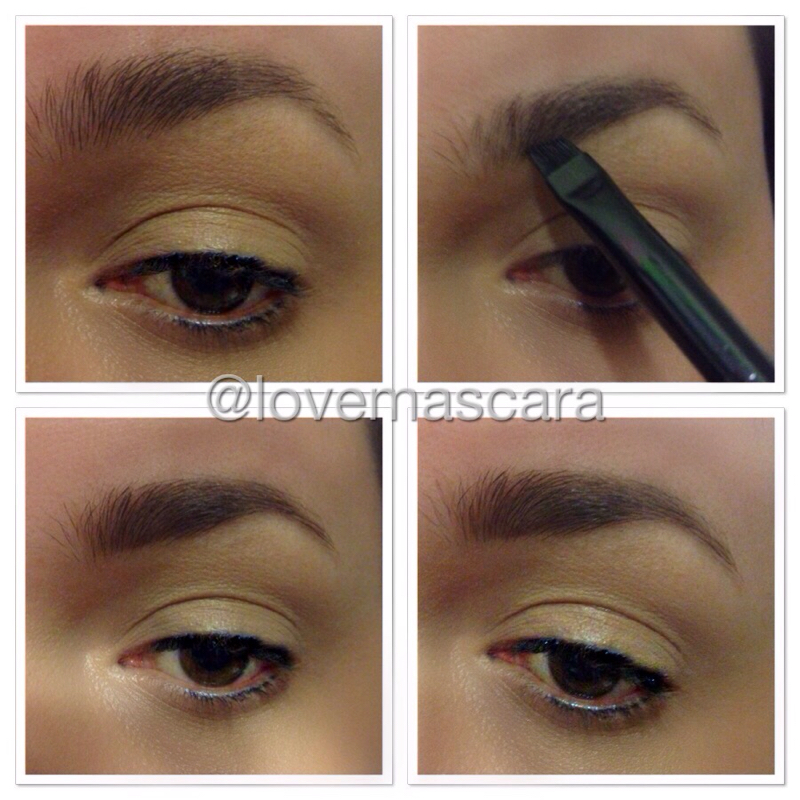 A few days ago I done a post about what was trending in the makeup world. I mentioned feathered brows and that's what this post is about. This is actually really simple if you already have a good shape to your brow. I have fuller, thicker brows so it's really easy for me to do. This is also a much more subtle and natural look than the sculpted, ombre, intense brows we've been seeing. I like both trends but this one is gonna be easier to do for beginners and just all around not intimidating. The only two products I used were: Benefit Gimme Brow and an eye shadow/brow powder. First I just brushed the brow up, to see the shape. I used LAB 2 Beauty brushes for this. The double ended brow groomer and the angled brow and liner brush. Next I go in with a shadow or brow powder that is close to the brow color. I use this just to fill in. Not line it or define it like I normally would. I use short strokes and go the direction of the hair growth. If you want you can take the brush spooly or disposable mascara wand and comb through the brow to soften the edges and keep your "feathered" look in place. 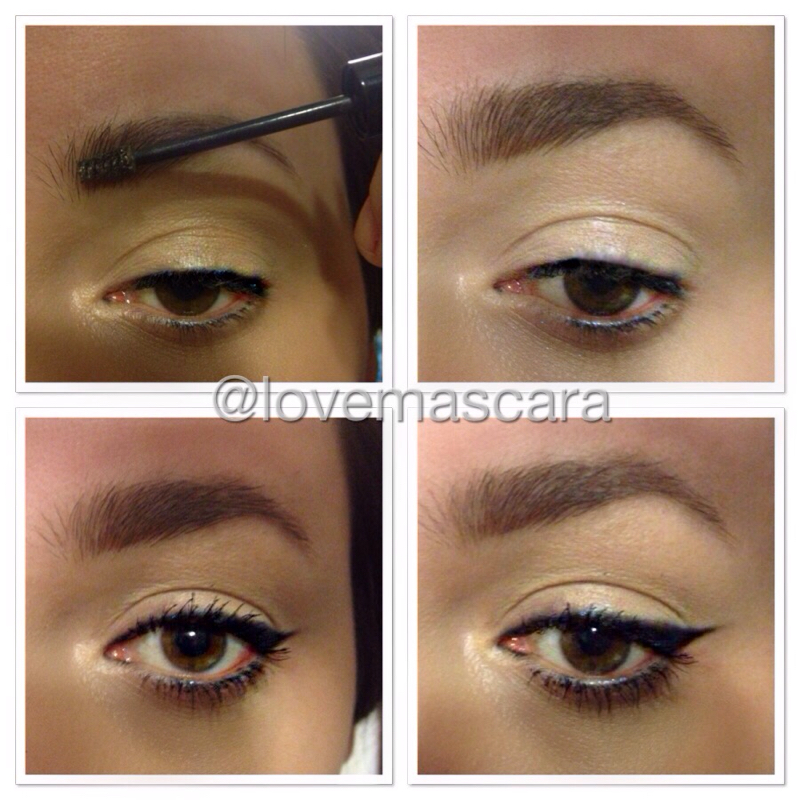 This next step is where the feathered part really comes out. I take the Benefit Gimme Brow which is a tinted brow fiber gel and LIGHTLY go over the brows. I just drag it through the hairs, I don't press it against the skin. The point of the feathered brow is that it looks a little "unruly" and messy while still being filled in. Where as a sculpted brow is very structured and sleek.
Side note: The Gimme Brow is also great to use just by its self for a really low key look. If you're someone who likes minimal makeup but you still need your brows filled in a little the Gimme Brow is good for that because the fibers cling to the hair and build it up to make them fuller. It comes in two shades I have Medium Deep but it also comes in Light/Medium. Sorry about the lighting in these pictures I done this last night so they're a little dark. As you know I wear fake lashes in 90% of my looks. I have really thin lashes and kinda short so I look like I don't have any especially in dramatic looks so I always wear false lashes for makeup looks especially. In this I'm wearing Nubounsom 3D Mink lashes. I have an entire post about them if you're curious. 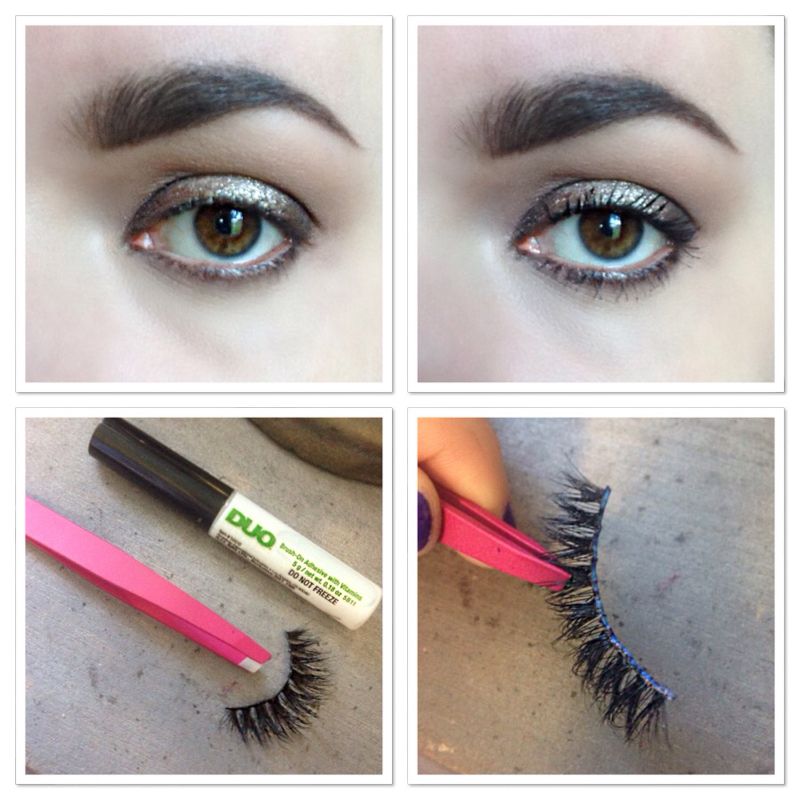 After I've finished my eye makeup I apply mascara. Just a thin coat to blend in with the lashes. I use brush on glue because you don't waste as much, it's thinner, it dries faster and just all around easier. Sometimes the lashes don't always stay on as long with it as it does the water proof squeeze tube but it does just fine for me and it's easy to touch up if one side comes unglued. I use tweezers to hold and apply the lashes so that I don't bend the actual lash hairs and flatten them. 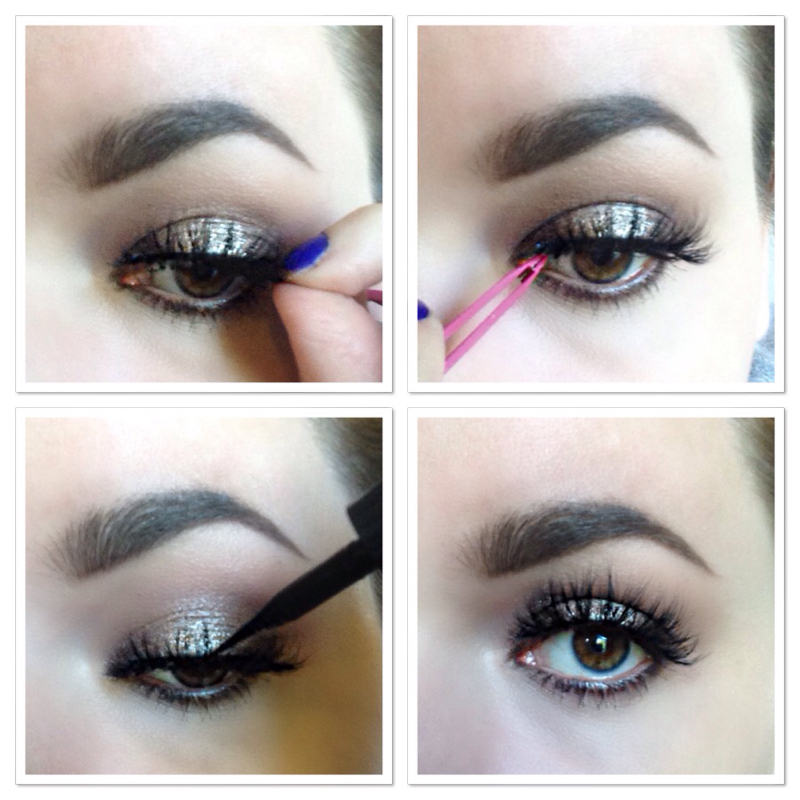 Going hand in hand with "strobing" that I have another post on, "baking" or "cooking" is trending like crazy in makeup right now. This isn't a new technique, it's actually a drag technique, which when you look at makeup these days, there seems to be a lot of drag tricks we're using day to day (*cough cough contouring). Just like contouring though it's an extremely effective method as far as highlighting, setting makeup, and making makeup last longer. I'm showing two ways to bake/cook in this post. One with powder and one with just your concealer. This is a highlighting technique but it doesn't mean that you can't put an actual highlighter on after you're done if you want. This just lightens up those areas that naturally are higher on the face, where light tends to hit. It's not using shimmery products to catch light and reflect back, it's just actually lightening up that area so that it helps you look more sculpted with very little effort and not a bunch of different products. 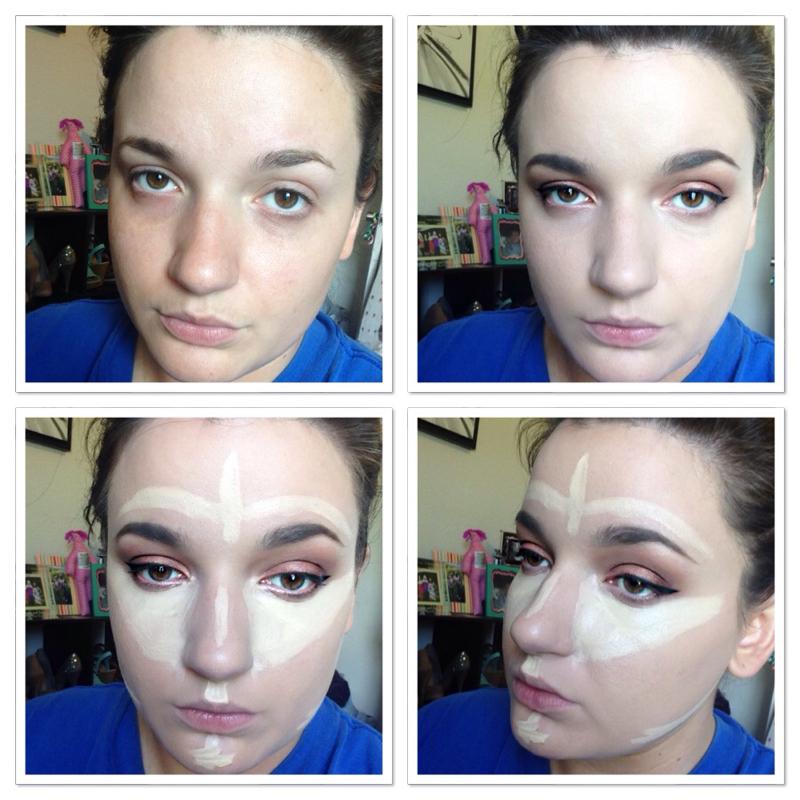 Ok so first I'm going to show you how to bake/cook with concealer. This is my preferred way of baking. I feel like it does a better job than packing powder on your face. What you're seeing a lot right now in the makeup world is just using powder but that's not the only way. So, moving on, I hit the areas I normally would hit when I highlight. The most important area I feel is the V, under your eye, down the side of your nose, and diagonally to the outer corner of the eye. You don't have to bring it down as far as I did or you can actually go heavier if you want. Another good area to bake, is underneath the cheek bone. Underneath the area that you would put your contour put some concealer there to bake and it actually makes a big difference as far as a sculpted look. The reason I like this way of baking is because my under eye area stays smooth. It just looks better when I actually take the time to do this, I look more awake, I have less creasing, and less noticeable fine lines. I let mine sit for around 10 minutes. I used Urban Decay Naked Skin Weightless concealer. I really feel like any creamy or liquid concealer will do good. If it's thicker it might look more cakey posssibly so that's why I chose Urban Decay which is full coverage but thin. I wouldn't use LA Girl Pro Concealers though because, they dry too fast and are hard to blend out once they've set up. So to blend this I use my ring finger that way I'm heating that product up again to blend, but also so that it's not taking any product away. A damp beauty blender would probably be fine as well, it may sheer it out some though. Each concealer is going to be different for how long it should probably "bake". Mine was kinda thin consistency so it could sit for a while. NARS Radient Concealers are thicker so I may not let those sit as long as I would say MAC Pro Longwear concealer because NARS is much thicker and MAC is liquid. You'll have to play with it a little and I feel the longer it sits the more full coverage it's going to be so keep that in mind. I set it with a really light thin powder. It's so easy to look "cakey" when your using these techniques. So I used Ambient powder in Diffused Light which is a really sheer wash of yellow face powder from Hourglass. 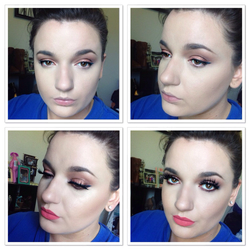 I go ahead and do the rest of my makeup once everything is blended. I added highlighter to it and just a little contour because doing this you really don't have to do much contouring. So I used Becca Opal highlighter I believe, and just a bronzer on my LAB 2 Beauty Multi Purpose brush (flat top kabuki buffing brush). You don't have highlight if you don't want but if you like that "sheen" from highlighters then go for it. 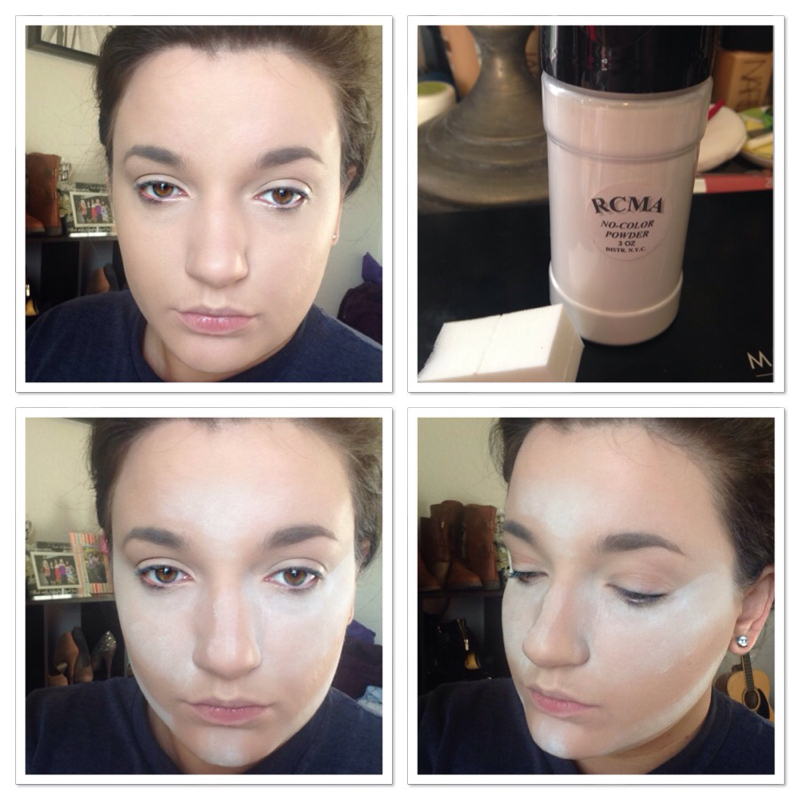 Alright so in this set I'm baking with powder. I'm using RCMA No Color loose powder for this. I use this one because it does not oxidize at all and almost all translucent powders oxidize (change color or get darker) on me. This technique is great for keeping makeup in place especially. I don't feel that its as highlighted a look as baking with a concealer but to each his own. So just using a wedge sponge (or a makeup pouf) you just pat powder on heavily, after you've done your concealer and foundation. So the same areas as before just pack on the powder. Now another great thing about this is you can do your eye shadow with all this powder baking and if you have any fall out from the eyeshadow it's no big deal because you're gonna dust it off. I left mine on for 12 minutes before dusting it off. You can leave it on for 30 minutes if you want because the majority of the product is just going to be dusted off. This is a more subtle look than the first one. It's not going to be as heavy but, especially under the eyes, if you have any fine lines I find that this much powder tends to settle into them no matter how hard you try. Which can actually make you look older. That's just me though. 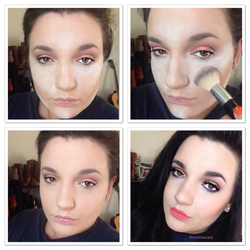 I'm using a Serenity and Scott (love these brushes) tapered brush to dust off the excess. I feel like when it's all dusted off, the areas aren't that highlighted, and under the eyes it looks a little cakey to me. So using a highlighter is a must when I do this if I want to draw attention to the higher planes of the face. Makeup doesn't budge once you've done this and you could literally let it sit for 30 minutes if you want. Some people recommend doing that anyway but I'm inpatient and I don't like white dust getting everywhere. So this has it's pros and cons it's definitely not my favorite way to bake but it's ideal for stage makeup or any event that you're gonna have a worry that your makeup may break down or move on you. Even if it didn't highlight your face it would be worth doing so that your makeup stayed in place. Just maybe go easy around areas of any fine lines. Like everything else in makeup, these tips are not set in stone nor are they "rules". Play around, see what works best with the products you have or want to use. I wanted to talk about it because everyone totally did a 180 from contouring and now it's focusing on highlighting more. So I hope this was helpful at least or gave you an idea of what people are talking about.
**disclaimer: I'm not trying to look so sad or pissed in these photos lol I just didn't want to disrupt the products or cause any creasing and what not by smiling in them. 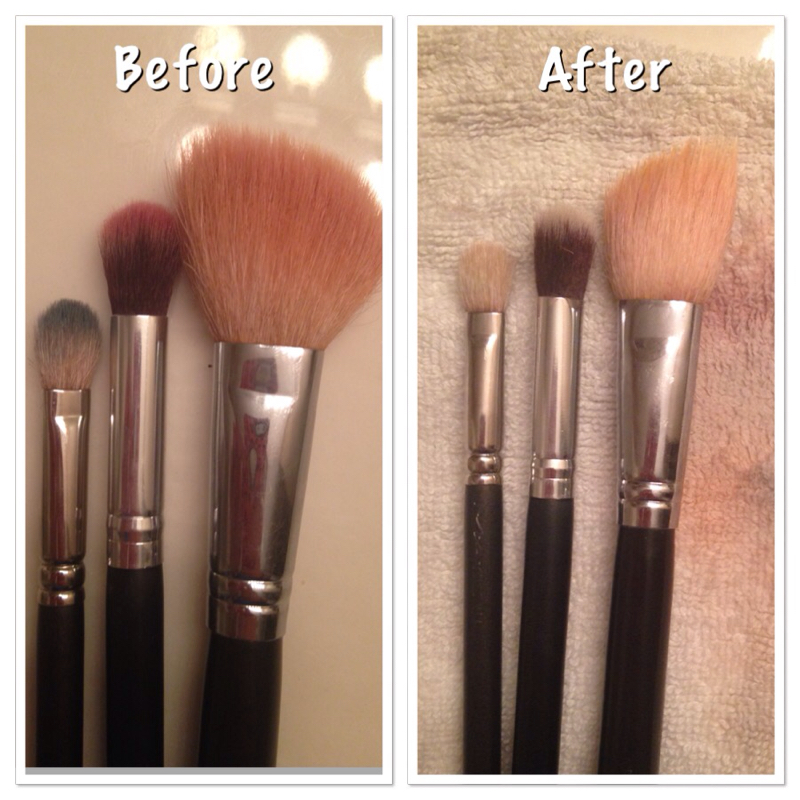 There's nothing I love more than getting homemade, indie company beauty products. Most of the time shopping small means, to me, that you're getting a better product because more work went into making that product. I can honestly say this is no different. I recently talked with Swirl and Sparkle (www.etsy.com/shop/swirlandsparkle) and got a sample of their brush cleaner. I normally use Beauty Blender solid cleaner. So I got the Coconut Mandarin sample made with Goat's Milk. I got three of my dirtiest brushes, cause I use a lot of color and went to town. What I like the most about this is that the brushes are softer after using it. So not only does it clean them but it conditions them as well. Another thing that I always appreciate about most Etsy sellers is that you can get a sample, which in this case is only $2.99, and try it out before committing to buying a big one. They come with the option of Goats Milk or Vegan Shea Butter. There are 3 scents: Toasted Marshmallow, Chocolate Cake, and Coconut Mandarin. If you want to go larger then 1 ounce is 17.99/19.99 or as of now 4 ounces it's 32.99/34.99. They come with cute little lids that make you feel fancy. I'm a huge fan. I think these are great. Up above is a before and after picture of my two eye brushes and a face brush.  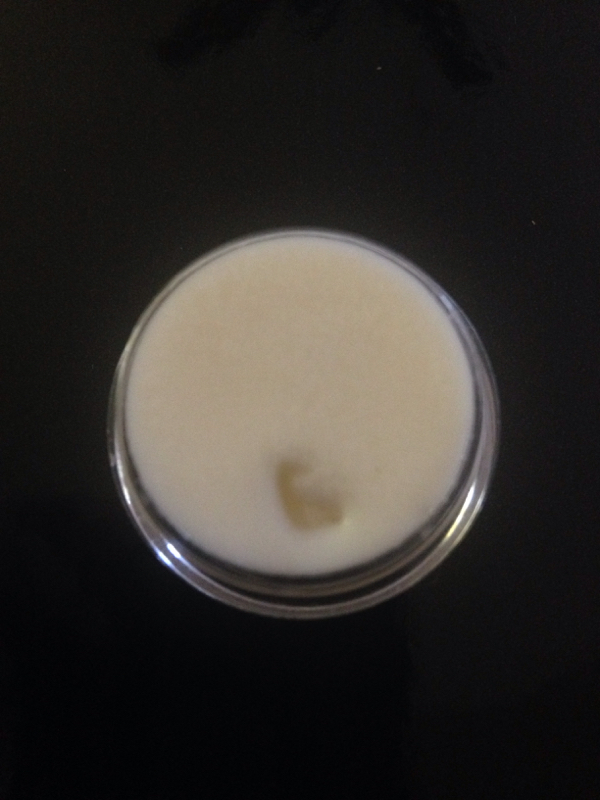 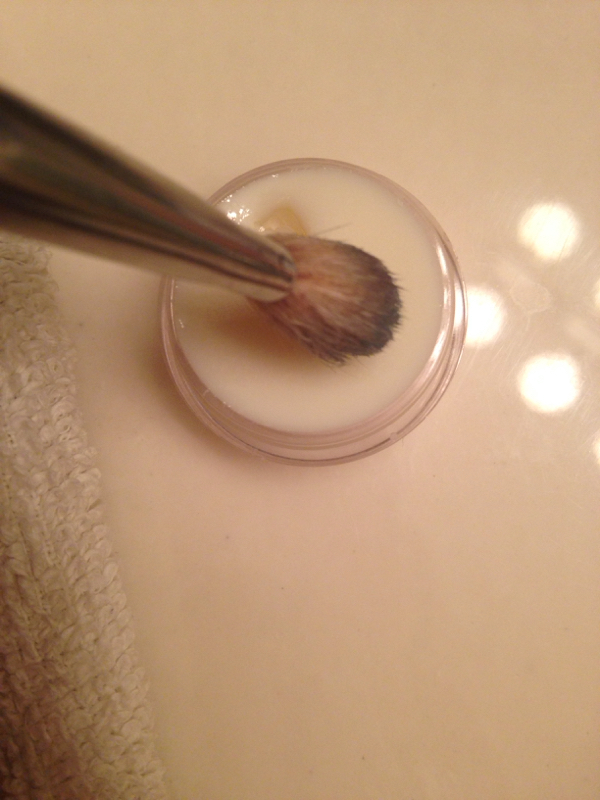 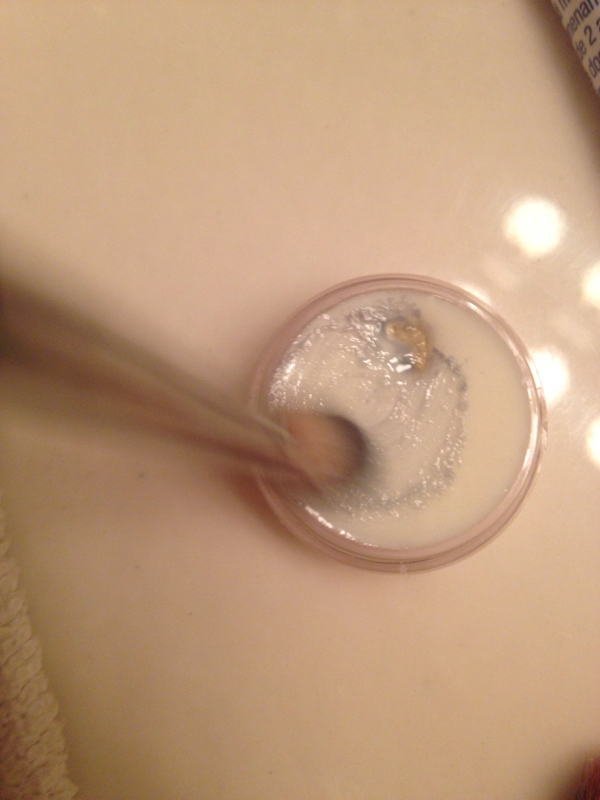 Here I'm cleaning my MAC 217 brush. It had navy blue eyeshadow on it. It was clean within seconds. 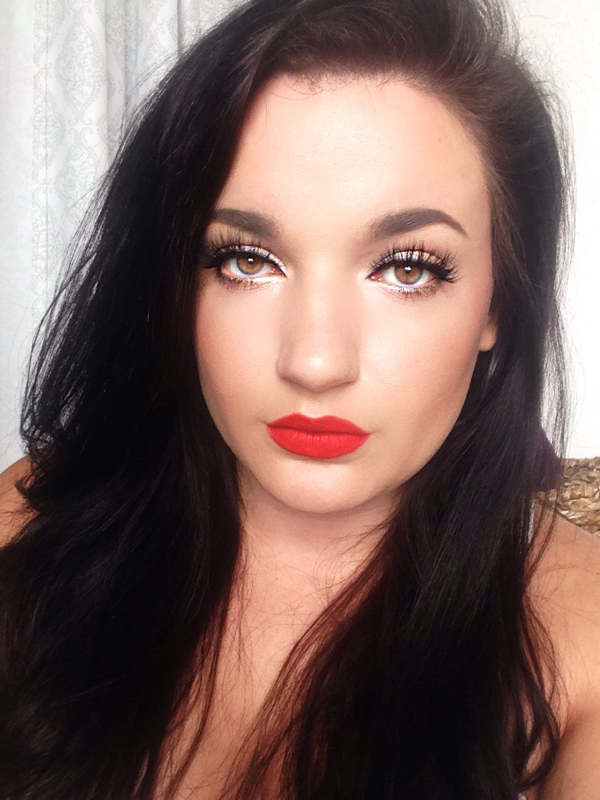 The newest "trend" that's taking off in makeup is "strobing". Contour is "like so last year" and now highlighting the bejesus out of your face is what's in. I, who am not usually the biggest fan of highlighters, am actually really loving this. Mainly because highlighters have become so much better the last few years. Thanks to Becca Cosmetics, I personally feel. So I done this new trend and now I can't stop doing it. You basically highlight the highest planes of your face which is what you would normally do. Most people do it with liquid or cream highlighters to really get that intense "glow from within" look. I use both though. You're gonna focus your highlight on the: Cheek Bones, Nose, Cupids Bow, Brow Bone, and Inner Corner of your Eye. These are all areas that naturally catch the light more. I tend to go a little further than this and I'll explain on down. The first thing you need to remember is to get this in the fullest effect you'll need to start with your skin. So use a really hydrating moisturizer, or a moisturizer that has some shimmer in it. I use Sanitas Oil Free Moisturizer because it just works best on my skin. Don't let the Oil Free part scare you away, it's still incredibly moisturizing. However, keep in mind to have very luminous skin you'll need to use products that will get you there at night too. So I use Caudalie Grape Water facial spray toner, it's moisturizing, as my toner so it doesn't dry out my skin and I used Josie Maran Argan Oil nightly to keep it luminous and glowy instead of dull and dry like some overbearing products can do. For foundation I will use a luminous foundation, which isn't necessary really but I like to do it. So I use Loreal True Match Lumi, NARS Luminous Weightless Foundation, NARS Sheer Glow you get the drift. You don't have to use luminous foundations that's just my preference. I always prime though, I use my Makeup Forever Mattifying Primer just so my foundation doesn't break up or move. I still look luminous but it doesn't move. Now if you're incredibly oily you may not want to do this. That's fine. You can skip straight to highlighting if you want. However, for myself, I tend to be Normal to Dry with my skin so I get a little crazy with my strobing. 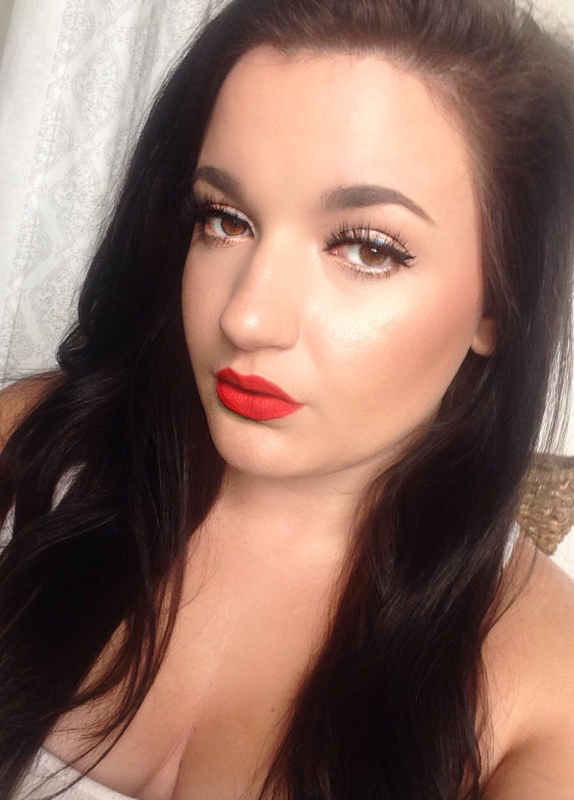 Products that I really feel make a difference are:
 I like to go in with luminous blush as well. Some say don't, I say why not? You can absolutely use matte blush if you want. I apply the highlighting first then I do blush and bronzer. I want the over all look to be sunkissed and have a summer vibe, I'm not looking for an intense pink or peach cheek or intense contour. I want it all to blend into a warm healthy deep glow. So some blushes that I've really loved are: NARS High Intensity Blush Duos applied wet are super watt sheen, almost foiled looking (Fervor is my fave) Becca Blushes (any of them will work, Songbird is my favorite but it's pretty dark) Milani Luminoso blush (very shimmery peach) Makeup Geek Romance (Very shimmery pink/peach) MAC Warm Soul (subtle coral blush with golden sheen) Bronzer that I use last, have been: Makeup Forever Sculpting Duo in 2 Chanel Bronze Universal MAC Careblend Pressed Powder in Dark I did a little contouring today, but I went over it with a "warm" toned bronzer so that it wouldn't look too "contoured". I feel like warmer tones suit this look the best. I don't like a really cool toned harsh contour with this super highlighted look. I would say you don't even have to contour if you don't want to just bronze. I contour because I like it to slim my face and give me cheek bones. So cream contour would be much more natural but you can still use powder contour lightly if you want.  The later in the day it gets the more your highlight shows up. It's great for dates, or cook outs, you best believe I'll be rocking it for the Fourth of July festivities. This picture taken above is at about 11 o'clock at night as you can see it's super intense and glowy. You can make it as intense as you want. So add or take away what you want from these tips. It's just makeup.
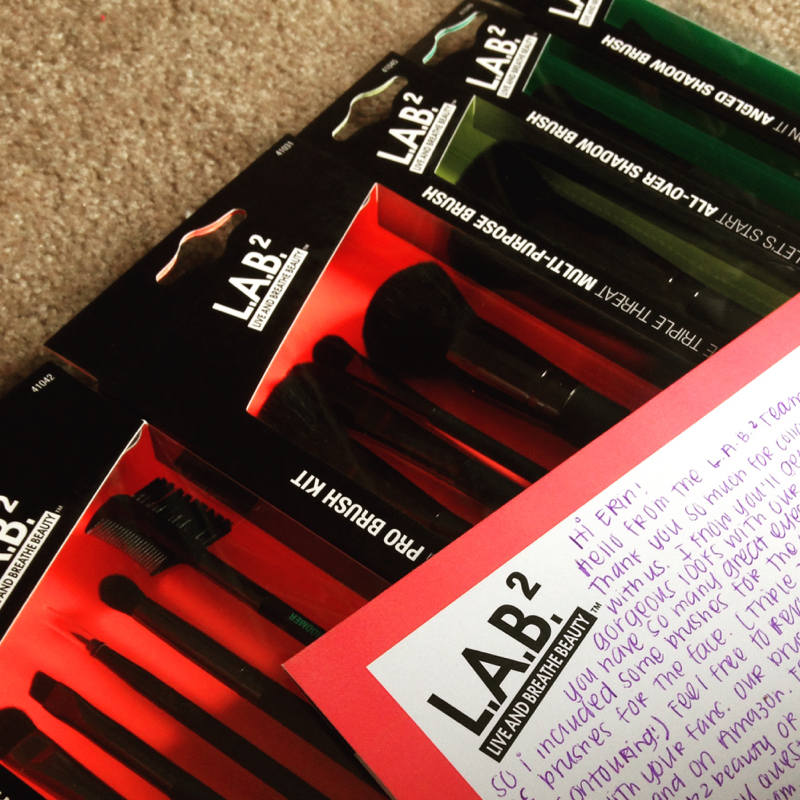 There's a new brush in town.......and they're pretty dang fabulous if I do say so myself. Let's talk about L.A.B 2 Beauty shall we? Alright. I was lucky enough to receive some brushes from the company this week and I must say I'm really impressed! These brushes are available at Walmart and Amazon. Which is one thing that makes them so great. I love Morphe and Sigma but it's nice to have good brushes at your closest Walmart. That way you know what you're buying. First I love the packaging. The brushes DON'T MOVE in the box, they're tucked into a foam like base so they won't get tossed around. That's really helpful, when you open them, open the bottom and press from the bottom to get the brush out of the foam without tugging the top of the brush and potentially damaging the hairs. The back of each box has a "How to use me" card that you can cut out and keep that has diagrams of how to use the brushes and where. I love how they are made, they are a soft matte black handle that's easy to hold and grip for better "controlled movements". The brush is soft on the skin. They're made with "FiberLuxe" Technology that make them transfer product easier, applies color more evenly, blends nicely, so on so forth. 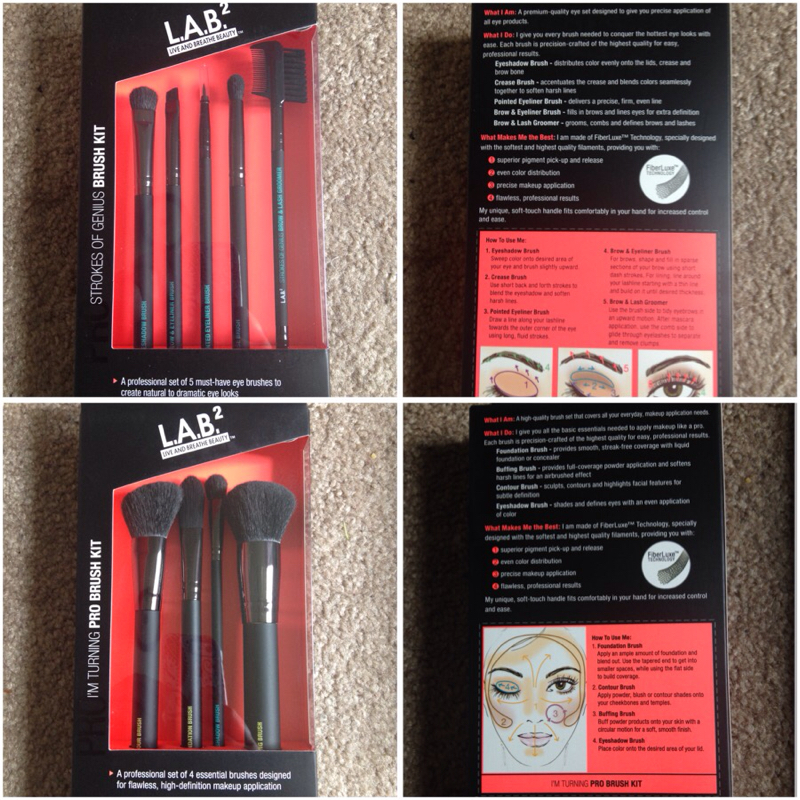 The first two sets are: Strokes of Genius Brush Kit ( $20 ) and I'm Turning Pro Brush Kit ( $22 ) In the Strokes of Genius Brush Kit you get 5 eye brushes: Eyeshadow Brush, Crease Brush, Pointed Eyeliner Brush, Brow/Eyeliner Brush, Brow and Lash Groomer. I used all of these today and they are really nice. I used the shadow brush to sweep an all over color from brow bone to lash line. The crease brush is really similar to the Makeup Geek crease brush. It's tapered and dense as opposed to a fluffy blending brush. It works great for really darkening up a crease as well as blending. Because it's tapered and more dense though you're going to get a lot of pigmentation with it, so be sure to wipe it off some if you're using it to buff out a color after you've applied it or use a fluffy blending brush instead. The pointed eyeliner brush is very cool! I like using an angled brush to do a winged liner but I used this today just for kicks and it worked really great. You can get the tiniest line or the thickest line whichever you prefer because it is needle point thin at the tip. This would also be great for "makeup art" using it to detail would be amazing. If you're into lip art using this for designs and precision detailing would be ideal. I'm very impressed with this brush. The brow and eyeliner brush is great for both. I used it today with my Dip Brow Pomade to sculpt my eyebrows and it was awesome. I used the Brow and Lash Groomer to buff out and blend the sculpting on my brows. Worked amazingly well. In the I'm Turning Pro Kit you get 4 brushes: Foundation Brush, Buffing Brush, Contour Brush, and Eyeshadow Brush. The Pro Kit is probably my favorite off all these. The foundation brush is a bit thin I feel to use for foundation so I actually used it for concealer under the eye and it was so soft. It was really more like an airbrushed finish. It didn't "pack on" a ton of concealer but it packed on just enough to leave a really light silky feeling. If you want more coverage then blend with your finger by tapping. The buffing brush is SO soft. I love this brush. It's great for the buffing technique I talked about a while ago, that Wayne Goss had spoke on. I used this to buff out contour, blush, to apply setting powder and buff that into the skin. The more you buff the more smooth and airbrushed your skin looks. It's quite impressive. The Contour Brush is my new favorite brush. It is angled, it looks like a mini blush brush but it's the perfect size for contouring your cheekbones. I used it with my Kat Von D Shade Light Contour palette. It deposited color nicely along with blending it out smooth and not patchy at all. You get a smaller eyeshadow brush in this that again, is great for sweeping a wash of color on the lid. 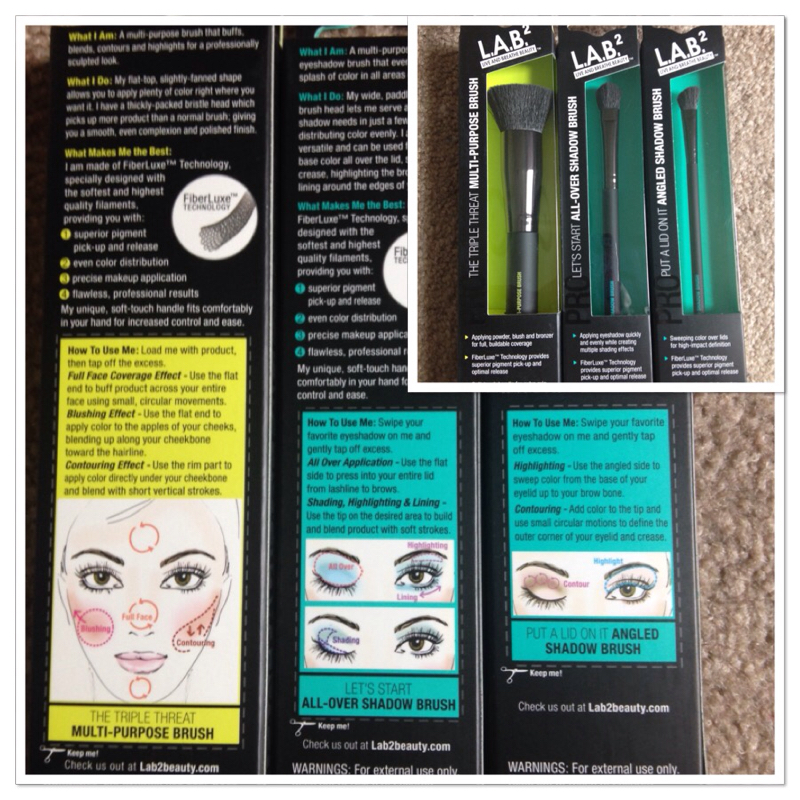 These three brushes are: The Triple Threat Multi-Purpose Brush ( $12 ) Let's Start All-Over Shadow Brush ( I think is $8 ) Put A Lid On It Angled Shadow Brush ( I also think is $8 ) The Multi-Purpose Brush I used for my foundation. It's a flat top kabuki which, as you know, is what I love to use to apply foundation. It gives full coverage and packs on color. You could easily use it for contouring, blush, or powder. I really really liked this. I used a Sigma F80 flat top kabuki which is a little denser but this works just as well. The All Over Shadow Brush is a bit larger brush. You could use this to even set the under eye concealer if you used it lightly enough. It can be used for highlighting the brow bone or all over lid color. The Angled Shadow Brush is a smaller angled brush. I love these to do brow bone highlighting. They're a little denser so if you want a brighter highlight this is great. It's also good for outer V definition of the eye. 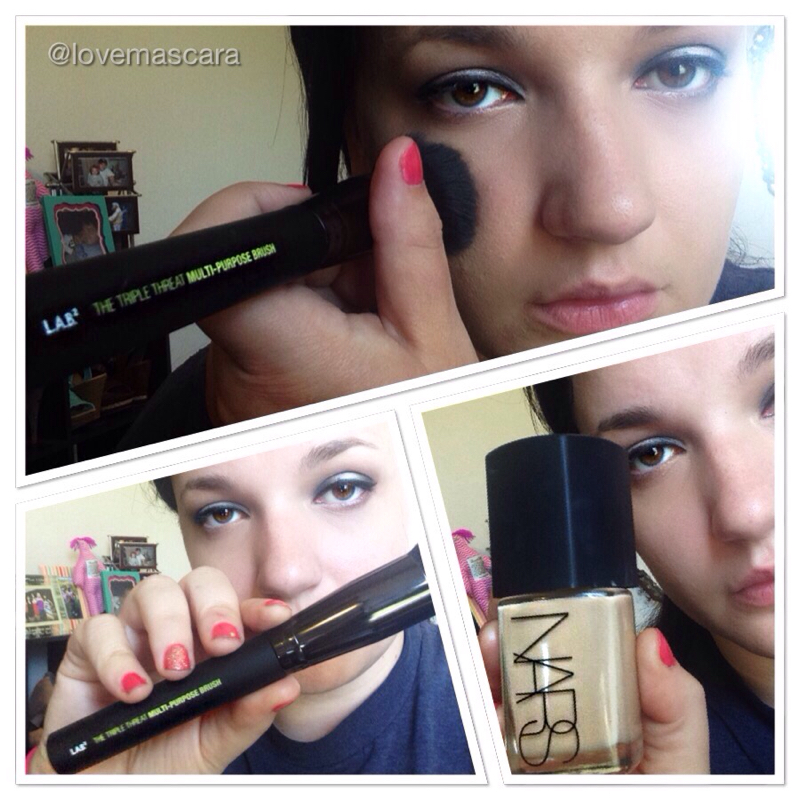 I'm sorry I didn't get any pictures of me doing my eye makeup with these brushes but I actually filmed it and it wouldn't focus. All the eye makeup you're seeing was done by the eye brushes though, even the eyeliner and brows. I did use a pencil brush in it and fluffy blending brush from Morphe but other than that it's all L.A.B brushes. Here I'm using the NARS Sheer Glow foundation with the Multi Purpose Brush to stipple my foundation on. It was fast, soft, and worked perfect. I didn't have any loose hairs stuck to my face from the brushes shedding which is always a great plus! 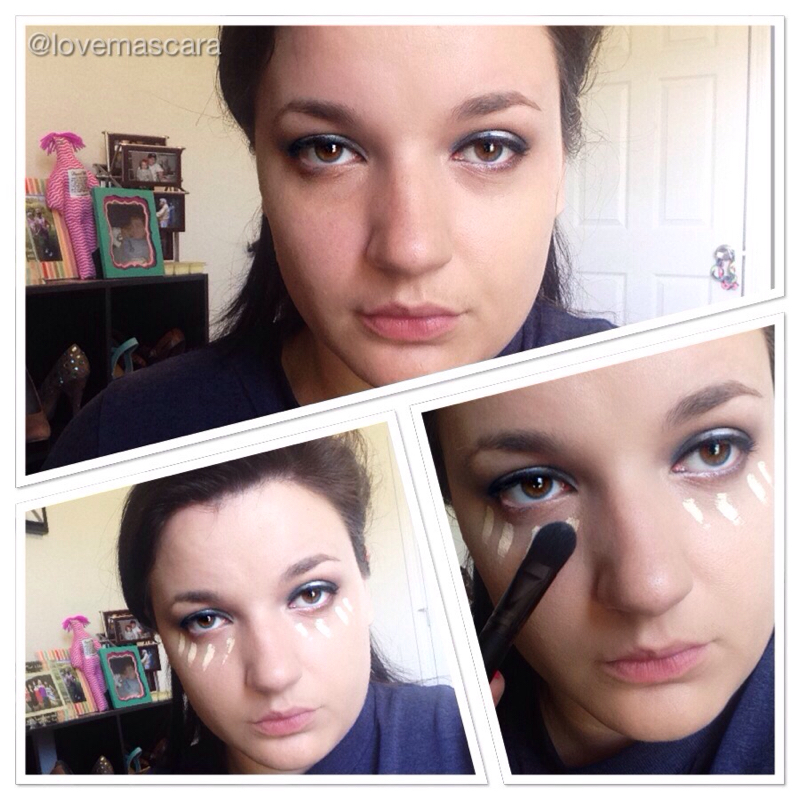 Here I'm using the Foundation Brush from the I'm Turning Pro Kit to blend out my concealer. I'm using Urban Decay Naked Skin Weightless concealer. It didn't pack on the concealer it blended it out very nicely. The top picture is no concealer and obviously the other ones are me blending it out. Like I said above if you need heavier coverage then use your ring finger and tap the concealer into the skin. 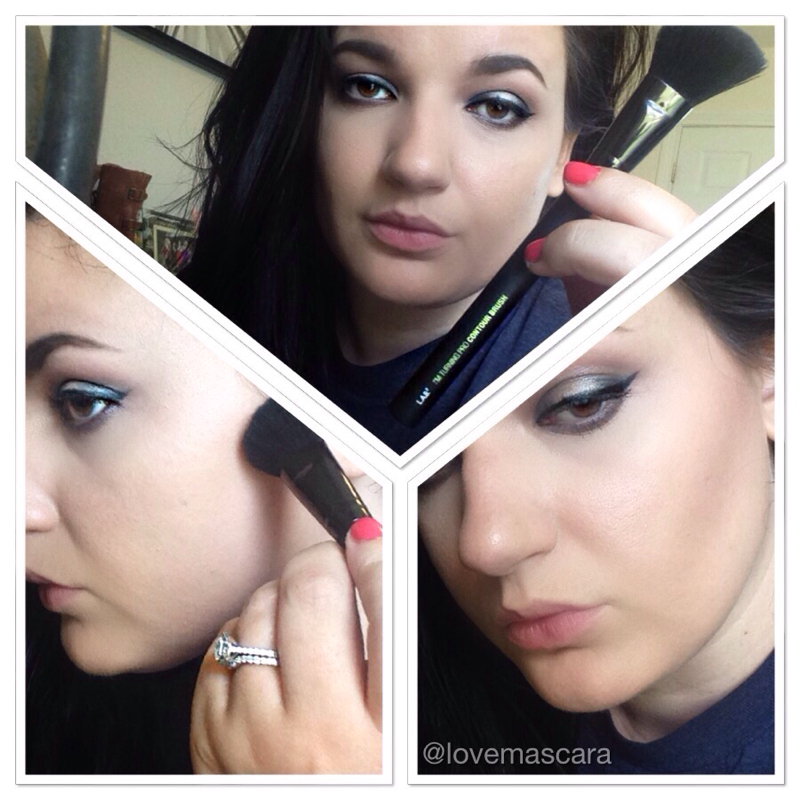 This set of pictures is using my baby. The contour brush. I freaking love this brush. I didn't have to blend it barely at all. It done all the work for me. I didn't have on any blush, bronzer, highlighter, or anything before I used this. This brush fit's perfectly to carve out a cheekbone. I love it. I can't get over it. It's my favorite of allllllllll of them. It's not a harsh contour. If you want a harsh contour I would use the Multi Purpose brush edges. 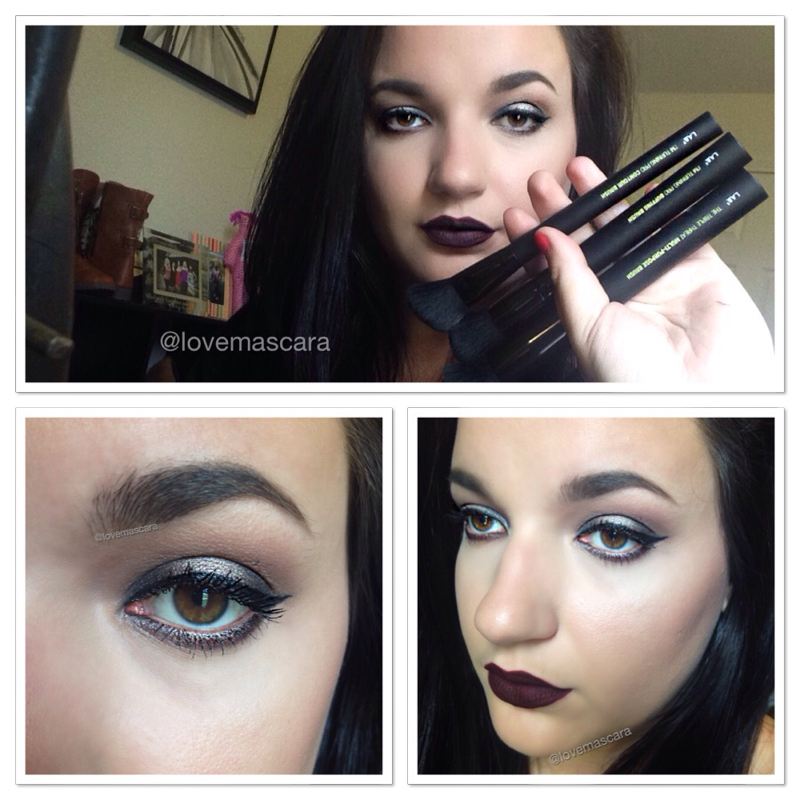 Here's the finished look. I used Urban Decay Naked 2 palette on the eyes for a gunmetal silver look. I used LA Splash Cosmetics lip couture in Vampire on the lips.
These brushes went above and beyond for me. I always get nervous trying newer brushes because I've had expensive brushes be a piece of crap before (seriously all the bristles fell out of one of my brushes all at once from a brand whose brushes shouldn't be doing that) but these delivered. They didn't shed, they blended, and there are more out there than just the ones I received. You can buy them at Walmart, on Amazon, and at L.A.B 2 Beauty. Check them out. I will be using them for my looks to come. I will also be using them for lip art and eye art. If you want my advice on what to choose, I'd definitely start with the face brushes they are my favorite. **I was not paid to make this post. I was sent the brushes but I wasn't paid to talk about them, and these are my honest opinions. |
ErinI'm from Tennessee. I'm a makeup and skincare lover. I have always enjoyed creating looks but I love to help people with product knowledge and application even more. I've been able to start blogging and do these things I love because God has seen fit to bless me with the opportunity. Thanks for stopping by and visiting with me! 

 
Categories
All
Archives
January 2022
|
 RSS Feed